After you publish landing pages on your website, take the following steps:
- Add a new record in the Landing pages and web forms section. Read more >>>
- Set up a page to redirect customers Read more >>>
- Modify the generated HTML code. Read more >>>
- Set up lookup and custom field mapping. Read more >>>
- Add the modified HTML code to the code of the landing page on the website. Read more >>>
- Set up default values for the fields that are not filled out on the landing page. Read more >>>
Add a new record in the Landing pages and web forms section
-
Go to the Landing pages and web forms section. Click the New button and select the type of landing page integration (Fig. 1). For example, lead registration form. This opens a new page.
Fig. 1 Create a new landing page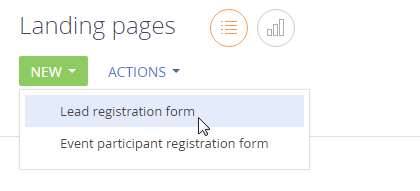
-
Fill out the fields on the page that opens:
-
Specify your landing page name in Creatio in the Name field.
-
Specify your landing page URL in the Website domains field.
Fig. 2 The landing page fields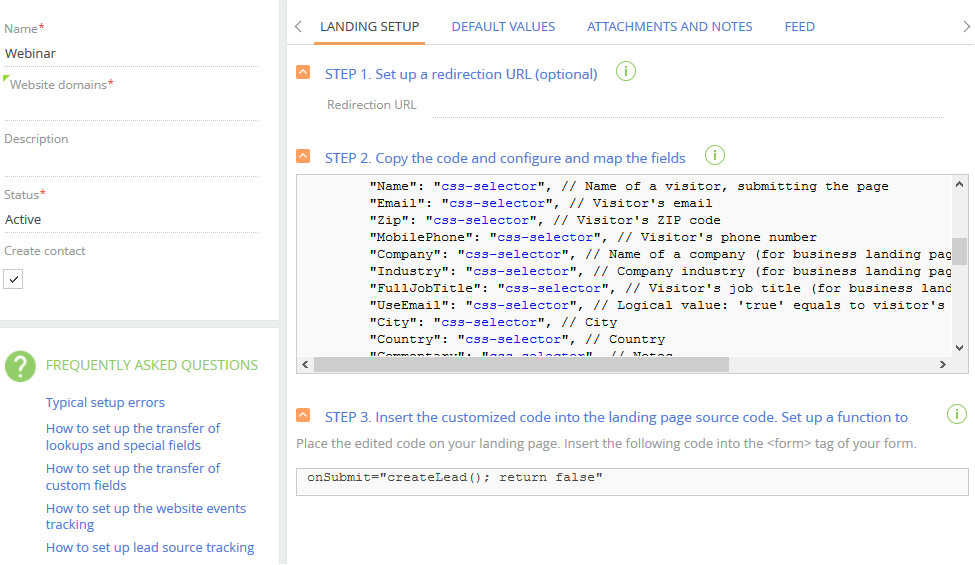
- Specify additional information about the landing page in the Description field.
- Select the Create contact checkbox to enable the automatic creation of both a lead and a contact when a user submits the form.
- Specify the URL to open for the user after the form submission in the Redirection URL field.
-
-
Click Save.
Set up a page to redirect customers
You can configure Creatio settings so that your site visitor is automatically redirected to a certain page right after submitting the web form. For example, to the Thank You page. To do that, open the Landing setup tab and enter the redirection page URL in the Redirection URL field. For example, http://mysite.com/submit/thank-you-page. As a result, the HTML code embedded into your landing page will use the specified URL for redirection. For example:
redirectUrl: "http://mysite.com/submit/thank-you-page"
Edit the unique HTML code
To ensure the the fields of a lead record added automatically after a registration on the landing page are populated correctly, edit the unique HTML code and add the edited code to the landing page code.
The list of lead page fields that are populated upon a registration on a landing page is located in the “fields” block of the HTML code. Match these fields to the web form fields. View an example of the “fields” block in the HTML code below.
To ensure the lead is registered correctly, add at least one field from the “contactFields” block to the HTML code. View an example of the block below.
Select fields to map to a lead record
You can set up mapping for both standard lead fields and custom fields. Learn more about setting up field mapping for lookups and custom fields: Set up lookup and custom field mapping.
See the values of standard fields from the HTML code and corresponding lead page fields below:
- “Name” → Contact full name
- “Email” → Email
- “Zip” → ZIP code
- “MobilePhone” → Mobile phone
- “Company” → Account name
- “Industry” → Industry
- “FullJobTitle” → Job title
- “UseEmail” → whether the customer agreed to receive promotional materials
You can delete the fields the web form does not use from the HTML code.
Match the web form fields to the lead record fields
To fill out the lead page, replace the “css-selector” expression with the ID or class of the corresponding field of the landing page form.
- Copy the unique HTML code to any text editor.
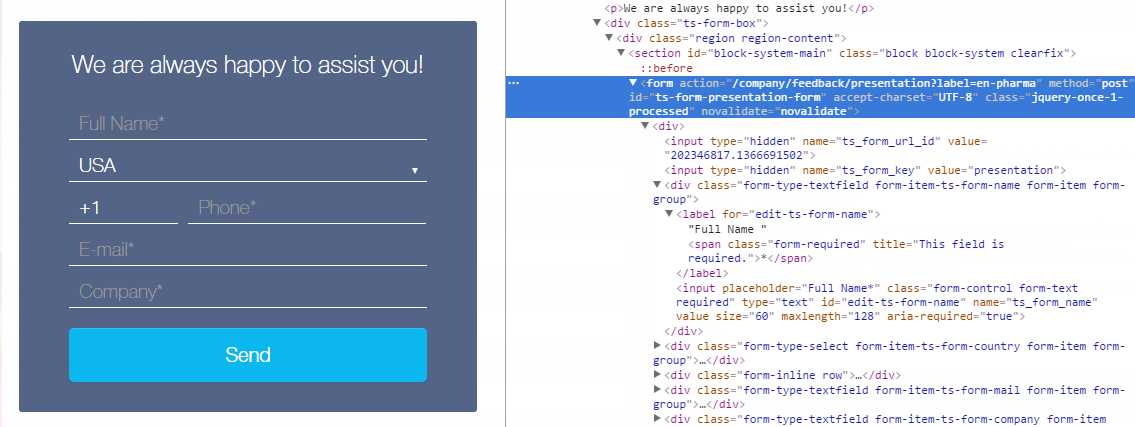
- Replace the “css-selector” text in the code with the corresponding selector name from the code of the landing page on your website. The procedure for viewing source code may be different in different browsers. See an example of filling out the Full name field in Google Chrome below.
- Go to the landing page and open the source code (Fig. 3).
Fig. 3 The landing page source code
- Click the
 icon in the source code area (Fig. 4).
Fig 4 Select a code item on the page
icon in the source code area (Fig. 4).
Fig 4 Select a code item on the page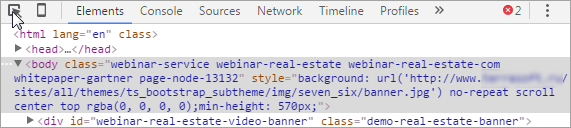
-
Click the Full name field on the landing page (Fig. 5)
.Fig. 5 Select an item to view code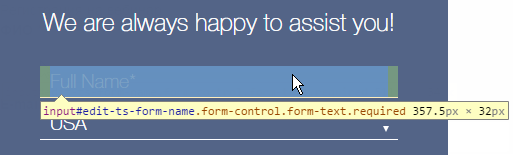
The code of the selected field will be highlighted in the source code area of the page (Fig. 6).
Fig. 6 The highlighted code fragment that corresponds to the Full name field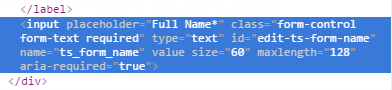
- Copy the value that is contained in the “id” parameter of the source code (Fig. 7).
Fig. 7 Copy the “id” value from the source code

- Replace the “css-selector” in the “Name” value of the source code:
- Go to the landing page and open the source code (Fig. 3).
-
Replace “css-selector” for the remaining fields in the same manner.
Recommendations on field mapping setup
- You can map one web form field to several fields in Creatio. For example, Creatio can use the value the customer specifies in the “Name” field of your form to populate the Name (of the contact) and Name (of the account) fields of the lead page.
- You can map one field of a lead page in Creatio to only one field of your web form. We do not recommend setting up a lead page field to be populated with values from two fields of your form. In that case, one of the values will overwrite the other.
- We recommend mapping the fields of the same type and format. However, if a lookup field contains the value the customer entered in the field of a different format, Creatio will populate the lookup field. For example, if your form contains a “Country” text field and the customer enters “United States” in that field, which matches a lookup value in the countries lookup, Creatio will populate the Country lookup field on the lead page with the existing lookup value. Also, Creatio includes additional input logic for Country, State/province and City fields.
- We recommend passing the unique code to the lead page when managing lookup fields, since a name cannot identify a record and is not a unique key in the Creatio database. If a user has a different UI language (culture) configured, passing the name will lead to creating another record, likely to be a duplicate.
- Use radio buttons and drop-down lists with unique ID values as interactive UI elements for localizable lookups. Learn more: Set up lookup and custom field mapping.
- We recommend passing data in a format that specifies the time zone when mapping date/time fields (“DATETIME” data type). For example, use the 4/12/2008 9:30:00 AM -01:00 format to pass data for the UTC-1 time zone, and use the 4/12/2008 9:30:00 AM +00:00 format to pass data for the UTC time zone.
Once you set up the mapping, add the modified HTML code to the landing page code.
Set up lookup and custom field mapping
Landing page web forms may use non-standard fields, such as radio buttons or drop-down lists with lookup records.
Pass the radio button values
-
Add a hidden field to the HTML markup of the landing page. The field can have a custom ID:
-
Map the lead field to the new hidden field in the “fields” block of the landing page code:
-
Pass the value selected using a radio button to the hidden field created earlier. Add an expression that contains this value to the landing page code before the fragment that calls the create lead function (createLead):
-
Save the changes.
Pass the drop-down list values
-
Add a hidden field to the HTML markup of the landing page. The field can have a custom ID:
-
Map the lead field to the hidden field in the “fields” block of the landing page code:
-
Calculate and pass the value selected in the field to the hidden field before calling the lead creation function. Add an expression that contains this value to the landing page code before the fragment that calls the create lead function (createLead):
-
Save the changes.
As a result, the data entered on the web form via the radio button or drop-down list will be passed to the Creatio lead page.
Add the modified HTML code to the landing page source code
After you edit the generated HTML code, add it to the code of the landing page on your website. To do this:
- Copy the entire code that you modified earlier to the clipboard.
- Place the source code on the landing page:
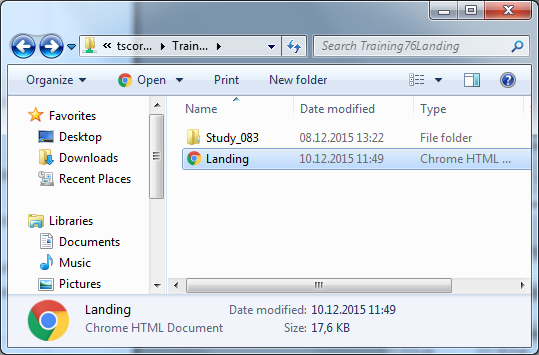
- Go to the location of the landing page file on the server (Fig 8).
Fig. 8 The location of the landing page on the server
-
Open the landing page in a text editor.
-
Paste the generated HTML code to the source code of the landing page. For example, before the closing </body> tag (Fig. 9).
Fig. 9 Embed the generated HTML code into the source code of the landing page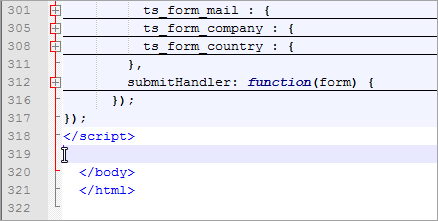
-
Save the changes.
- Go to the location of the landing page file on the server (Fig 8).
-
Add the event that launches the CreateLead() function to the landing page code. To do this, use the following code: onSubmit="createLead(); return false". To place an event in the source code of the landing page:
-
Go to the “form action” tag in the source code:
-
Add onSubmit="createLead(); return false" code to the opening <form> tag. For example:
-
Save the changes.
-
After you connect the landing page to Creatio, proceed to set up automatic page field population for leads created via landing pages.