Use the Pre-configured page element (Fig. 1) to open a custom page as part of a business process. You can design a new custom page or open an existing page.
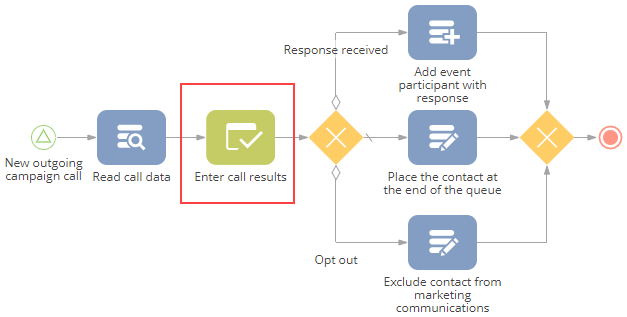
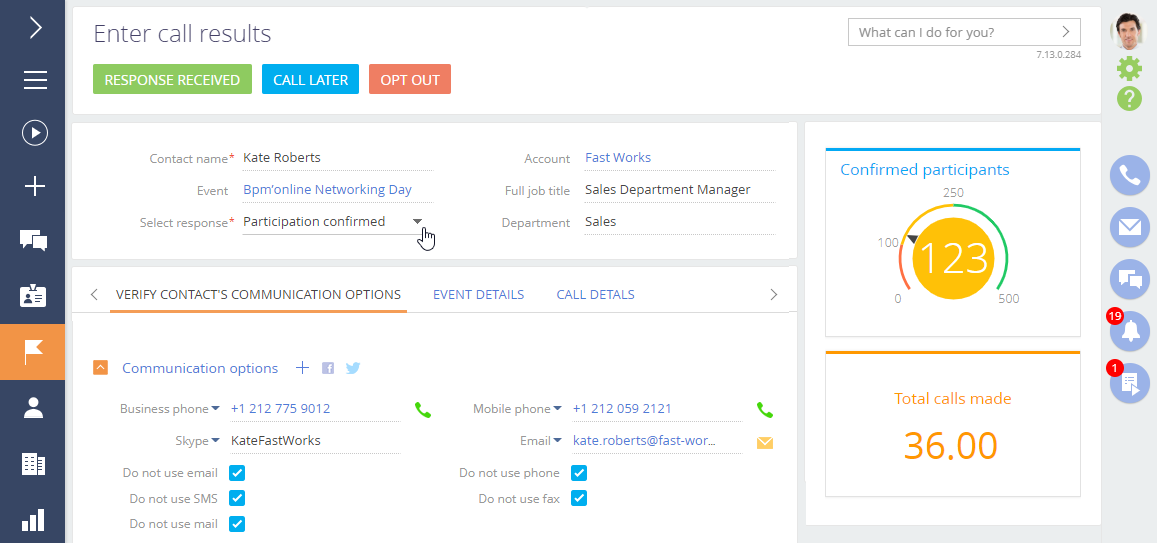
This enables easy use of custom UI elements for interaction with the business process users. For example, as part of an outgoing call campaign, an agent must invite customers to an event, update email subscription and verify customer contact information. This involves creating and updating records in several sections, such as Contacts and Events, each of which normally has a separate page. Using the Pre-configured page element (Fig. 1), you can design a single custom page (Fig. 2) for all these actions.
Element activation
The incoming flows of a Pre-configured page element are activated:
-
In the regular mode, the element opens the specified page for the specified user. A corresponding task is added on the Process tasks tab of the communication panel.
-
In the background mode, the page does not immediately open for the user, but a corresponding task is added on the Process tasks tab of the communication panel. The process user can click the task to open the pre-configured page.
Element execution
The element is deemed complete when the user clicks a button that closes the page. Leaving the pre-configured page otherwise (e. g., clicking a different section on the side bar, running global search, etc.), will close the page but will not complete the element (it will remain available on the Business process tasks tab of the communication panel).
Upon completion, Creatio will record any values entered on the page in the corresponding parameters or data source objects and activate its outgoing flows.
Set up the pre-configured page parameters
The Pre-configured page element setup area largely depends on the selected pre-configured page.
|
Which page to open? |
Select a Creatio page, which the element will open on execution. If the page has its own parameters, they will be displayed along with other properties in the Page parameters block. To create a new page via the page designer, click the To modify the currently selected page, click the |
|
For whom to open page? |
Select the user who will be working with the page. You can populate this parameter using the parameter value window. |
|
Recommendations for filling out the page |
Enter the text that will be displayed right below the title of the opened edit page and on the Business process tasks tab of the communication panel. For example, here you can specify what the user should do to advance to the next process step or how their choices will affect the process flow. Since this is a single line field, inserted line breaks will have no effect regardless of the used syntax and characters. |
|
Hint for user |
Enter additional information that will be displayed when the user clicks the |
|
Connected object Record of connected object |
The section and its record to which the process element will be linked. You can populate this field using the parameter value window. The record specified in the Record of connected object parameter will be added to the Connected to block of the Process log section after you save the pre-configured page during process execution. Also, the Move down the process menu options will become available on the edit page of the connected record. |
|
Page parameters |
Any page parameter fields that you add to the page in the page designer are displayed in this block.
|
 button.
 button.
 on the opened page.
Open page designer
You can create custom pre-configured pages via a page designer (Fig. 3), which is similar to the one used in the section wizard.
To open the page designer:
-
Click
 in the Which page to open? field to create a brand-new page. If the field is already populated, you will need to clear it first.
 -
Click
 in the Which page to open? field (Fig. 4) to open the currently selected page for editing. If the currently selected page was created via the page designer, it will be opened in the page designer.

Select the template
Each time you create a new pre-configured page, you will be offered to select a template. The template determines the layout of page areas (e. g., tabs, profile area, etc.) where you can add page UI elements. Please note, that you cannot change a page template after you click the Select button on the template selection screen.
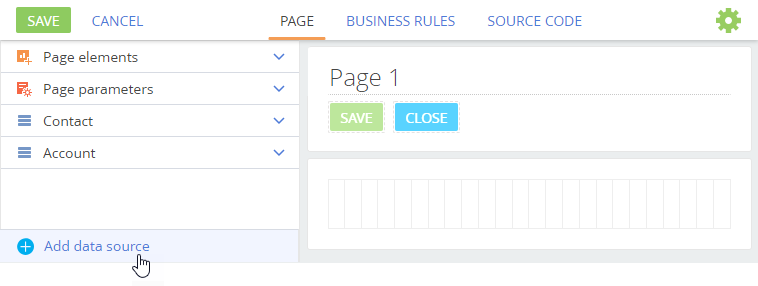
Add a page data source on a pre-configured page
If you plan to add or update Creatio records using your pre-configured page, consider adding the corresponding Creatio object as the data source. For example, to add or modify a contact record, add the Contact object as the data source.
To add a page data source, click Add data source (Fig. 5) in the page designer menu.
A data source page will open. Populate its fields:
|
The object from which to read data |
Select a section, detail or lookup object, whose records will be added or updated on the pre-configured page. For example, to set up a page, where the process user will be able to modify the name of a contact, select the “Contact” object. |
|
Data source name |
If necessary, enter a custom name for the data source. This name will be displayed in the page designer menu. |
|
The parameter of the page to which the current record is transferred |
Enter the name for the Pre-configured page element parameter, which will store the Id of the created or modified record of the data source object. You can select an existing parameter or type in the parameter name to add a new one. A corresponding field will be added to the Page parameters menu and the Page parameters block of the element setup area. Population of this parameter depends on whether you need to add a new record in the data source, or modify an existing one:
|
You can add multiple data sources to a single page. Page data sources are displayed in the page designer menu, marked with the  icon.
icon.
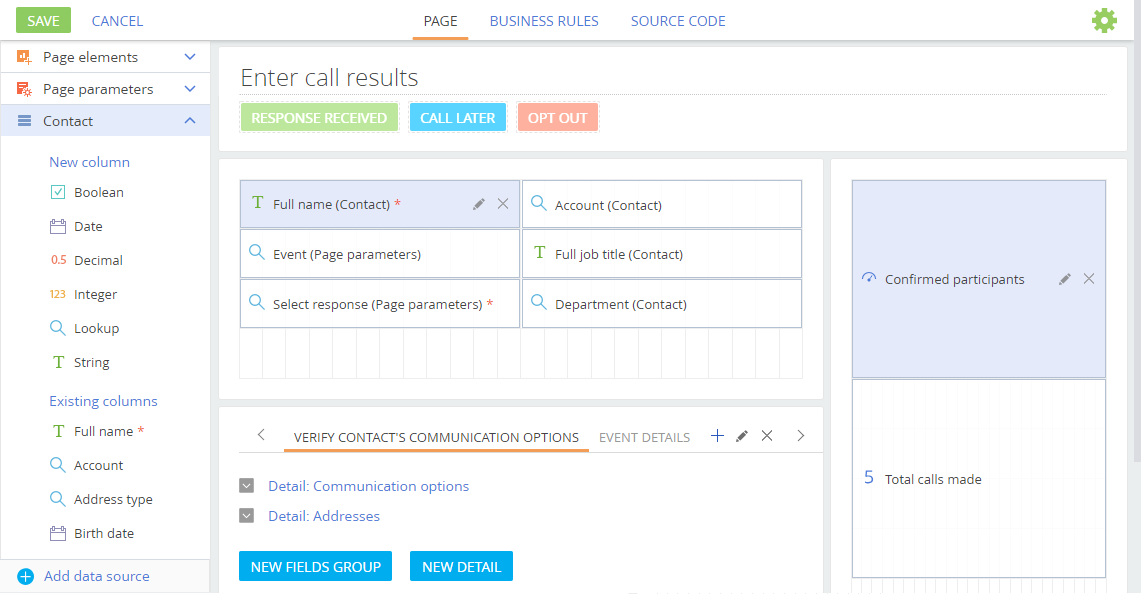
Add a field to a pre-configured page
To add a field on a page, drag it from the page designer menu to the page layout grid. You can add two types of fields to a pre-configured page:
-
 Data source fields correspond to the columns of the object selected as the page data source. Use these to add or update Creatio records. For example, adding a Full name field from the Contact data source will enable you to edit a contact name.
 -
 Page parameter fields represent parameters of the current Pre-configured page element. Adding a new page parameter field will add a corresponding parameter to the Page parameters block of the Pre-configured page element setup area. Use the page parameter fields to pass any information that goes beyond the scope of objects used as page data sources.
For example, to verify the contact’s name and job title during a call, add the Contact data source and its Full name and Full job title fields to the page. Additional business process-specific information, such as Agreed to participate in the email campaign checkbox, can be added as a page parameter field.
Add dashboards (widgets) on a pre-configured page
You can add summary analytics data from any Creatio section to the pre-configured page. Before adding a dashboard becomes possible, the page must be saved.
Add details and field groups on a pre-configured page
You can add tabs with field groups and details to the pre-configured page tab area. This area is available in all templates, except for the “Grid page” template.
When adding details on a pre-configured page, you will need to select a pre-configured page parameter, which will be used to filter detail records. Usually, these are the parameters, where the Id of the current data source record is passed.
For example, when you add a Contact data source to the page, a Contact parameter is also added to store the contact Id. If you need to add the Contact addresses detail to display contact information of a particular contact, select the Contact parameter in the Object column field on the detail settings page.
Configure buttons on a pre-configured page
You can add buttons to the pre-configured page and define their logic. Buttons can save and/or close the page, as well as serve as conditions for process branching using conditional flows. You can add buttons below the page title. By default the Save and Close buttons are available on the page.
To modify a button properties, double-click it. To delete a button, select it and click “X” in the top right corner.
Use the following properties to set up button functions:
|
Completes the process step |
If this checkbox is selected, the button closes the page and terminates an element with a specific result that can be used in conditional flows (similar to the Perform task element). All the buttons that close the page can be used in conditional flows. |
|
Validates and saves the entered data |
Select this checkbox to check if all required fields are populated and save the data entered in the page fields before closing the page. |
|
Generates a signal |
Select this checkbox and enter the signal to be generated upon the click of this button, similar to the Throw signal element. |
|
Active |
Select this checkbox if the button must be active when the page is opened. You can add buttons that are inactive by default and become active according to the page business rules. |
Add business rules to a pre-configured page
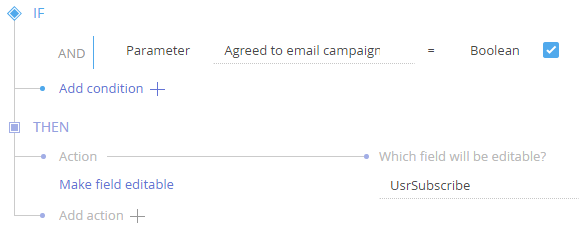
Use the Business rules tab to add custom business logic to a pre-configured page.
For example, you can make the Subscribe to bulk email lookup field editable only when the Agreed to email campaign checkbox is selected (Fig. 6).
Set up default values for pre-configured page fields
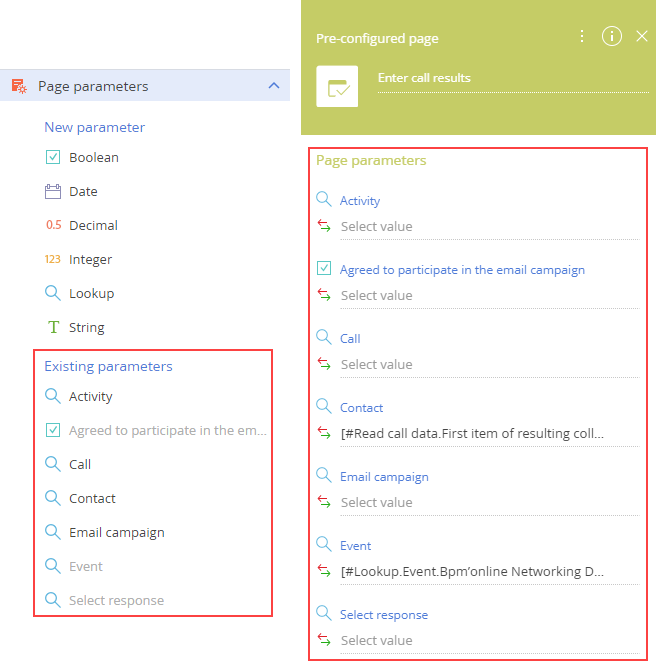
You can set up default values for the parameter fields of a pre-configured page, using the parameters of the Pre-configured page element. Each field in the Page parameters → Existing parameters menu corresponds to a parameter of the Page parameters block of the Pre-configured page element setup area (Fig. 7).
These parameters serve two functions:
-
Values passed to the page parameters determine the default values of the corresponding fields when the page is opened during business process execution.
-
Any values entered in the corresponding fields when the pre-configured page opens during the process flow will be written as parameter values when the element completes its execution. These parameter values can be mapped further down the process.
For example, a page has a Contact data source and contains several fields from the Contact object, as well as the Communication options detail. To populate these fields and detail with the data of a particular contact, populate the Contact parameter with the Id of the needed contact (Fig. 8).
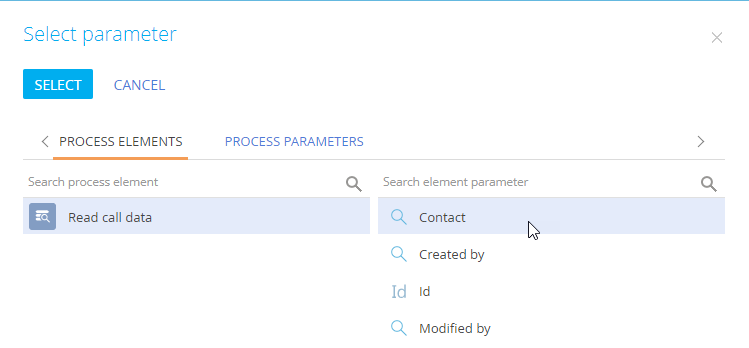
If you leave the Contact parameter empty, any information entered in the Contact object fields and the Communication options detail will be saved as the data of a new contact.