Using the EntityMapper schema
Glossary Item Box

Introduction
Terrasoft.Configuration.EntityMapper is the utility configuration class, implemented in the EntittyMapper schema of the [FinAppLending] package in Financial Services Creatio, lending edition. EntittyMapper enables you to match the data of one entity with another according to the rules defined in the configuration file. This approach prevents the creation of monotonous code.
Creatio lending features two objects with identical columns – [Contact] and [AppForm]. There are several details related to the [Contact] object and having similar details pertaining to [AppForm]. When the application is filled, there should be a possibility to get a list of all columns and values by the [Id] column of the [Contact] object, as well as a list of necessary details with their columns and values, and match this data with the application form data. After that, you can automatically fill out the fields of the application form with mapped data. This enables you to reduce manual data input.
Case description
Create a custom UsrEntityMapperConfigsContainer class to check the data matching mechanism through Terrasoft.Configuration.EntityMapper. Implement the data matching logic for the [Contact] and [AppForm] objects in this class. Implement a custom configuration service for data matching on the client side of the application. Add a button that will launch the custom configuration service on the edit page of the application form. The result has to be displayed in the browser’s console.
Case implementation algorithm
1. Create a custom UsrEntityMapperConfigsContainer class for data matching.
Learn more about the process of creating the [Source code] schema in the “Creating the [Source code] schema” article.
Property values for the created schema:
- [Title] — "UsrEntityMapperConfigsContainer".
- [Name] – "UsrEntityMapperConfigsContainer".
- [Package] — "Custom" (or a different custom package).
Add the following source code on the [Source Code] tab of the schema designer:
namespace Terrasoft.Configuration
{
    using System;
    using System.Collections.Generic;
// This class contains mapping settings.
public class UsrEntityMapperConfigsContainer
{
    // Settings for contact and application form mapping.
    public MapConfig ContactToAppFormConfig { get; protected set; }

    public UsrEntityMapperConfigsContainer() {
        this.InitContactToAppFormConfig();
    }
    // Configures the mapping of contact and application form objects.
    protected virtual void InitContactToAppFormConfig() {
        var columns = new Dictionary<string, string>();
        // In this case, the column names of the contact and the application form coincided.
        columns.Add("Surname", "Surname");
        columns.Add("GivenName", "GivenName");
        columns.Add("MiddleName", "MiddleName");
        columns.Add("INN", "INN");
        columns.Add("SpouseSurname", "SpouseSurname");
        columns.Add("SpouseGivenName", "SpouseGivenName");
        columns.Add("SpouseMiddleName", "SpouseMiddleName");
        columns.Add("Spouse", "Spouse");
        var config = new MapConfig {
            SourceEntityName = "Contact",
            Columns = columns,
            RelationEntities = new List<RelationEntityMapConfig>() {
                    new RelationEntityMapConfig() {
                        SourceEntityName = "Contact",
                        ParentColumnName = "Spouse",
                        Columns = new Dictionary<string, string>() {
                            { "Surname", "SpouseSurname" },
                            { "BirthDate", "SpouseBirthDate" }
                        }
                    }
                },
                DetailsConfig = new List<DetailMapConfig>() {
                    new DetailMapConfig() {
                        SourceEntityName = "ContactAddress",
                        DetailName = "RegistrationAddressFieldsDetail",
                        Columns = new Dictionary<string, string>() {
                            { "AddressType", "AddressType" },
                            { "Country", "Country" },
                            { "Region", "Region" }
                        },
                        Filters = new List<EntityFilterMap>() {
                            new EntityFilterMap(){
                                ColumnName = "AddressType",
                                Value = BaseFinanceConst.RegistrationAddressTypeId
                            }
                        }
                    }
                },
                CleanDetails = new List<string>() {
                    "AppFormIncomeDetail"
                }
            };
            this.ContactToAppFormConfig = config;
        }
    }
}
Publish the schema to apply changes.
2. Create a custom configuration service for data matching
The process of creating a custom configuration service is described in the “Creating a user configuration service” article.
Create the [Source Code] schema in a custom package. Property values for the created schema:
- [Title]— "UsrEntityMappingService".
- [Name] — "UsrEntityMappingService".
- [Package] — "Custom" (or a different custom package).
Add the following source code on the [Source Code] tab of the schema designer:
namespace Terrasoft.Configuration
{
using System;
using System.Linq;
using System.Collections.Generic;
using System.Runtime.Serialization;
using System.ServiceModel;
using System.ServiceModel.Activation;
using System.ServiceModel.Web;
using Terrasoft.Core;
using Terrasoft.Core.Factories;
using Terrasoft.Core.Entities;
using Terrasoft.Common;
using System.Web;
using Terrasoft.Web.Common;
using Terrasoft.Nui.ServiceModel.DataContract;
using Terrasoft.Common.Json;
using Terrasoft.Core.Configuration;

    /// Service class for mapping entities and their details.
    [ServiceContract]
    [AspNetCompatibilityRequirements(RequirementsMode = AspNetCompatibilityRequirementsMode.Required)]
    public class UsrEntityMappingService: BaseService
    {
        private EntityMapper _entityMapper;
        // Returns an EntityMapper instance.
        protected virtual EntityMapper EntityMapper {
            get {
                return _entityMapper ?? (_entityMapper = ClassFactory.Get<EntityMapper>(
                    new ConstructorArgument("userConnection", this.UserConnection)));
            }
        }
        // Returns mapping settings.
        protected virtual MapConfig GetConfig() {
            UsrEntityMapperConfigsContainer mapperConfigsContainer = new UsrEntityMapperConfigsContainer();
            return mapperConfigsContainer.ContactToAppFormConfig;
        }
        // Performs the mapping and returns the result. The main method of service.
        [OperationContract]
        [return: MessageParameter(Name = "result")]
        [WebInvoke(Method = "POST", BodyStyle = WebMessageBodyStyle.Wrapped,
            RequestFormat = WebMessageFormat.Json, ResponseFormat = WebMessageFormat.Json)]
        public EntityMappingResult GetMappedEntity(string id)
        {
            EntityMappingResult result = new EntityMappingResult();
            try {
                Guid recordId;
                MapConfig config = this.GetConfig();
                EntityResult entityResult = new EntityResult(config);
                result.columns = entityResult.Columns;
                result.details = entityResult.Details;
                if (!Guid.TryParse(id, out recordId)) {
                    return result;
                }
                entityResult = EntityMapper.GetMappedEntity(recordId, config);
                result.columns = entityResult.Columns;
                result.details = entityResult.Details;
                result.Success = true;
            } catch (Exception e){
                result.Success = false;
                result.Exception = e;
            }
            return result;
        }
    }

}
Publish the schema to apply changes.
3. Adding a data mapping button to the application form edit page
To add a data mapping button, replace the existing [Application Form Edit Page] schema. The procedure for creating a replacing client schema is covered in the “Creating a custom client module schema”.
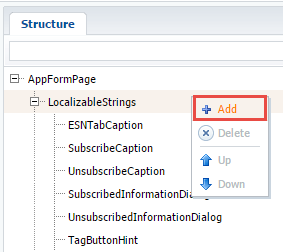
Add a localizable string to a replacing schema (Fig. 1) with the following properties:
- [Title] — “Call service”.
- [Name] — “EntityMappingButtonCaption”.
Fig. 1. Adding a localizable string

Add the following source code on the [Source Code] tab of the schema designer:
define("AppFormPage", [], function() {
    return {
        entitySchemaName: "AppForm",
        methods: {
            // User service request function.
            requestContactData2: function() {
                var data = {
                    id: this.get("Contact").value
                };
                // A configuration object for passing parameters to the service.
                var config = {
                    serviceName: "UsrEntityMappingService",
                    methodName: "GetMappedEntity",
                    data: data
                };
                // Calling a service.
                this.callService(config, this.parseMappedEntityResponse2, this);
            },
                //Callback-function for outputting the service response to the console.
            parseMappedEntityResponse2: function(response) {
                window.console.log("Response from UsrEntityMappingService", response);
            }
        },
        diff: /**SCHEMA_DIFF*/[
            {
                "operation": "insert",
                "parentName": "ProfileContainer",
                "propertyName": "items",
                "name": "EntityMappingButton",
                "values": {
                    itemType: Terrasoft.ViewItemType.BUTTON,
                    "style": Terrasoft.controls.ButtonEnums.style.GREEN,
                    // Bind the button's title to the localized string of the schema.
                    caption: { bindTo: "Resources.Strings.EntityMappingButtonCaption" },
                    // Bind the button click method-handler.
                    click: { bindTo: "requestContactData2" },
                    "layout": {
                        "column": 0,
                        "row": 2,
                        "colSpan": 24
                    }
                }
            }
        ]/**SCHEMA_DIFF*/
    };
});
Add the configuration object to the diff array. The object will be used to add the data matching button to the application form edit page. The requestContactData2() method is called when the button is pressed, and the UsrEntityMappingService configuration service is called in the method with all necessary parameters. The parseMappedEntityResponse2() callback-function will display the service response in the browser console.
Instead of browser console output, you can implement the mechanism of auto completing fields of the application form edit page with the matched values. However, this functionality is already implemented in the requestContactData() and parseMappedEntityResponse() methods of the AppFormPage parent schema.
Save the schema to apply changes.
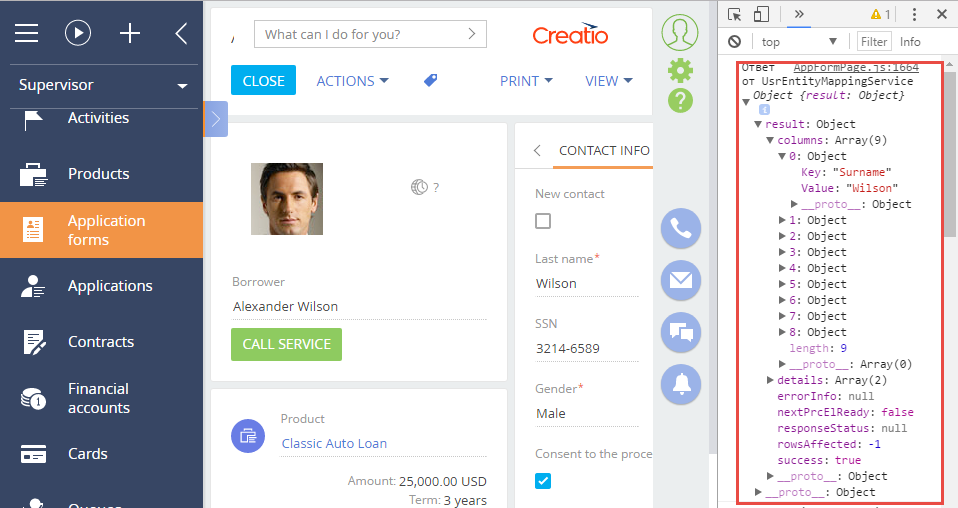
As a result, the button will appear on the application form edit page. When you press the button, the object with mapped data will be displayed in the browser console.
Fig. 2. Case result

If the profile edit page is open in the new record creation mode, you must first select or create a contact connected to the created application form. If a contact is not selected, an exception will occur, because This.get ("Contact") returns null.


