Configuration of the editable columns on the product selection page
Glossary Item Box

Introduction
In the Creatio version 7.11.2 or higher the editable columns are available on the product selection page. By default the [Quantity], [Unit of measure] and [Price] columns are available for edit. You can also make other columns editable.
Case description
Make editable the [Discount, %] column on the product selection page in the [Orders] section. Add and make editable the [Custom price] column.
NOTE
The case can be also done for the product selection page in the [Invoices] section.
Case implementation algorithm
1. Add a custom column to the [Product in order] object
For this, create the [Product in order] replacing object and add a column to it. Creating replacing object and adding a custom column is described in the “Creating the entity schema”.
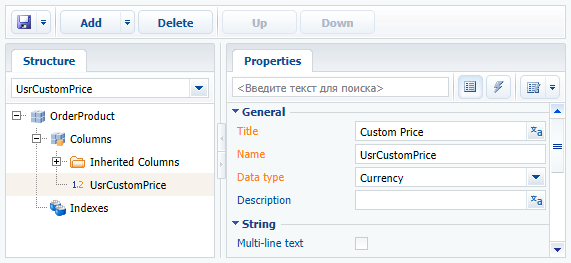
Set following properties for the added column (Fig. 1):
- [Title] – “Custom Price”
- [Name] – "UsrCustomPrice"
- [Data type] – “Currency.”
Fig. 1. Properties of the custom column

Publish the object schema to apply changes.
NOTE
To implement case in the [Invoices] section, perform above steps for the [Product in invoice] object.
2. Create a replacing custom module for the product selection page schema
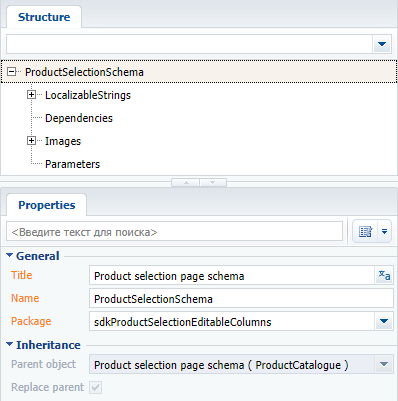
The procedure of creating a replacing custom module is covered in the “Creating client schema”. Set following properties for the for the created module (Fig. 2):
- [Title] – [Product selection page schema]
- [Name] – "ProductSelectionSchema”
- [Parent object] – [Product selection page schema].
Fig. 2. Properties of the replacing client module

Add the following source code on the [Source Code] tab of the schema designer:
define("ProductSelectionSchema", [],
    function() {
        return {
            methods: {
                getEditableColumns: function() {
                    // Getting an array of editable columns.
                    var columns = this.callParent(arguments);
                    // Adding the [Discount,%] column to the array of editable columns.
                    columns.push("DiscountPercent");
                    // Adding a custom column.
                    columns.push("UsrCustomPrice");
                    return columns;
                },
                setColumnHandlers: function(item) {
                    this.callParent(arguments);
                    // Bind the event handler of the user column change event.
                    item.on("change:UsrCustomPrice", this.onCustomPriceChanged, this);
                },
                // A handler method that will be called when the field value is changed.
                onCustomPriceChanged: function(item, value) {
                    window.console.log("Changed: ", item, value);
                }
            }
        };
    });
Save the schema to apply changes.
3. Configure columns display on the product selection page
Configure the columns to display them on the product selection page, (see ”Setting up columns”). In title view configuration of the list, add the [Discount, %] and [Custom price] columns.
As a result, two editable columns will be displayed on the product selection page (Fig. 3).
Fig. 3. Case result

After modification of the value in the [Custom price] column, the corresponding message will be displayed in the browser console (Fig. 4).
Fig. 4. The result in the browser console


