


The cases are processed in the [Cases] section or on the home page.
Note
Depending on the queue settings, an agent can take any of the cases in the queue, or take only the next case in the queue. Read more >>>
Note
Cases are processed according to a predefined business process. By using the BPMS function, you can set up your own business process and use it to process cases from separate queues.
The cases list in the home page only displays unopened cases.
Note
You can set up closing the case page and transferring to the list of the [Cases] section after you modify the page and save your changes. To do this, select the [Close on save] checkbox in the [Case statuses] lookup. Read more >>>
Contents
•How to start processing a case
•Passing a case to a different assignee
•How to communicate with the customer
How to start processing a case
Select a case in the [Home page] section and click the [Open] button and select the “In progress” status on the workflow bar. You can also start working with a case from the [Cases] section. Select the “In progress” status on the workflow bar.

The case status will be changed to “In progress”, and the current user will be specified in the [Assignee] field. The system will send an email notification to the customer informing about opening the case and containing information about the resolution deadline.
After case resolution is completed, transfer it to the following stage using the workflow bar.
If a case is created by error or if the response for this case is no longer required, cancel the case by selecting the [Canceled] option on the workflow bar (Fig. 2).

The case status will be changed to “Canceled”, and the customer will be notified by email.
Passing a case to a different assignee
To escalate a case, change the value in the [Assignee] or [Assignee group] field.
A new assignee or an employee from the assignee group will continue processing the case.
How to communicate with the customer
Use the  [Email] and
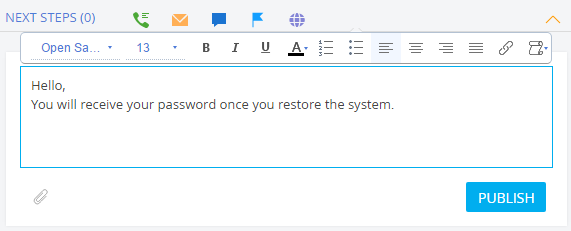
  [Portal message] buttons on the action panel to send replies and requests for additional information to the customer (Fig. 3).
Fig. 3 Sending a message through the customer portal
Click the  button to attach a file to an email or portal message.
If the case assignee sends a portal message, the customer will receive an email notification.
After you finish processing the case, for instance, if you send the customer a request for additional information, change the case status to “Waiting for response” (Fig. 4), which indicates that this case is waiting for a reply from the customer.
Fig. 4 Changing case status to “Waiting for response”.

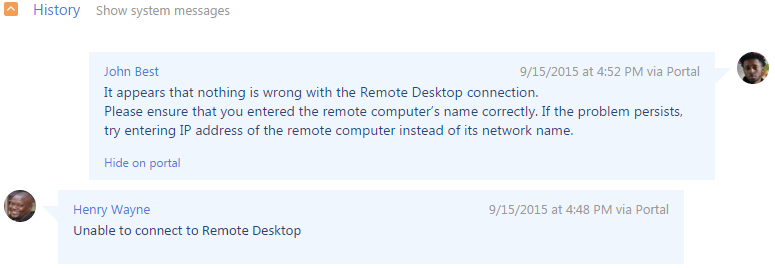
The customer can reply by email or by posting a message on the customer portal. The customer's reply will appear in the [History] detail (Fig. 5). The case will be reopened. The [Assignee] field will be cleared and the case will be returned to the processing queue.
Fig. 5 The communications history with the customer
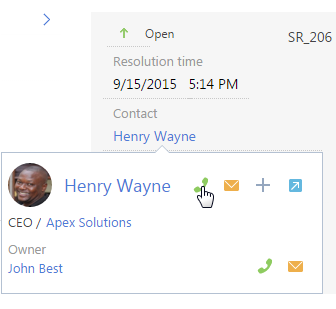
To quickly call the customer, place the cursor on the contact's name in the case profile. If the contact has any communication options that are phone numbers, dialing options will be available on the mini page (Fig. 6).
Fig. 6 Dialing the case customer
You can also use the communication panel to dial the customer.
After the customer is provided with the case resolution, change the case status to “Resolved”.
Fig. 7 Resolving the case

The customer will be notified by an email that the case has been resolved. The email will contain the user satisfaction scale which the customer can use to grade the performance of the contact center or helpdesk: Case status will change depending on the customer’s evaluation. To do this:
-
If the user satisfaction level is "1" or "2", the case will be reopened and the [Assignee] field will be cleared.
-
If the user satisfaction level is "3", "4" or "5", the case status will be changed to “Closed”.
Note
The connection between customer satisfaction levels and case statuses is configured in the [Satisfaction levels] lookup.
To expedite the resolution of future similar cases specify the knowledge base articles that contain the required resolution. If there are no such articles in the knowledge base, Creatio will automatically suggest creating a new article.
Note
By default, the process of creating a new article is not active. To activate this process, go to the [Process library] section -> select the needed process record -> click [Activate].
Automatic reopening of a case when receiving an email or a comment from the portal
Automatic reopening of a case and clearing the [Assignee] field takes place if:
1.The case in paused or resolved and not in the final state.
Note
Use the [Case statuses] lookup to configure incident and service request statuses. By default, the “Resolved” and “Waiting for response” statuses have the [Pause status] or [Resolved status] checkboxes selected. The [Final status] checkbox is cleared for these case statuses.
2.Users can reply to case emails or leave comments on the portal.
After receiving incoming email or a customer comment, case status will be automatically changed to “Reopened”. The [Assignee] field will be cleared. This is done to enable other employees to work with the reopened case.
Note
If the [Assignee group] field is not cleared all the group participants will receive a notification displayed on the home page.
How to notify the contact about a message in the "Portal" feed.
A portal user receives a notification about a message in the "Portal" feed if this user has an active email.
The text of an email is configured in the [Email templates] lookup.
Creating a knowledge base article after resolving a case
After resolving the case, you can create articles in the knowledge base to be used for resolution of similar cases.
By default, the subprocess is inactive. To activate a sub-process:
1.Click  to open the System Designer —> [Process library].
2.Deselect the [Active] checkbox to display all business processes available in Creatio.
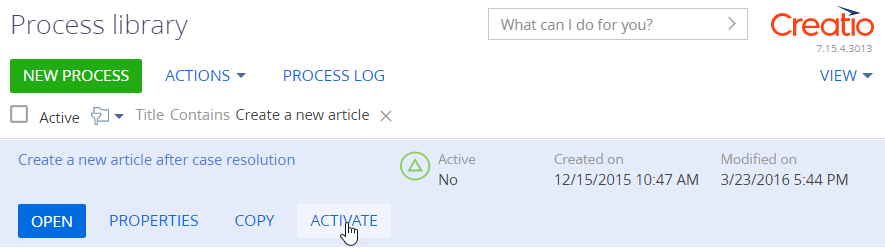
3.Select the “Create a new article after case resolution” business process in the list and click [Activate] (Fig. 8).
Fig. 8 Activating the “Create a new article after case resolution” sub-process
The “Create a new article after case resolution” sub-process runs as follows:
1.When resolving a case, previously created articles in the knowledge base are checked.
2.When an article is missing from the knowledge base, a user is asked if it is required to create a new one. To create a new article, select "Yes".
3.After the article is saved, it will be automatically connected to the case.
See also
•How to calculate response and resolution time
Video tutorials
•