


How to deploy bpm'online on-site
Glossary Item Box
Introduction
To deploy the bpm’online application on-site, the server-side and the client-side must meet certain technical requirements. These requirements are described in the “Server-side system requirements” and “Client-side system requirements” articles. Complying with certain technical requirements will ensure high system performance.
To install bpm’online on DBMS, MS SQL, you need to perform the following steps:
- Install and/or enable required Windows components on the application server.
- Install MS SQL Server on the database server.
- Install Redis database on the user session storage server.
- Install SVN server on the package repository computer.
- Install the bpm’online application on the application server.
 |
ATTENTION To ensure compatibility with cloud infrastructure of the bpm’online platform, the application database should be created in SQL Server 2016. |
|
NOTE Installation procedure of MS SQL Server or SVN is covered in the documentation of each product. |
Installing and configuration of required Windows components
|
ATTENTION This article lists the components that should be enabled in Windows 8 and Windows 10 operating systems. |
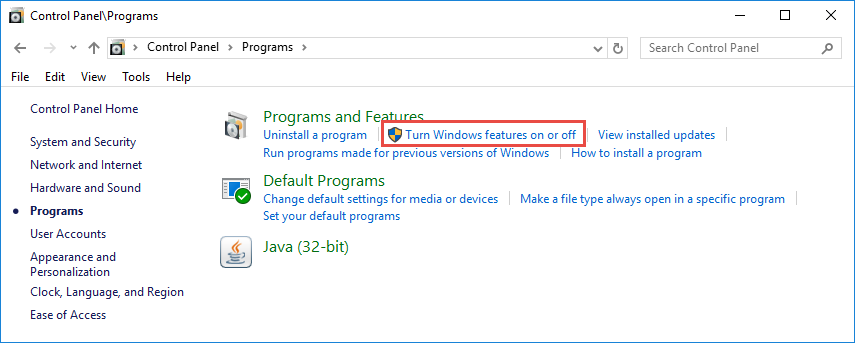
To check the availability of the required components, select [Turn Windows features on or off] in the [Control Panel] section of the [Programs and Features] section (Fig. 1).
Fig. 1. Configuration Command of the Windows Control Panel Components
Check the [Windows Features] window for the components listed in the Table 1 and select missing components for installation (if need).
Fig. 2. [Windows Features] window
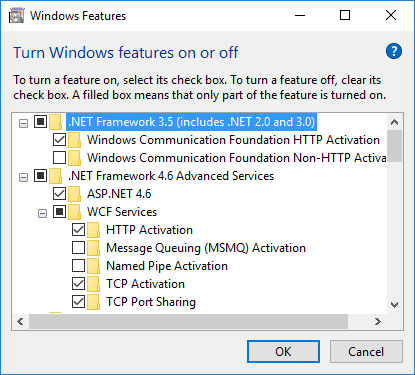
Table 1. Required winrows components
| Component | Component items |
|---|---|
| .NET Framework 3.5 (includes .NET 2.0 and 3.0 |
Windows Communication Foundation HTTP Activation |
| .NET Framework 4.6 Advanced Services |
ASP.NET 4.6 WCF services
|
| Internet Information Services |
Web Management Tools World Wide Web Services |
|
NOTE If need the other components (for example, FTP Server) can be installed. |
|
ATTENTION To install and launch IIS server on the Windows 7, enter the "C:\Windows\Microsoft.NET\Framework\v4.0.30319\aspnet_regiis.exe –i” command in the command line. |
bpm’online installation sequence
1. Extract the application
Extract zip archive with the application ti the folder on the application server (for example, c:\bpmonline).
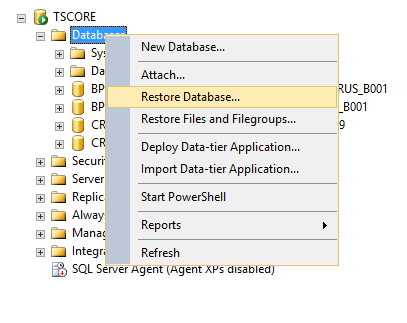
2. Restore the database from a backup
Copy the database backup (located in the “db” folder of the extracted application, for example, C:\bpmonline\db) to the database server.
Run the Microsoft SQL Management Studio and select the [Restore Database...] command in the context menu of the “Database” section to restore the database from the backup. (Fig. 3).
Fig. 3. Restoration of the database from the backup
In the opened window, select the [Device] as a source and then spesify a path to the database backup file (Fig. 4).
Fig. 4. Database restoration setup from the backup file
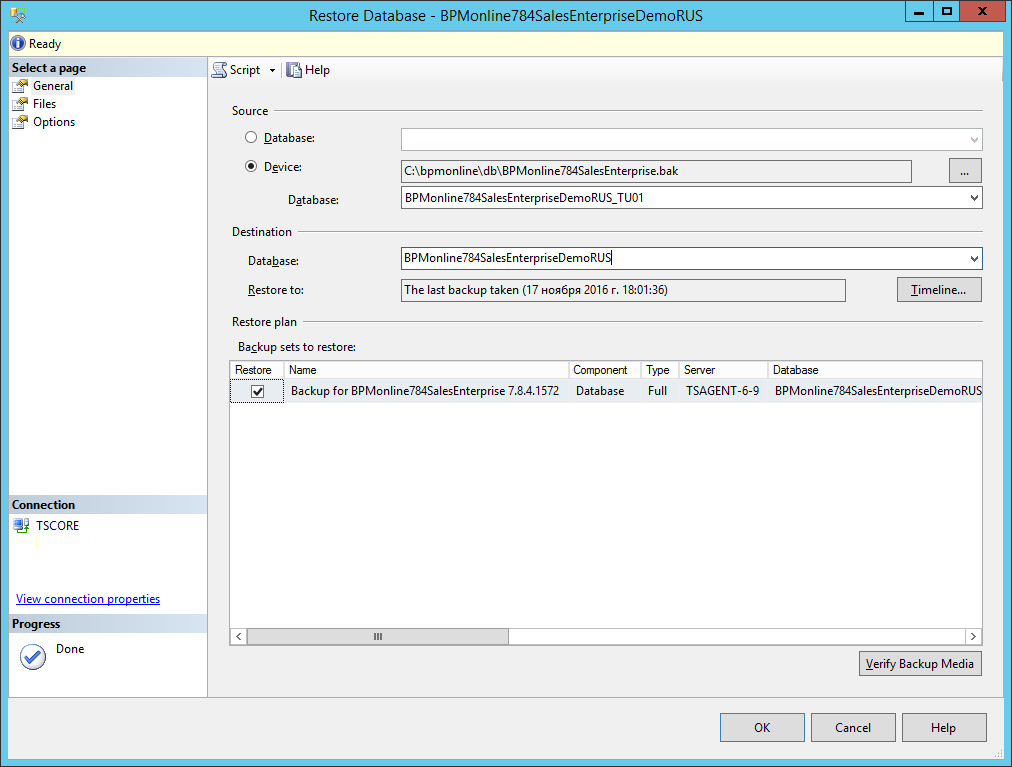
Click [OK] button to launch the database restoration.
|
ATTENTION If you need to get user connected to the database as a database user (not as a domain user), add corresponding user name as the owner of the restored database. |
3. Set up the ConnectionStrings.config file
ConnectionStrings.config is located in the application root folder (for example, C:\bpmonline). It is standard XML file. Add there the following information:
The <db> element
- DataSource – database server, where the database is deployed.
- InitialCatalog – the name of the deployed database.
<add name="db" connectionString="Data Source=DBSERVER;Initial Catalog=BPMonline78;User ID=CustomUser;Password=CustomPassword; Persist Security Info=True; MultipleActiveResultSets=True; Pooling = true; Max Pool Size = 100; Async = true" />
The <redis> element
- host – the computer name, where the Redis server is deployed.
 |
ATTENTION It is recommended to specify the network name of the machine instead of localhost. Using the setting with localhost under the high load can lead to slow performance. |
- db – database number, that will be used to store sessions (a number of available databases is configured in the Redis configuration file).
|
ATTENTION Each bpm'online application must have its own unique Redis database number. |
The <reports> element
- DataSource – database server, where the database is deployed.
- InitialCatalog – the name of the deployed database.
|
ATTENTION The configuration of the server, database, user and password in the <reports> section must be completely identical to the <db> section. |
The <defPackagesWorkingCopyPath> element
The connectionString attribute should point to a particular local path. The working copies of application packages will be uploaded by this path.
The <sourceControlAuthPath> element
The connectionString attribute should point to a particular local path. The client identification information for authentication in the storage will be stored there.
An example of configuring the ConnectionStrings.config file:
<?xml version="1.0" encoding="utf-8"?>
<connectionStrings>
    <add name="db" connectionString="Data Source=DBSERVER;Initial Catalog=BPMonline710;User ID=CustomUser;Password=CustomPassword; Persist Security Info=True; MultipleActiveResultSets=True; Pooling = true; Max Pool Size = 100; Async = true" />
    <add name="redis" connectionString="host=RedisServer;db=0;port=6379;maxReadPoolSize=25;maxWritePoolSize=25" />
    <add name="reports" connectionString="XpoProvider=MSSqlServer;Data Source=DBSERVER;Initial Catalog=BPMonline710;User ID=CustomUser;Password=CustomPassword" />
    <add name="defWorkingCopyPath" connectionString="C:\Projects\WorkingCopy" />
    <add name="defPackagesWorkingCopyPath" connectionString="C:\Projects\TerrasoftPackages" />
    <add name="clientUnitContentPath" connectionString="C:\Projects\Dev\ClientUnitSrc" />
    <add name="sourceControlAuthPath" connectionString="C:\Projects\WorkingCopy\Svn" />
    <add name="elasticsearchCredentials" connectionString="User=gs-es; Password=DEQpJMfKqUVTWg9wYVgi;" />
</connectionStrings>
|
NOTE The ConnectionStrings.config may contain other configurations. In most cases they are no longer used by the system and will be removed later. |
4. Web.config internal file setup
The internal Web.config located in the Terrasoft.WebApp folder is configured in a following way:
The <appSettings> element
- UseSvn – by default does nit appear in the Web.config. By default it has the true value, i.e. there is a functionality for working with SVN storages in the [Configuration] section. If this functionality needs to be disabled, then add the UseSvn=false element to the Web.config.
- SeparatedJsFiles – is needed at the debugging, to display the JavaScript page code in a readable view. Add this parameter if it is disabled. Optional.
An example of internal Web.config configuration (<appSettings>) section:
<appSettings>
  ...
  <add key="UseSvn" value="true" />
  ...
  <add key="IncludeDebugInformation" value="true" />
  ...
  <add key="CompilerSourcesTempFolderPath" value="C:\Projects\Dev\src" />
  ...
</appSettings>
5. Configure the application site on IIS.
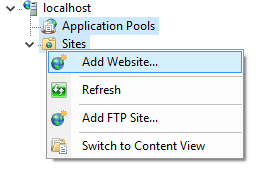
Launch the Internet Information Services and add a new website (Fig. 5).
Fig. 5. Adding the website in IIS
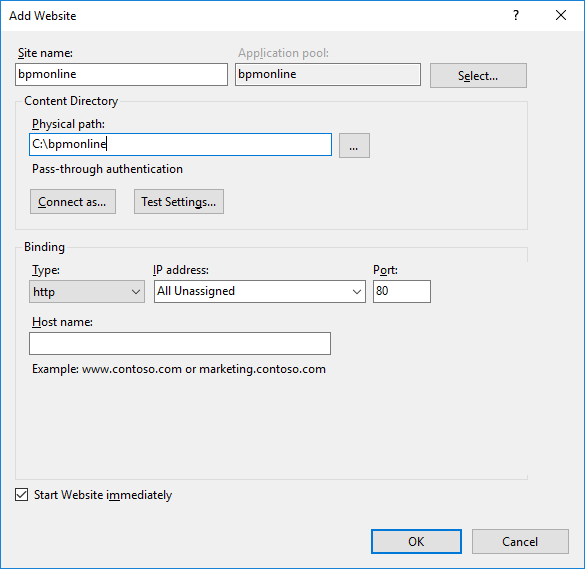
Specify an arbitrary name of the website in the website settings and specify the root folder of the application as the content directory (Fig. 6). You can also specify the external address of the website in this window.
Fig. 6. Settings of the created application
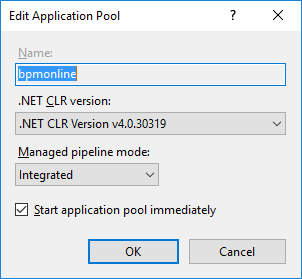
Then, in the list of application pools, check the version of the .NET environment for the created pool – version v4.0 and the [Integrated] managed pipeline mode must be specified. If another version or mode is specified, change them by selecting the [Basic settings...] on the [Actions] panel.
Fig. 7. Setting the required version of the .NET environment
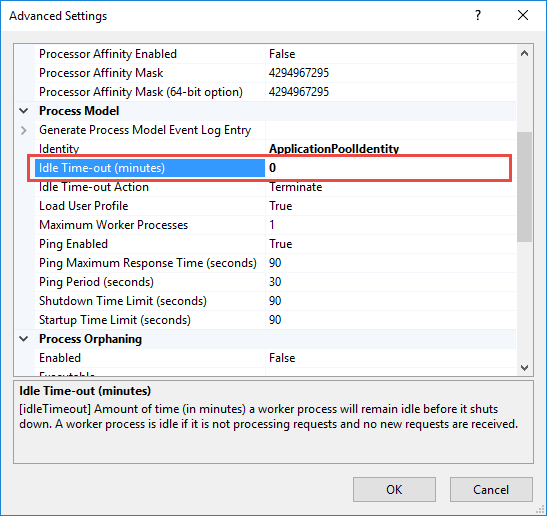
Select the [Advanced settings...] in the context menu of the selected pool. Set the “0” value in the [Idle Time-out (minutes)] field in the opened window(Fig. 8).
Fig. 8. Setting the Idle Time-out
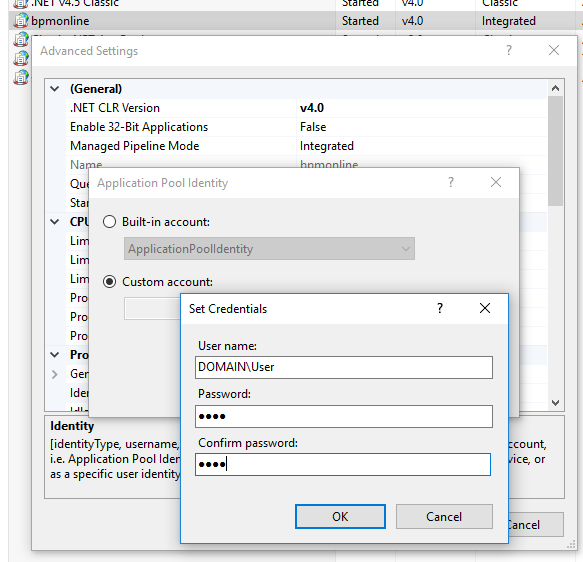
Specify the account, that will be used by application to access the application folder. To do this, click the [...] button in the [Identity] field to edit this property. In the opened window, select the [Custom account] option and click the [Install] button.
Then, enter the user name and password of the domain user account that is used by the application to access the file system. For example, it can be the domain user that has started the bpm’online installation (Fig. 9).
Fig. 9. Identity configuration for the application pool.
Add the application to the website (Fig. 10).
Fig. 10. Adding application to the website
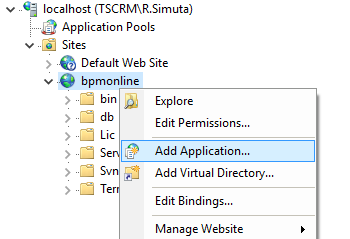
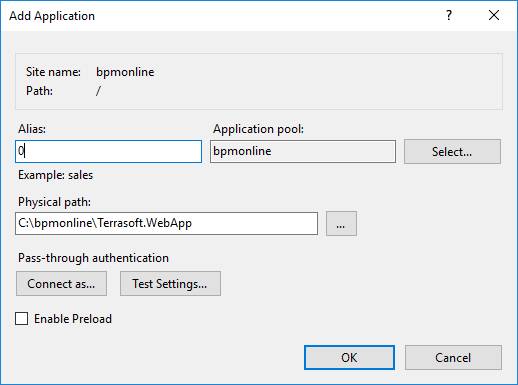
In the application settings, set “0” value in the [Alias] field, and the path to the “Terrasoft.WebApp” folder in the [Physical pass] field (Fig. 11).
Fig. 11. Settings of the created application
|
ATTENTION The “0” application corresponds to the [Default] workspace. Before creating a new workspace, you must add a new application to the system's website, indicating the next sequential number (1, 2, ...) as the alias. Other application settings must be the same as in the “0” application. |
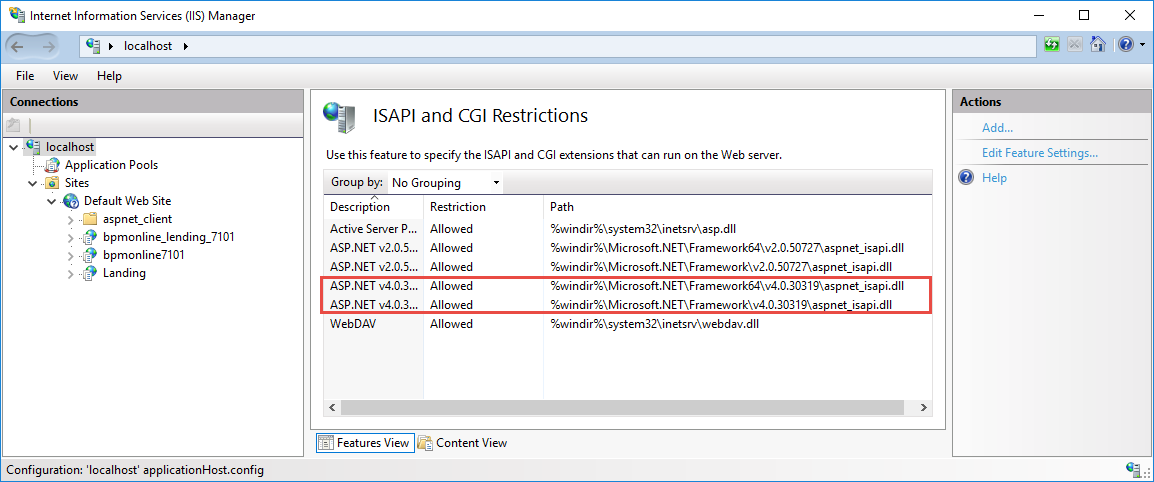
Make sure that:
a. The ISAPI and CGI limitations are not set in the used ASP.NET version (Fig. 12).
Fig. 12. ISAPI and CGI limitations
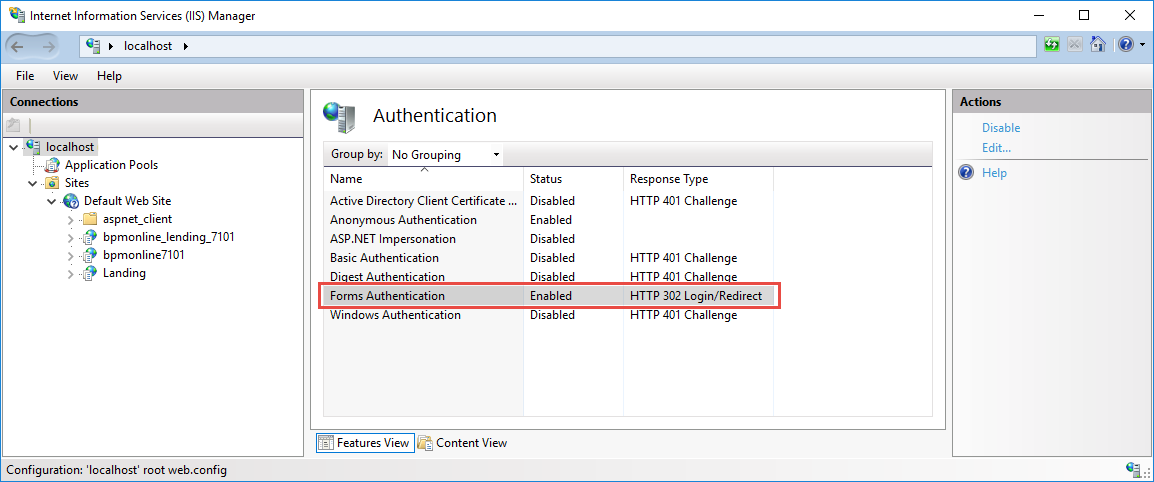
d. Forms authentication is enabled (Fig. 13).
Fig. 13. Authentication settings
Used ports
Ports by default:
| Application name | Used port |
|---|---|
| bpm'online | 80 (http), 443 (https) or another specified for application in the IIS. For more information please see the article. |
| SVN | 3690 |
| Redis | 6379 |
| MSSQL Server | 1433 or another if more than one instance is installed. For more information please see the article. |