How to create own macros for a MS Word printable
Glossary Item Box
We recommend familiarization with the setup of MS Word printables detailed in the article The MS Word printables setup.
In most cases, a printable can be set up using standard tools of the BPMonline MS Word Report Designer. To implement special tasks for printables setup, macros must be used. A macro for the printable setup is a class implementing the IExpressionConverter interface.
To call the created macro from the printable template, mark it with the ExpressionConverterAttribute attribute, with the indication of the macro name, for example:
[ExpressionConverterAttribute("CurrentUser")]
The Evaluate(object value, string arguments = "")interface method must be implemented in the class. The method accepts the field value from the printable template as an argument and returns the value of the string type; the latter will replace this field in the finished printable.
Algorithm of creating a custom macros for a printable:
- Create a printable and add the [ID] column to the list of the printable columns. This column will be an incoming parameter for the macros.
- Add the source code module to the custom package and describe the inheritor class of the IExpressionConverter interface. The class must be marked with the ExpressionConverterAttribute attribute with the macro name and the Evaluate(object value, string arguments = "") method must be implemented in it.
- Add a tag with the macro name in the [#MacrosName#] format to the [ID] column in the printable template.
- Publish the source code module and upload the updated template to the printable.
An example of macro creation for the printable is provided below.
Case description
Create the [Account summary] printable for the edit page of the [Accounts] section. This printable will contain such common fields as [Name], [Type] and [Primary Contact], and also the [Additional Information] field where the annual turnover will be displayed for accounts of the [Customer] type and the number of employees will be displayed for accounts of the [Partner] type. In addition, the printable must contain information on when it was generated and and the name of the user contact who generated it.
Case implementation algorithm
1. Create the [Account Summary] printable for the edit page of the [Accounts] section
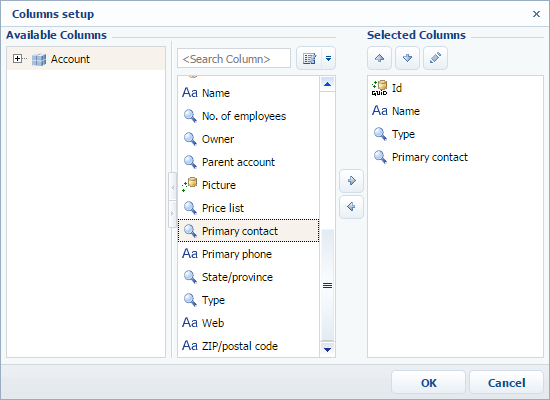
Add [Id], [Name], [Type], and [Primary Contact] columns to the list of printable columns (Fig. 1).
Fig. 1. – List of printable columns
The printable is detailed in the article The MS Word printables setup.
2. Download the printable template and allocate fields on its page
3. Add three modules of the source code to the custom package
The macros code for receiving additional information depending on the type of the account is as follows:
namespace Terrasoft.Configuration
{
    using System;
    using System.CodeDom.Compiler;
    using System.Collections.Generic;
    using System.Data;
    using System.Linq;
    using System.Runtime.Serialization;
    using System.ServiceModel;
    using System.ServiceModel.Web;
    using System.ServiceModel.Activation;
    using System.Text;
    using System.Text.RegularExpressions;
    using System.Web;
    using Terrasoft.Common;
    using Terrasoft.Core;
    using Terrasoft.Core.DB;
    using Terrasoft.Core.Entities;
    using Terrasoft.Core.Packages;
    using Terrasoft.Core.Factories;

    // Attribure with macros name [AccountInfoByType].
    [ExpressionConverterAttribute("AccountInfoByType")]
    // The class must implement the IExpressionConverter nterface.
    class AccountInfoByTypeConveter : IExpressionConverter
    {
        private UserConnection _userConnection;

        // Implementation of the Evaluate method of the IExpressionConverter interface.
        public string Evaluate(object value, string arguments = "")
        {
            try
            {
                _userConnection = (UserConnection)HttpContext.Current.Session["UserConnection"];
                Guid accountId = new Guid(value.ToString());
                return getAccountInfo(accountId);
            }
            catch (Exception err)
            {
                return err.Message;
            }
        }
        // Method for receiving additional information depending on the type of the account.
        // The account Id is used as the incoming parameter.
        private string getAccountInfo(Guid accountId)
        {
            try
            {
                /// Creating an object of the EntitySchemaQuery class with the [Account] core schema/
                EntitySchemaQuery esq = new EntitySchemaQuery(_userConnection.EntitySchemaManager, "Account");
                // Adding the [Name] column from the [Type] lookup field to the schema.
                var columnType = esq.AddColumn("Type.Name").Name;
                // Adding the [Name] column [EmployeesNumber] lookup field to the schema.
                var columnNumber = esq.AddColumn("EmployeesNumber.Name").Name;
                // Adding the [Name] column [AnnualRevenue] lookup field to the schema.
                var columnRevenue = esq.AddColumn("AnnualRevenue.Name").Name;
                // Records are filtered by the account Id.
                var accountFilter = esq.CreateFilterWithParameters(FilterComparisonType.Equal, "Id", accounted);
                esq.Filters.Add(accountFilter);
                // Receiving the entities collection.
                EntityCollection entities = esq.GetEntityCollection(_userConnection);
                // If the collection contains items, the method returns
                // corresponding information depending on the account type.
                if (entities.Count > 0)
                {
                    Entity entity = entities[0];
                    var type = entity.GetTypedColumnValue<string>(columnType);
                    switch (type)
                    {
                        case "Client":
                            return String.Format("Annual turnover {0} mln. roubles",
                                entity.GetTypedColumnValue<string>(columnRevenue));
                        case "Partner":
                            return String.Format("Number of employees {0} persons",
                                entity.GetTypedColumnValue<string>(columnNumber));
                        default:
                            return String.Empty;
                    }
                }
                return String.Empty;
            }
            catch (Exception err)
            {
                throw err;
            }
        }
    }
}
Below is the macros code for receiving the current date:
namespace Terrasoft.Configuration
{
    using System;
    using System.CodeDom.Compiler;
    using System.Collections.Generic;
    using System.Data;
    using System.Linq;
    using System.Runtime.Serialization;
    using System.ServiceModel;
    using System.ServiceModel.Web;
    using System.ServiceModel.Activation;
    using System.Text;
    using System.Text.RegularExpressions;
    using System.Web;
    using Terrasoft.Common;
    using Terrasoft.Core;
    using Terrasoft.Core.DB;
    using Terrasoft.Core.Entities;
    using Terrasoft.Core.Packages;
    using Terrasoft.Core.Factories;

    // Attribute with the [CurrentDate] macros name.
    [ExpressionConverterAttribute("CurrentDate")]
    // The class must implement the IExpressionConverter interface.
    class CurrentDateConveter : IExpressionConverter
    {
        private UserConnection _userConnection;

        // Implementation of the Evaluate method of the IExpressionConverter interface.
        public string Evaluate(object value, string arguments = "")
        {
            try
            {
                _userConnection = (UserConnection)HttpContext.Current.Session["UserConnection"];
                // The method returns the current date.
                return _userConnection.CurrentUser.GetCurrentDateTime().Date.ToString("d MMM yyyy");
            }
            catch (Exception err)
            {
                return err.Message;
            }
        }
    }
}
Below is the macros code for determining the current user (the user who generated the printable):
namespace Terrasoft.Configuration
{
    using System;
    using System.CodeDom.Compiler;
    using System.Collections.Generic;
    using System.Data;
    using System.Linq;
    using System.Runtime.Serialization;
    using System.ServiceModel;
    using System.ServiceModel.Web;
    using System.ServiceModel.Activation;
    using System.Text;
    using System.Text.RegularExpressions;
    using System.Web;
    using Terrasoft.Common;
    using Terrasoft.Core;
    using Terrasoft.Core.DB;
    using Terrasoft.Core.Entities;
    using Terrasoft.Core.Packages;
    using Terrasoft.Core.Factories;

    // Attribute with the [CurrentUser] macros name.
    [ExpressionConverterAttribute("CurrentUser")]
    // The class must implement the IExpressionConverter interface.
    class CurrentUserConveter : IExpressionConverter
    {
        private UserConnection _userConnection;
        // Implementation of the Evaluate method of the IExpressionConverter interface.
        public string Evaluate(object value, string arguments = "")
        {
            try
            {
                _userConnection = (UserConnection)HttpContext.Current.Session["UserConnection"];
                // The method returns the current user contact.
                return _userConnection.CurrentUser.ContactName;
            }
            catch (Exception err)
            {
                return err.Message;
            }
        }
    }
}
4. Add tags with macros names to the report template fields
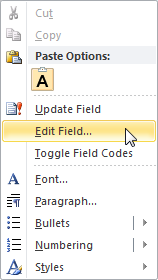
For this purpose, select the [Edit Field...] item in the right-click menu of the template field (Fig. 2).
Fig. 2. — Right-click menu of the template field
Add tags to the field names (Fig. 3, 4, 5).
Fig. 3. — Adding the AccountInfoByType tag for receiving additional information about the account
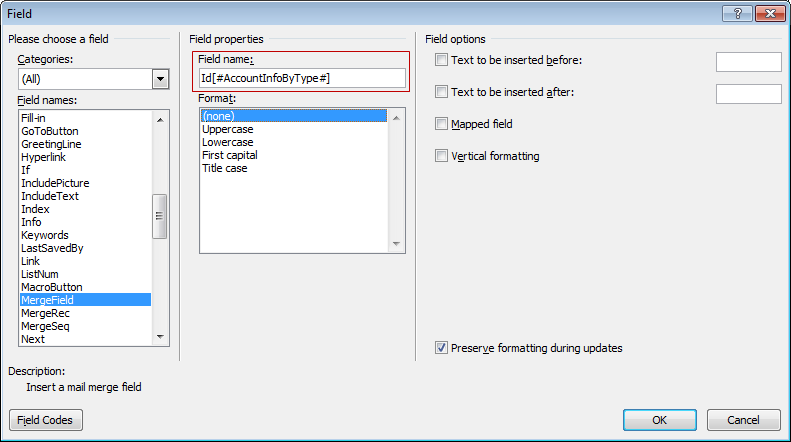
Fig. 4. — Adding the CurrentDate tag for receiving the current date
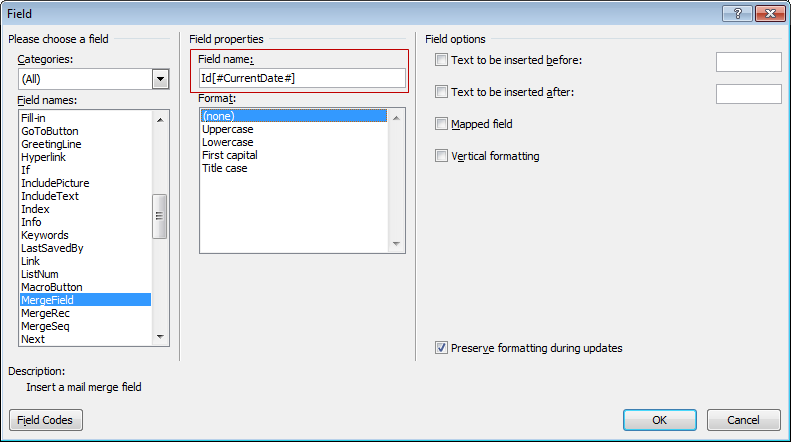
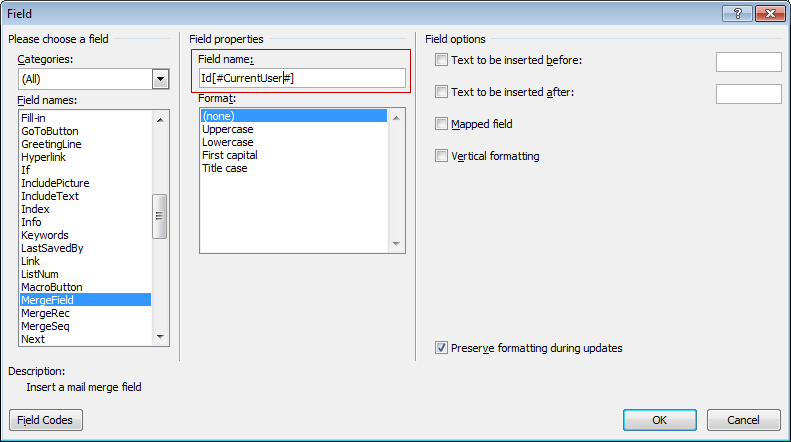
Fig. 5. — Adding the CurrentUser tag for receiving the current user contact
As a result, the template will look as shown in Fig. 6.
Fig. 6. – Printable template

5. Save the template and upload it to the printable
6. Publish the source code modules
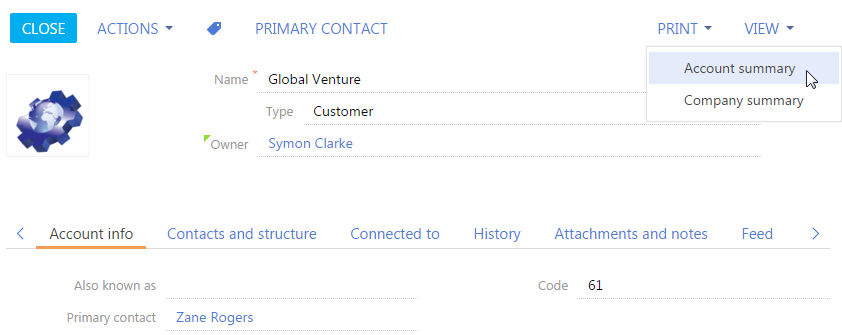
When the template is uploaded and the source code modules are published on the account edit page, a new [Account summary] printable will appear in the [Print] list (Fig. 7).
Fig. 7. — New printable in the [Accounts] section
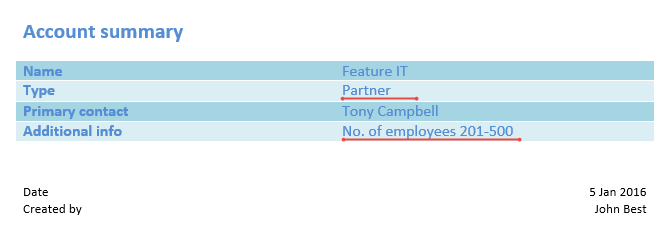
Data in the template will depend on the type of the account (Fig. 8, 9).
Fig. 8. — Printable for the account of the [Customer] type
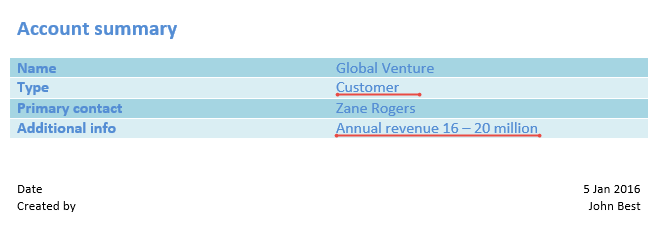
Fig. 9. — Printable for the account of the [Partner] type