


How to use events for processes branching
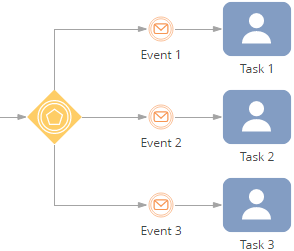
To branch processes depending on an activated event, the [Event-based gateway] operator is used. Events used for process branching are placed on the gateway outgoing flows (Fig. 1).
Fig. 1 Using the event-based gateway
Example
After you have created a contract, you need to send it for approval. The execution of a business process will depend on the approval results. Upon receiving the approval, the contract must be signed. If a contract wasn't approved, it must be sent back for revision.
To create a contract, use the [Open edit page] element. Settings here are identical to the settings used when creating a new document.
To send a contract for approval, you must use the [Auto-generated page] element. Working with the [Read data] element is covered in a separate article. After the contract has been sent to approval, you have to add approval to the contract page. Use the [Add data] element to automatically add new system records.
A schema with branching is displayed on Fig. 2.
Fig. 2 The contract approval process
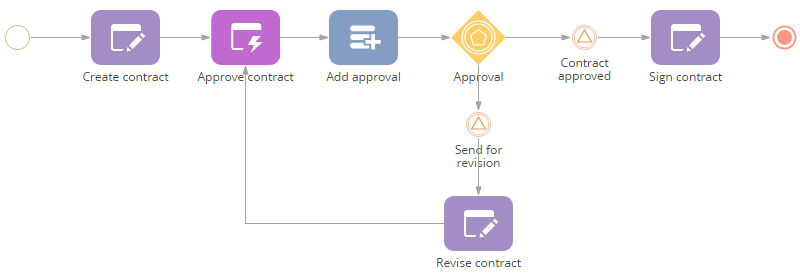
To build a process branching, the outgoing flow of each branch has to be activated depending on the result:
1.Place the [Event-based gateway] operator after the "Add approval" action and connect them with a sequence flow.
2.Place the [Wait for signal] element after the gateway and connect them with a sequence flow.
3.Populate the [Wait for signal] element settings page if the contract has been approved (Fig. 3).
Fig. 3 — Setting up the [Wait for signal] element for a contract to be approved
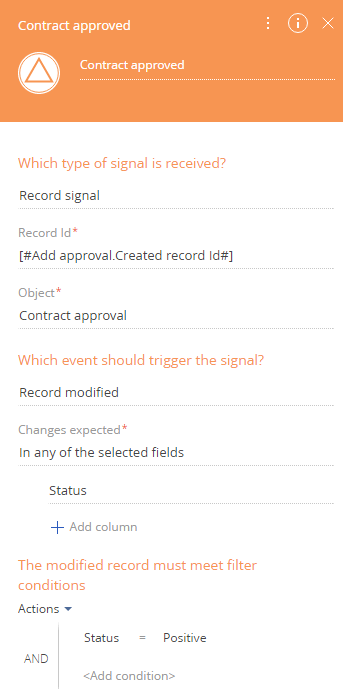
a.In the [Which type of signal is received?] field, select “Object signal”.
b.Click the [Record ID] field to open the parameters window.
-
Select the [Add approval] element on the [Process elements] tab.
-
Double-click the [Record ID] parameter. The corresponding value will be added to the text field at the top of the parameter value window.
-
Click the [Save] button.
c.Specify the object to receive a signal from. For example, "Contract approval".
d.In the [What event should happen?] field, set "Record changing".
e.Select the column whose event must activate the signal. For example, the "Status" column.
f.Specify the filter conditions that the modified record must meet. For the signal to activate after the approval and the previously created contract page to open, the contract status has to be "Approved".
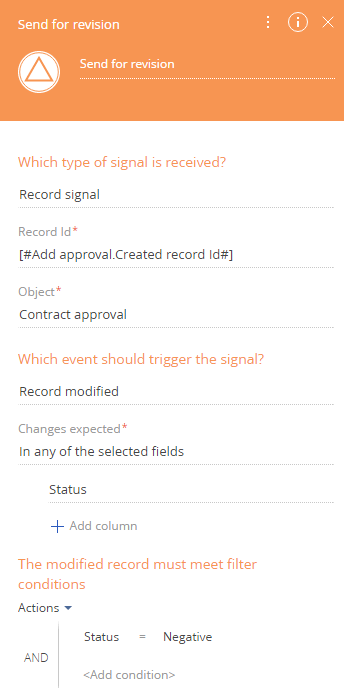
4.Place one more [Wait for signal] element after the gateway and connect them with a sequence flow. This signal should activate when a contract has not been approved.
5.Populate the [Wait for signal] element setup area (Fig. 4). Settings are identical to the signal which is triggered after obtaining an approval, however you must specify “Status=Negative” in the filtering criteria.
Fig. 4 Setting up the [Wait for signal] element for a contract to be approved
6.Add the [Open edit page] element after the “Contract approved” and “Send for revision” elements. If a contract has been approved, the previously created contract opens in which you must change the status to "Approved". If a contract was rejected, the previously created contract page will open for revision.
7.Save the process.
Attention
The [Event-based gateway] operator requires the process to be published. All created processes are checked during the publication.
See also
•[Wait for message] intermediate event