Set up Creatio.ai automation for chats
This functionality is available for Creatio 8.3.4 and later. To use it, install the Customer Communication Hub app from Creatio Marketplace. Download the app. The app adds AI automation to the following chat channels: Facebook Messenger, Telegram, WhatsApp, and SMS.
Let Creatio.ai handle incoming conversations in your chat channels before a human agent gets involved. AI automation reduces repetitive workload for the contact center team, improves response times, and increases overall support efficiency. Enable AI automation per channel from the channel settings and use the out-of-the-box configuration to start without additional setup.
AI automation is configured separately for each chat channel. Only user roles with the "Access to "Chat settings" section" (CanManageChats code) operation permission can turn AI on or off in a channel. Out of the box, only users who have the "System administrators" organizational role and "Developer" and "Administrator" roles on ALM Portal can execute the action.
Out-of-the-box AI configuration
Out of the box, Creatio provides a complete AI configuration so you can turn AI automation on without preparing extra data. The Customer Support Agent answers user requests based on the content of the Knowledge base section, connecting to your knowledge base articles through the "Customer Support Agent knowledge source" listed on the Knowledge sources tab of the agent page. The "Sofia, AI assistant" personality from the AI personality for chats lookup greets customers in a friendly tone of voice.
When AI is enabled for a channel, Creatio.ai responds to all new incoming messages using this configuration and the channel-specific options you select (personality, handoff). The AI introduces itself by name and role at the start of each new conversation. The greeting appears only once per conversation. Creatio sends AI responses as plain text.
Set up AI automation for a chat channel
In general, AI automation setup consists of the following steps:
- Enable AI automation for a chat channel. Read more >>>
- Customize the AI assistant personality (optional). Read more >>>
- Control which agents AI can use (optional). Read more >>>
- Configure handoff to a human agent. Read more >>>
Step 1. Enable AI automation for a chat channel
- Click the
 button to open the System Designer.
 - Click Chat settings.
- Click the name of the channel for which you want to enable AI automation.
- Go to AI settings.
- Select the AI handles conversation first checkbox. AI responds first to all incoming messages in this channel.
- Select an AI assistant personality that matches your brand tone of voice. The default is "Sofia, AI assistant" with a friendly tone of voice.
- Select the Enable handoff checkbox to let customers request a human agent during an AI-handled conversation. When the AI detects such a request, it transfers the conversation to the queue configured for the channel without continuing automated responses.
- Click Save.
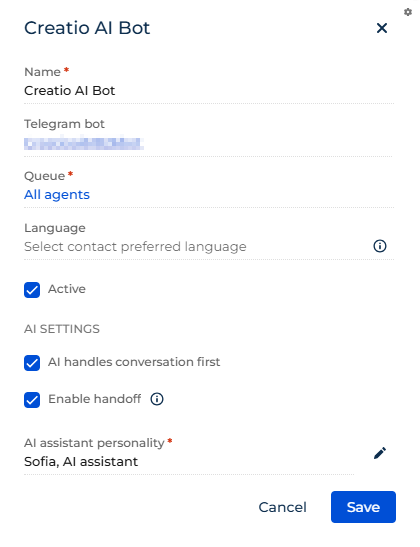
As a result, Creatio.ai handles all new incoming messages in the channel using the selected personality and your knowledge base content, transfers the conversation to a human agent when the customer asks for one, and closes idle conversations automatically. The AI Assistant contact appears in the chat history of every AI-handled chat in the Chats section, so you can review past AI conversations alongside regular ones.
Step 2. Customize the AI assistant personality
The AI assistant personality controls how the AI introduces itself and how it phrases messages, helping ensure consistent communication aligned with your brand. A personality combines a name, a role, and a tone of voice.
Out of the box, Creatio provides one personality, "Sofia, AI assistant," which uses the "Friendly" tone of voice. The Tone of voice field offers two options: "Formal" and "Friendly."
Select an AI assistant personality for a channel
To select an AI assistant personality for a channel:
- Go to AI settings in channel settings.
- Select a personality in the AI assistant personality field.
- Click Save.
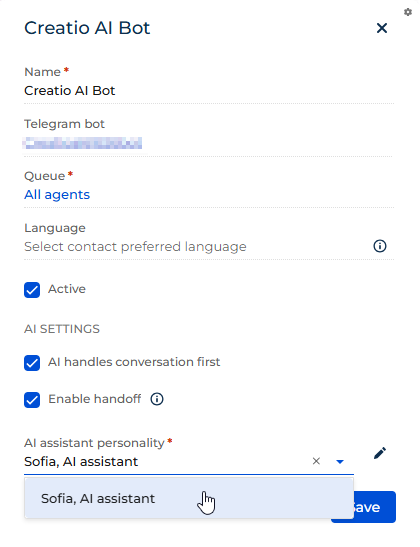
As a result, AI communicates using the selected personality in all new conversations in the channel.
Configure a personality
To configure a personality:
- Click the
 button next to the AI assistant personality field. This opens the Configure AI assistant personality window.
 - Enter the Name & Role.
- Select the Tone of voice.
- Click Save.
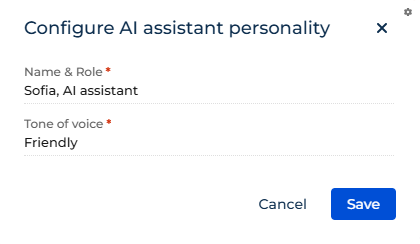
As a result, AI introduces itself using the updated name and role and phrases messages in the selected tone of voice in new AI-handled conversations.
Add a personality or tone of voice
To make additional personalities or tones of voice available:
- Open the AI personality for chats or AI tone of voice for chats lookup.
- Add a record.
As a result, the new personality or tone of voice appears in the AI assistant personality field in channel settings.
Step 3. Control which agents AI can use
By default, AI uses only the Customer Support Agent in chat channels and answers user requests based on the content of the Knowledge base section.
AI uses agents and sub-agents in chat channels on behalf of the "ExternalChatAiUser" technical user. A contact named "AI Assistant," with the Creatio.ai avatar, is linked to this technical user. To change the name and avatar displayed next to AI messages in the chat history, edit the name and photo of the "AI Assistant" contact.
To make a different agent or sub-agent available to AI in chat channels, add "ExternalChatAiUser" to the Permissions to execute list on the General information tab of the agent or sub-agent page. If the agent or sub-agent reads or modifies a Creatio object, grant the technical user access to that object as well. To remove an agent or sub-agent from AI usage in all chat channels, remove "ExternalChatAiUser" from that list. Out of the box, "ExternalChatAiUser" is added only to the Customer Support Agent.
These changes apply to all chat channels where AI automation is enabled. The set of capabilities passed to the LLM in chat channels is additionally filtered by an internal capability allowlist that currently includes only handoff and the default knowledge base sub-agent. AI capabilities are explained in a separate article: Creatio.ai overview.
AI uses only the knowledge sources bound to a permitted agent or sub-agent. The out-of-the-box "Customer Support Agent knowledge source" is listed on the Knowledge sources tab of the Customer Support Agent page and uses the Knowledge base section as its content source.
Step 4. Configure handoff to a human agent
Handoff transfers the conversation from AI to a human agent when a customer explicitly asks for one. To enable handoff, select the Enable handoff checkbox in channel settings.
When handoff is enabled and triggered:
- The conversation is transferred to the queue set in the channel's Queue field.
- The conversation appears in the communication panel waiting to be accepted by an agent.
- The chat moves to the "Handed over to agent" status displayed on the progress bar on the chat page.
When handoff is disabled and the customer asks for a human, the conversation is not transferred and AI continues to respond.
AI chat lifecycle
When AI is enabled, an incoming chat follows a different lifecycle from a regular chat, with AI-specific statuses shown on the progress bar on the chat page:
Status | Description |
|---|---|
Bot processing | AI is handling the conversation. The chat does not appear in the communication panel and is not assigned to an agent. |
Completed by bot | The chat was closed automatically because the customer was inactive for the time defined by the "AI chat inactivity timeout" ( |
Handed over to agent | Handoff was triggered. The conversation is handed over to a human agent. |
Using the progress bar on the chat page, the "Supervisor" user can manually change a chat's status, for example, from "Bot processing" to "Completed by bot."
View AI debug information
For any AI-handled chat, you can open a debug view of the AI session to review how the AI processed the conversation.
To view the debug information:
- Open the chat in the Chats section.
- Click the
 Debug info icon in the top-right of the chat page. The icon appears only for chats that have an AI session.
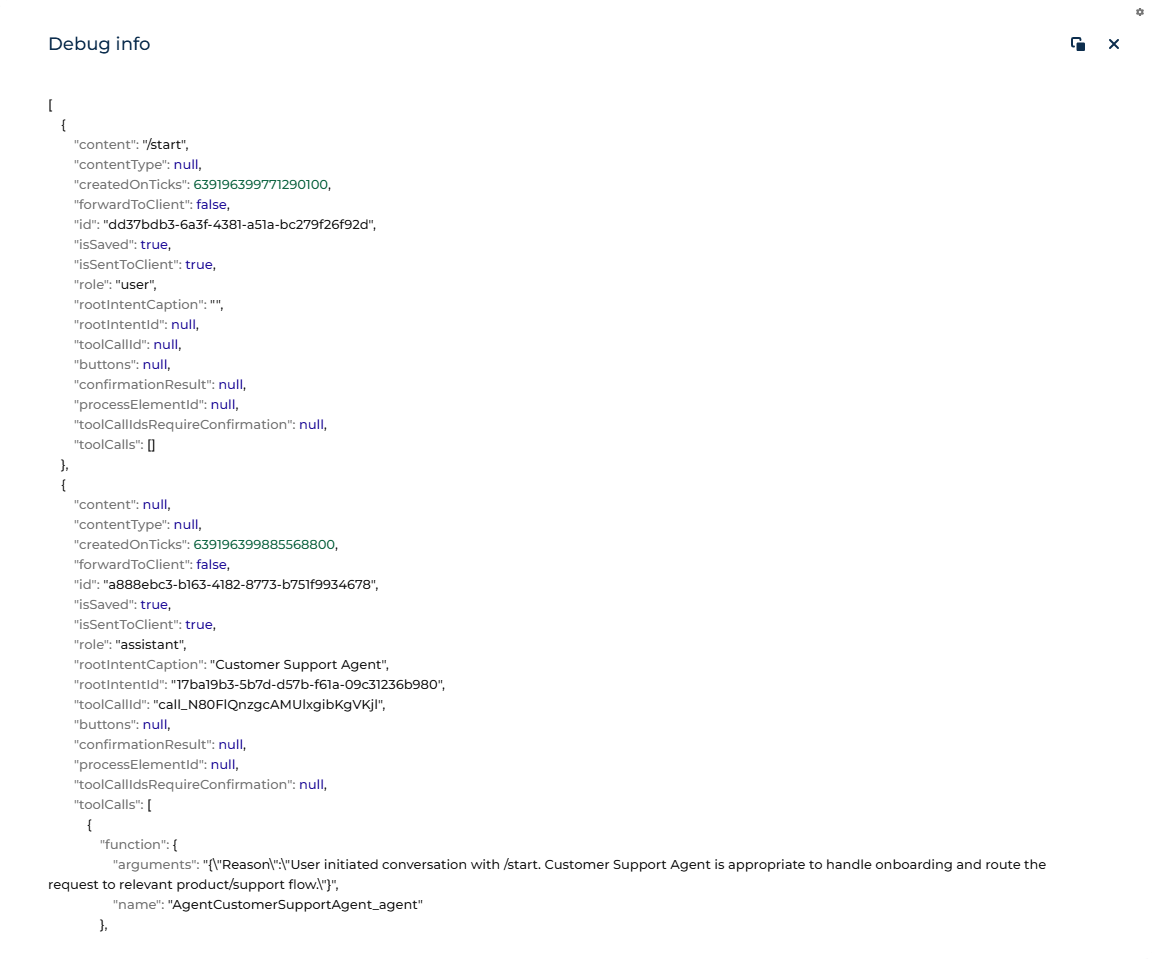
As a result, Creatio opens the full record of the AI session: every message exchanged, the agent that handled each request, and the tool calls the AI made.