Register a visit with GPS coordinates in Creatio Mobile
To implement the example:
- Create a TypeScript project. Read more >>>
- Create a custom request. Read more >>>
- Create a custom request handler. Read more >>>
- Add the custom request handler to the Freedom UI page. Read more >>>
Add a Check in button to the contact mobile page. When a user taps the button, Creatio Mobile must get the current GPS coordinates of the device and register the visit to the contact. Display the registered visits in the Visits list on the Details tab of the contact mobile page. Each visit must be displayed as a separate list item that includes the "Visit date and time," "Latitude," and "Longitude" columns.
If Creatio Mobile cannot get the coordinates or register the visit, display a notification and do not register the visit.
Implement a request handler using a remote module created in a TypeScript project.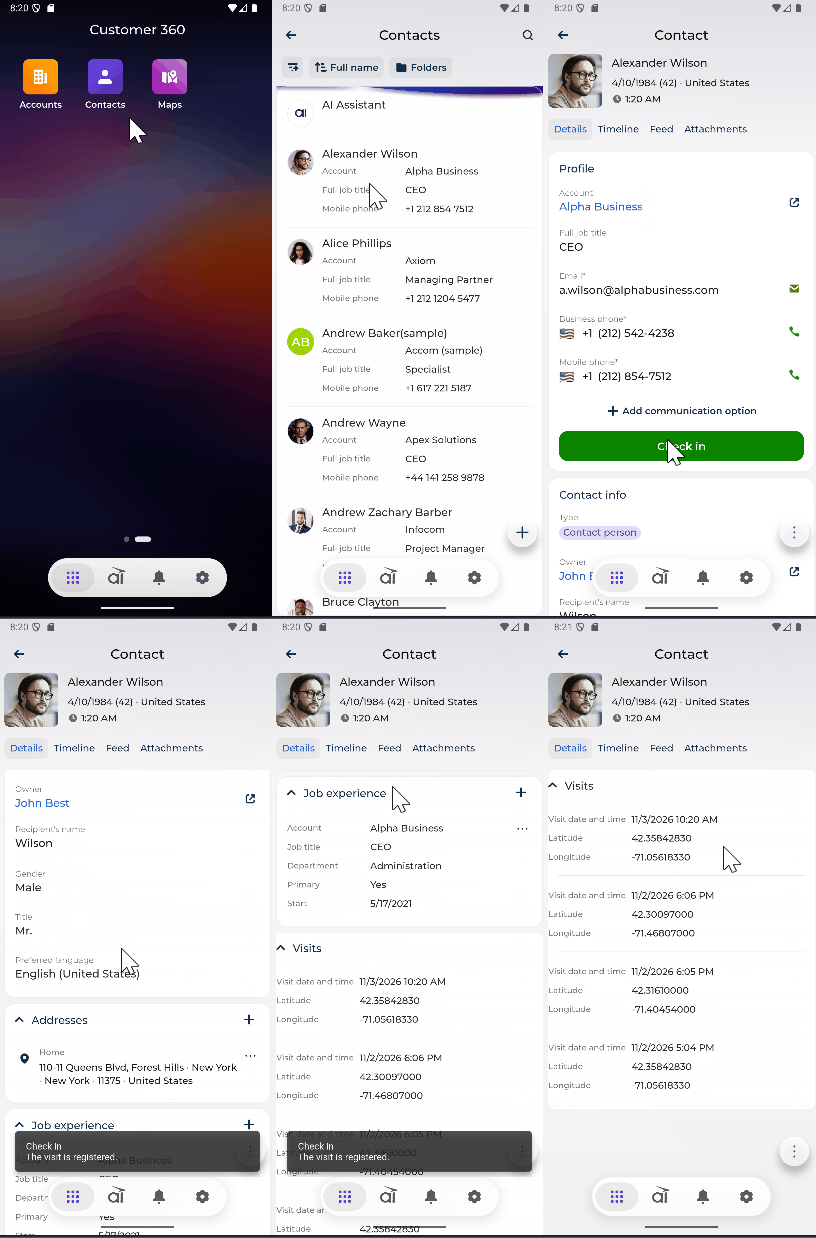
1. Create a TypeScript project
To create a TypeScript project, follow the instructions: Create a TypeScript project.
For this example, change the directory name of the TypeScript project to "check_in_mobile."
As a result, a TypeScript project to develop a custom request handler using a remote module will be added.
2. Create a custom request
- Open the "index.ts" file.
- Inherit the
BaseRequestclass from the@creatio/mobile-commonlibrary. - Import the required functionality from the libraries into the class.
- Save the file.
/* Import the required functionality from the libraries. */
import {
    BaseRequest,
    CrtRequest
} from "@creatio/mobile-common";

/* Add the "CrtRequest" decorator to the "CheckInRequest" class. */
@CrtRequest({
    type: 'usr.CheckInRequest'
})

export class CheckInRequest extends BaseRequest {}
3. Create a custom request handler
-
Implement a custom request handler that gets the GPS coordinates of the device and registers the visit.
-
Open the "index.ts" file.
-
Add the configuration object that declares the request handler.
- Set the
typeproperty to "usr.CheckInRequestHandler." Thetypeproperty is the type of handler. - Set the
requestTypeproperty to "usr.CheckInRequest." TherequestTypeproperty is the type of request to execute the handler specified in thetypeproperty. - Set the
scopesproperty to "['Contact_MobileFormPage']." Thescopesproperty is the list of Freedom UI page schemas where Creatio Mobile runs the handler.
- Set the
-
Flag the
CheckInRequestHandlerclass using theCrtRequestHandlerdecorator. -
Inherit the
BaseRequestHandlerclass from the@creatio/mobile-commonlibrary. -
Call the
getCurrentCoordinates()method of theGeolocationServiceservice and pass the accuracy from theGeolocationAccuracyenumeration to implement getting the GPS coordinates of the device. For this example, use the "high" accuracy. Learn more: GeolocationService service.If the
errorCodeproperty of the result is empty, thelatitudeandlongitudeproperties contain the coordinates. Otherwise, Creatio Mobile could not get the coordinates. For example, the user denied access to the device location. In this case, display a notification and stop processing the request. -
Register the visit.
-
Call the
Model.create()method to create an instance of theUsrContactVisitmodel. -
Call the
insert()method to add a record to the model. Use theIdattribute of the contact mobile page to bind the visit to the contact. Use theencodeDate()function to pass the date and time of the visit.If the
successproperty of the result is "true," Creatio Mobile saves the record locally and synchronizes it with the main Creatio app. Otherwise, display a notification and stop processing the request. -
Execute the
crt.LoadDataRequestbase request to reload the data of the Visits list. Set themodeproperty of therefreshDataConfigconfiguration object to "RefreshMode.RefreshAll" to reload all data sources of the page. Creatio Mobile does not reload the list automatically after the record is added. -
Call the
showSnackBar()method of theModalPresenterclass to notify the user that the visit is registered.
-
-
Use the
DialogServiceservice to implement theshowMessage()method that displays a notification. -
Import the required functionality from the libraries into the class.
-
Save the file.
"index.ts" file/* Import the required functionality from the libraries. */import {BaseRequestHandler,CrtRequestHandler,GeolocationService,GeolocationServicePosition,GeolocationAccuracy,Model,HandlerChainService,LoadDataRequest,RefreshMode,ModalPresenter,encodeDate,DialogService,BaseDialogConfig} from "@creatio/mobile-common";/* Add the "CrtRequestHandler" decorator to the "CheckInRequestHandler"class. */@CrtRequestHandler({requestType: 'usr.CheckInRequest',type: 'usr.CheckInRequestHandler',scopes: ['Contact_MobileFormPage'],})export class CheckInRequestHandlerextends BaseRequestHandler<CheckInRequest> {public async handle(request: CheckInRequest): Promise<unknown> {/* Get the GPS coordinates of the device. */const coords: GeolocationServicePosition =await new GeolocationService().getCurrentCoordinates(GeolocationAccuracy.high);/* Notify the user and stop processing if Creatio Mobile cannot getthe coordinates. */if (coords.errorCode) {await this.showMessage(request,'Check in','Unable to get the device location.');return this.next?.handle(request);}/* Register the visit in the "UsrContactVisit" object. */const contactId: string = await request.$context['Id'];const contactVisitModel: Model =await Model.create('UsrContactVisit');const insertResult = await contactVisitModel.insert({UsrContact: contactId,UsrVisitDate: encodeDate(new Date()),UsrLatitude: coords.latitude,UsrLongitude: coords.longitude});/* Notify the user and stop processing if Creatio Mobile cannot savethe visit. */if (!insertResult.success) {await this.showMessage(request,'Check in','Unable to register the visit.');return this.next?.handle(request);}/* Reload the data of the "Visits" list. */await HandlerChainService.instance.process({type: 'crt.LoadDataRequest',$context: request.$context,refreshDataConfig: {mode: RefreshMode.RefreshAll}} as LoadDataRequest);/* Notify the user that the visit is registered. */await ModalPresenter.showSnackBar('Check in','The visit is registered.');return this.next?.handle(request);}/* Display the notification that contains the message. */private async showMessage(request: CheckInRequest,title: string,message: string): Promise<void> {const dialogService = new DialogService(request.$context);const config: BaseDialogConfig = {title: title,message: message,actions: [{key: 'ok',config: {caption: 'OK',color: 'primary'}}]};await dialogService.open(config);}} -
-
Register the request handler.
- Open the "index.ts" file.
- Add the
CheckInRequestHandlerhandler to therequestHandlerssection in theCrtModuledecorator. - Import the required functionality from the libraries into the class.
- Save the file.
"index.ts" file/* Import the required functionality from the libraries. */import {CrtModule,bootstrapCrtModule,DoBootstrap} from "@creatio/mobile-common";...@CrtModule({/* Specify that "CheckInRequestHandler" is a request handler. */requestHandlers: [CheckInRequestHandler]})export class SdkCheckInApp implements DoBootstrap {bootstrap(): void {bootstrapCrtModule('SdkCheckInApp', SdkCheckInApp);}} -
Build the project. Instructions: Build the project.
As a result, the "main.js" build file will be added to the TypeScript project's directory that is specified in the "webpack.config.js" file → baseConfig configuration object → output configuration object → path property. For this example, the build file will be added to the "../check_in_mobile/out/mobile/SdkCheckInApp" project directory.
4. Add the custom request handler to the Freedom UI page
-
Repeat steps 1-7 of the procedure to add the custom request handler to the Freedom UI page.
For this example:
- Create the
sdkCheckInMobileuser-made package. - Create the "../Terrasoft.WebApp/Terrasoft.Configuration/Pkg/sdkCheckInMobile/Files/src/mobile/SdkCheckInApp" directory.
- Copy the "main.js" build file from the "../check_in_mobile/out/mobile/SdkCheckInApp" project directory to the "../Terrasoft.WebApp/Terrasoft.Configuration/Pkg/sdkCheckInMobile/Files/src/mobile/SdkCheckInApp" directory.
- Create the
-
Create the object that stores visits. Instructions: Implement an object.
For this example:
-
Create the "Contact visit" (
UsrContactVisitcode) object. -
Add the columns listed in the table below.
Column
Type
Property
Value
Column that contains the contact
Lookup
Code
UsrContact
Title
Contact
Lookup
Contact
Column that contains the visit date and time
Date/Time → Date/Time
Code
UsrVisitDate
Title
Visit date and time
Column that contains the latitude
Number → Decimal (0.00000001)
Code
UsrLatitude
Title
Latitude
Column that contains the longitude
Number → Decimal (0.00000001)
Code
UsrLongitude
Title
Longitude
-
Publish the object.
-
-
Open the Customer 360 app in the Application Designer.
-
Open the Contact mobile edit page.
-
Add a button that registers the visit to the contact.
-
Drag the Button component from the element library to the Profile block of the Details tab.
-
Fill out the button properties.
Element
Property
Value
Button that registers the visit to the contact
Title
Check in
Style
Focus
Element code
UsrCheckInButton
-
-
Add a list that stores visits.
-
Add an expansion panel.
-
Drag the Expansion panel layout element from the element library to the Details tab.
-
Fill out the expansion panel properties.
Element
Property
Value
Expansion panel that contains the list of visits
Title
Visits
Element code
UsrContactVisitExpansionPanel
-
-
Add a list.
-
Drag the List component from the element library to the Visits expansion panel.
-
Fill out the list properties.
Element
Property
Value
List that stores visits
Object
Contact visit
Apply filter by page data
- Click
 .
- Set the Contact parameter to "Id."
- Set the Contact visit parameter to "Contact."
Columns
- Click . This opens the Select field window.
- Select the Visit date and time, Latitude, and Longitude fields.
- Click Select.
Sort by column
- Click
 . This opens the Select field window.
- Select the Visit date and time field.
- Click Select.
- Click
 .
Element code
UsrContactVisitList
- Click
-
-
-
Click
 → Source code to open the source code of the Freedom UI mobile page.
-
Set up how to handle the action executed on button click.
- Go to the
viewConfigDiffschema section →UsrCheckInButtonelement. - Bind the sending of the custom
usr.CheckInRequestrequest to theclickedbutton event.
Contact_MobileFormPage{"viewConfigDiff": [...,/* Button that registers the visit to the contact. */{"operation": "insert","name": "UsrCheckInButton","values": {"type": "crt.Button","caption": "#ResourceString(UsrCheckInButton_caption)#",...,"clicked": {/* Bind the sending of the custom request to the"clicked" button event. */"request": "usr.CheckInRequest"}},...}]} - Go to the
-
Save the changes.
As a result, the Check in button and the Visits list will be added to the contact mobile page.
View the result
-
Synchronize the changes. Instructions: Add the custom request handler to the Freedom UI page (steps 13-14).
-
Open the Contacts section.
-
Open a contact. For example, "Alexander Wilson."
-
Tap Check in.
-
Allow access to the location of the device if needed. Creatio Mobile requests the permission when you use geolocation for the first time.
If you use a mobile app emulator configured in Android Studio, set the device location. Instructions: Extended controls, settings, and help (official vendor documentation).
As a result, Creatio Mobile will get the current GPS coordinates of the device and register the visit. The Visits list will display the new visit that includes the visit date and time, latitude, and longitude. After the visit is registered, Creatio Mobile displays the "The visit is registered" message. Each subsequent check-in adds a new list item. View the result >>>
If you deny access to the device location, Creatio Mobile displays a notification that contains the corresponding message and does not register the visit.
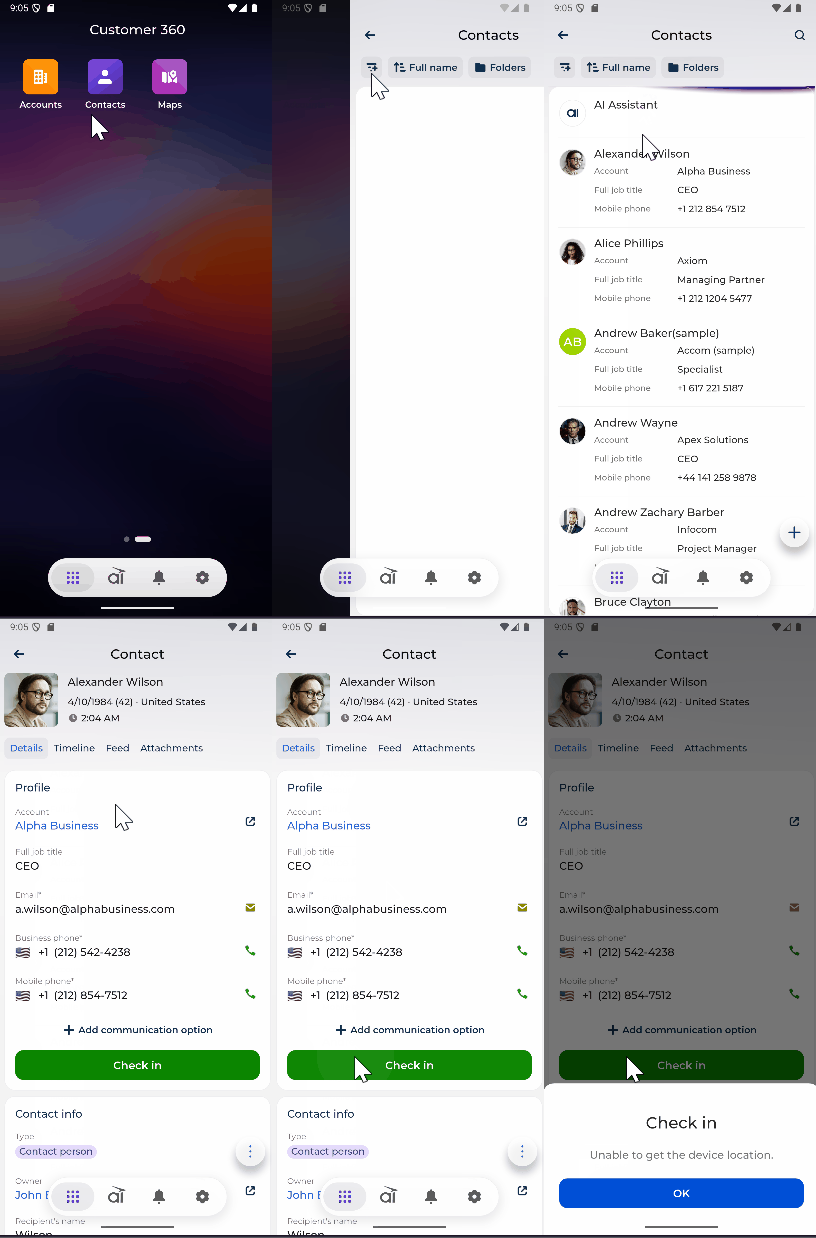
The handler is implemented using the remote module created in a TypeScript project.
Resources
*.zip archive that contains the implemented Freedom UI app for Creatio Mobile