Pre-configured page process element
Open a custom page as part of a business process using the Pre-configured page element (Fig. 1). You can design a new page or open an existing page in both Freedom UI and Classic UI.
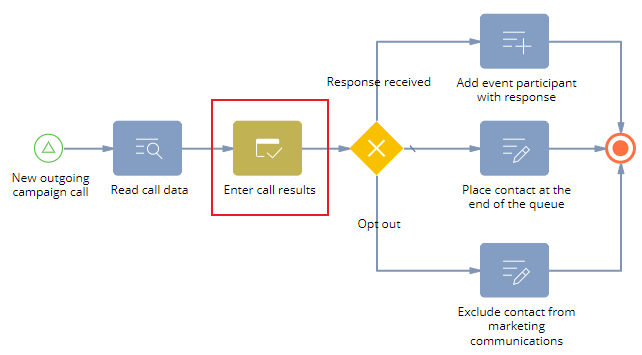
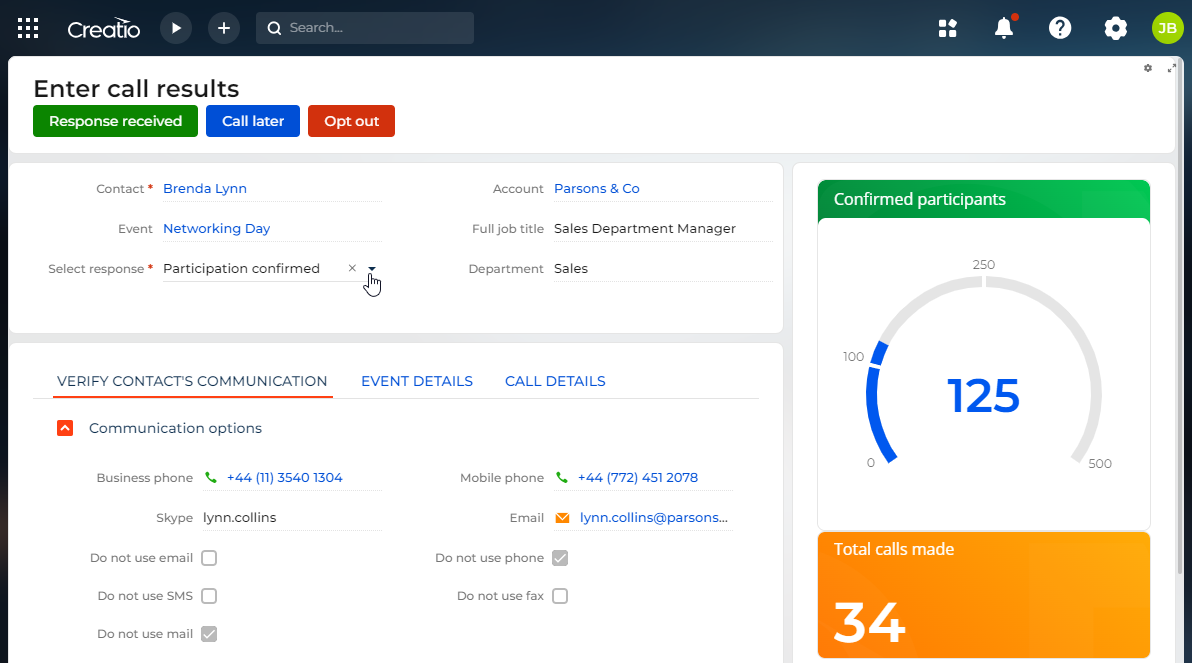
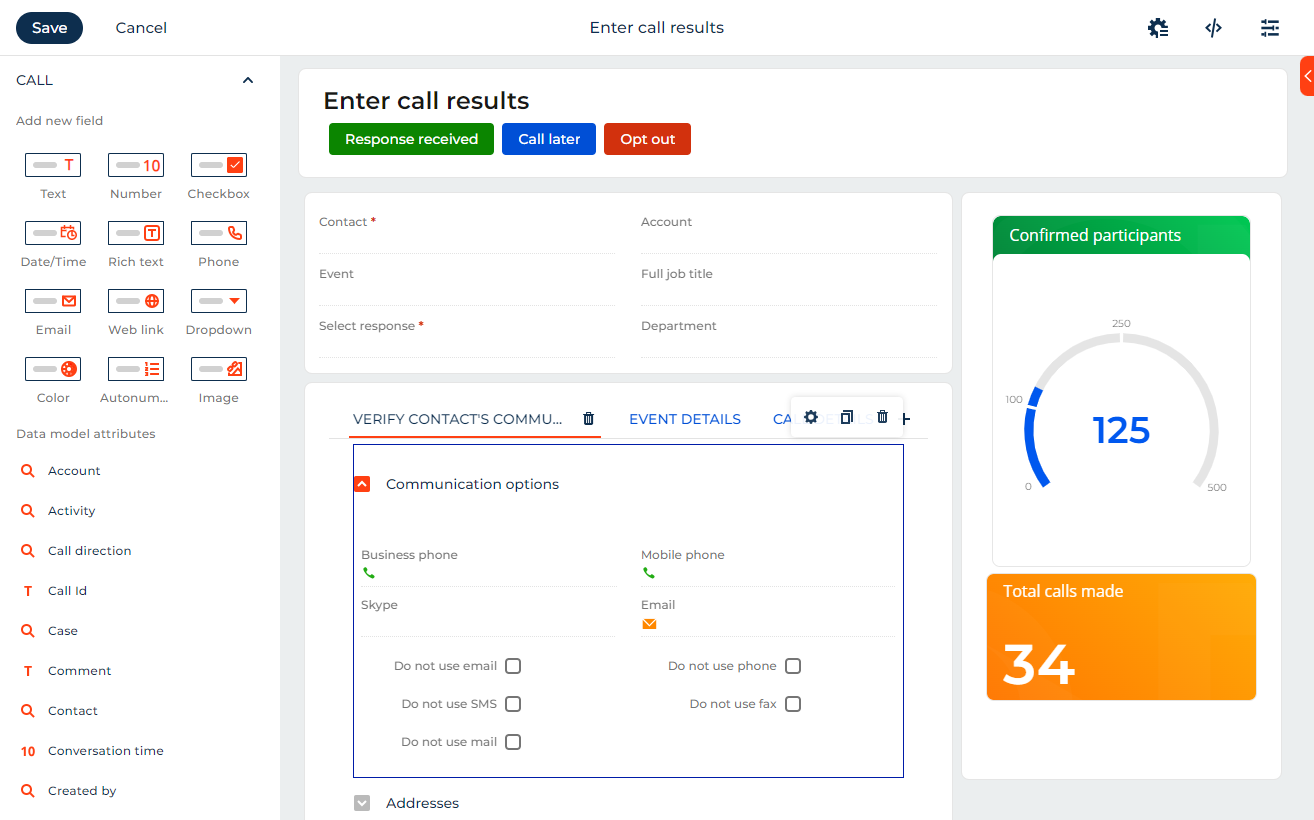
A pre-configured page makes it easy for users to interact with the UI elements as part of a business process. For example, an agent has to invite customers to an event, update the email subscription, and verify the customer contact information as part of an outgoing call campaign. This requires creating and updating records in the Contacts and Events Creatio sections. Each existing section has a dedicated edit page. Use the Pre-configured page element (Fig. 1) to create a single custom page (Fig. 2) for the required actions.
The Events section is available in Creatio Marketing product and Creatio CRM lineup.
We recommend using the Open edit page element to display standard pages. For example, a contact or an invoice page. We recommend using the Auto-generated page element if you need a simple custom page without elaborate components, such as tabs, details, widgets, and business rules.
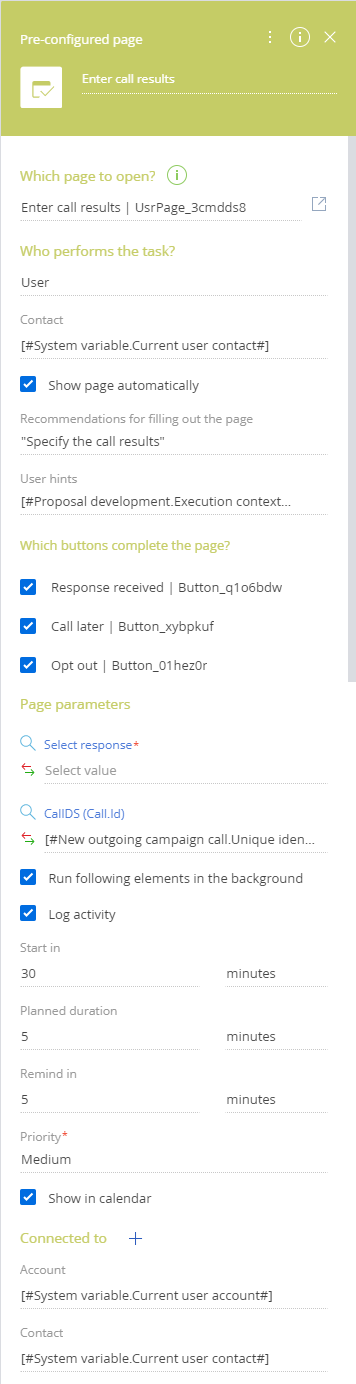
Specify the pre-configured page parameters in the element setup area (Fig. 3). What fields are available in the Pre-configured page element setup area largely depends on the selected page and its type.
-
Enter the element caption at the top of the element setup area. Creatio will display the caption in the process diagram.
-
Use Which page to open? to select an existing page or create a new page to open. If the page has its own parameters, they will be displayed alongside other properties in the Page parameters block. Click the
 button to create a new page in the Page Designer. Click the
  button to modify the currently selected page.
 -
Use Who performs the task? to select one of the options and fill out the field that opens:
-
Use "User" to specify the user who will see the page in the Contact field.
-
Use "Employee's manager" to specify the user whose manager will see the page in the Contact field.
-
Use "Role" to specify the role the users with which will see the page in the Role field.
You can specify a dynamic parameter value or select a constant in the parameter value box.
-
-
Use Show page automatically to select the checkbox to display the page to the current user automatically as soon as the process initiates the action. Creatio does not display the page automatically if the process is currently running for other users or is in the background mode.
-
Use Recommendations for filling in the page to enter the recommendations to display on the page. The recommendation text is a single line string which does not support line breaks regardless of syntax. To display the text in the assignee's language, make sure the "Create business process tasks in the owner's language" ("UsePerformerCultureInUserTask" code) system setting is enabled and the Translation section includes the translation. Learn more: Localize UI via the Translation section.
noteIf the assignee is a group whose members use different Creatio languages, the recommendation will use the default culture.
-
Use User hints to enter additional information about the task. Click the
 button on the page to view the hint.
 -
Use Connected object to specify the section to which the process action is connected. You can fill out this field using the parameter value box.
This field is only available for Classic UI pre-configured pages because the object to which the Freedom UI page is connected is specified in the page itself.
-
Use Record of connected object to specify the connected section record. You can fill out this field by using the parameter value box.
If the user saves the pre-configured page as part of the process, Creatio will add the records of the connected object and connected object instance to the Connected objects block of the Process log section.
The Run process menu will be available on the connected record page.
This field is only available for pre-configured Classic UI pages because the record connected to the page is already specified in the corresponding Freedom UI page parameter, for example, "CallDS (Call.Id)".
-
Use Which buttons complete the page? to select which of the buttons on the pre-configured Freedom UI pages can complete the page. After the user clicks any of these buttons, the business process will resume, provided that nothing is blocking submitting the page, such as empty required fields.
This field is only available for pre-configured Freedom UI pages.
-
The Page parameters block displays the page parameter fields you add to the page. You can set the field values in several ways:
- Specify the default values.
- Receive the values specified by the user as part of the process. To do this, pass the needed parameter values from the corresponding elements to the page parameters.
- Use collection parameters that contain complex values, each representing several entries. For example, a list of contacts with the name, address, and phone number for each contact. To set up a collection parameter in the page, find the page view model in the Configuration section by title, add the "Serializable list of composite values" parameter with the needed sub-parameters to the model, and code the custom business logic.
-
Use Run following elements in the background to select the checkbox to run the elements connected to the outgoing flows in the background.
-
Use Create activity to select the checkbox to create a corresponding activity as part of this process step. If you select the checkbox, the following fields will appear:
-
Use Start in to specify the period after which the activity must start, in minutes, hours, days, weeks, or months. The countdown starts after the activity is created. Creatio uses this parameter to populate the Start field of the activity page.
noteThe value of the activity page's Start field is the sum of the current user time and the Start in field value. For example, if you specify "30 minutes" in the Start in field, and the task was created at 12:00 PM, the value of the task's Start field will be "12:30 PM."
-
Use Planned duration to enter the activity duration, in minutes, hours, days, weeks, or months. Creatio uses this parameter to populate the Due field of the activity page.
noteThe value of the activity page's Due field is the sum of the Start and Planned duration field values.
-
Use Remind in to specify the time period for the reminder to be sent before the activity begins. Once this time period expires, a notification will automatically be generated.
-
Use Show in calendar to select the checkbox to display the task in the Calendar view of the Activities section.
-
Use Connected to to connect the task to other Creatio entities. For example, an account. Creatio will display the task on the Activities detail of the connected record. By default, the element setup area displays account and contact connections. Click the
 button to connect the task to other Creatio entities.
-
Set up a Freedom UI pre-configured page
Open the Freedom UI Designer
You can create custom pre-configured Freedom UI pages in the Freedom UI Designer (Fig. 4).
Since Creatio version 8.1.1, business processes can render Freedom UI pages even when you use Classic UI.
To open the Freedom UI Designer:
- Click
 in the Which page to open? field to create a new pre-configured page → select "Freedom UI page." If you have already filled out the field, clear it first.
 - Click
 in the Which page to open? field (Fig. 5) to edit an existing page. If the page was created in the Freedom UI Designer, the Designer will open.

Select the page template
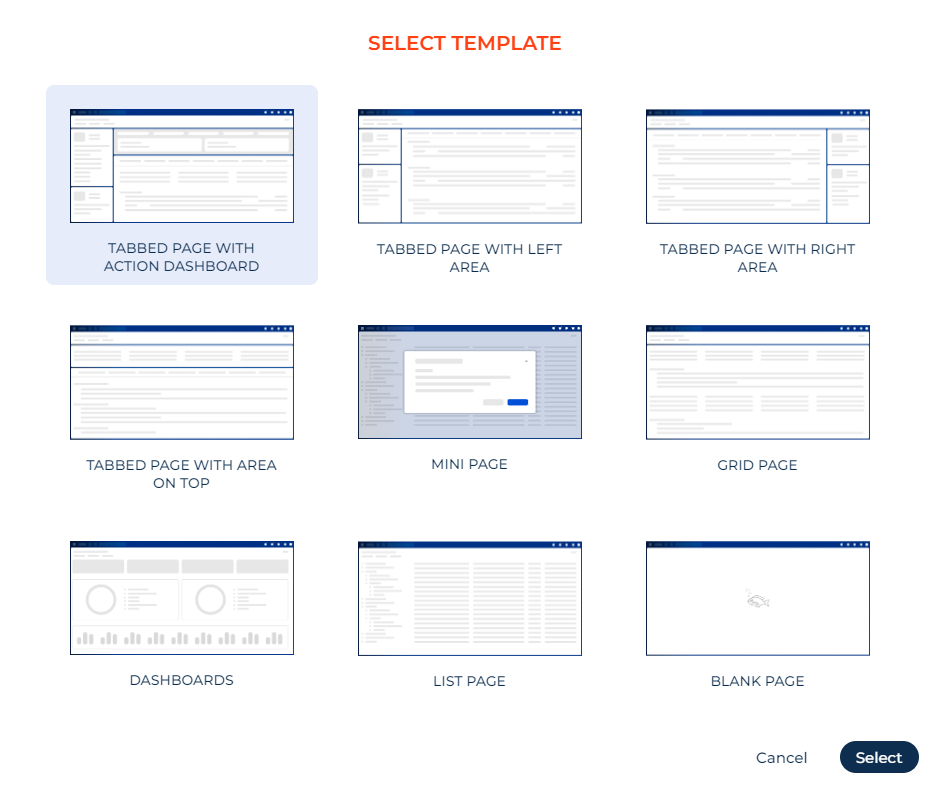
You can select a template (Fig. 6) each time you create a new pre-configured page. The Freedom UI template determines the layout of UI elements, for example columns, tabs, grid, and more on the page, as well as its components, such as buttons and dashboards. The template cannot be changed after you click the Select button on the template selection box.
The pre-configured page templates are view model schemas, which can be customized using development tools.
Add a data source
If you plan to add or update Creatio records using a pre-configured page, consider adding the corresponding Creatio object as the data source. For example, add the "Contact" object as the data source to add or modify a contact record.
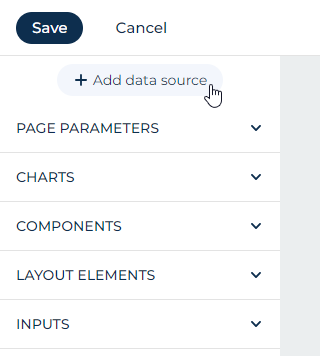
Click Add data source → Existing data (Fig.7) in the Freedom UI Designer menu to add a page data source.
A new popup will open. Select "Contact" in the Object field and click Select.
As a result, Creatio will add an object and connect it to the page as a data source. The Freedom UI Designer will display the data source in the group named after the object.
Display and enter data
You can display data and enable users to enter data using fields and inputs.
Fields
Add or modify fields to add or modify attributes in the data model of the data source object or the page itself. To add a field to a page, drag it from the Freedom Designer element library to the template area. You can add two types of fields to a pre-configured page:
-
Data source fields that correspond to the columns of the object selected as the page data source. Use these fields to add or update Creatio records. For example, add a Full name field from the Contact data source to edit the contact's full name.
-
Page parameter fields represent parameters of the current Pre-configured page element. If you add a new page parameter field, Creatio will add the corresponding parameter to the Page parameters block in the Pre-configured page element setup area. Use the page parameter fields to pass any information that goes beyond the scope of objects used as page data sources.
For example, add the Contact data source and its Full name and Full job title fields to the pre-configured page to verify the contact name and job title during a call. You can add process-specific information, such as an Agreed to participate in the campaign checkbox, as a page parameter field. Learn more about fields: Fields.
Inputs
Use Input layout elements to display data and enable users to enter data. Inputs are very similar to fields, but when you set up an input and the user uses it to enter data, Creatio does not modify the attributes of the data model.
You can set up an attribute of the page model or a related object as the data source of an input in the Advanced section of the input setup area. If you specify an attribute of the page data model, Freedom UI Designer converts the input on the canvas to a field. Learn more about inputs: Inputs.
Add charts (dashboards)
You can add summary analytics data from any Creatio section to the pre-configured page. Adding charts is similar to analytics in the Dashboard section of the main Creatio application. Learn more: Charts.
Add components
You can add buttons, lists, labels, folder and other components to the canvas area of the pre-configured page. Learn more: Components.
Add layout elements
You can add areas, columns, flex containers, tabs, and expansion panels to the canvas area of a pre-configured page. Use these elements to arrange the placement of components, fields, and inputs. Learn more: Layout elements.
Set up default field values
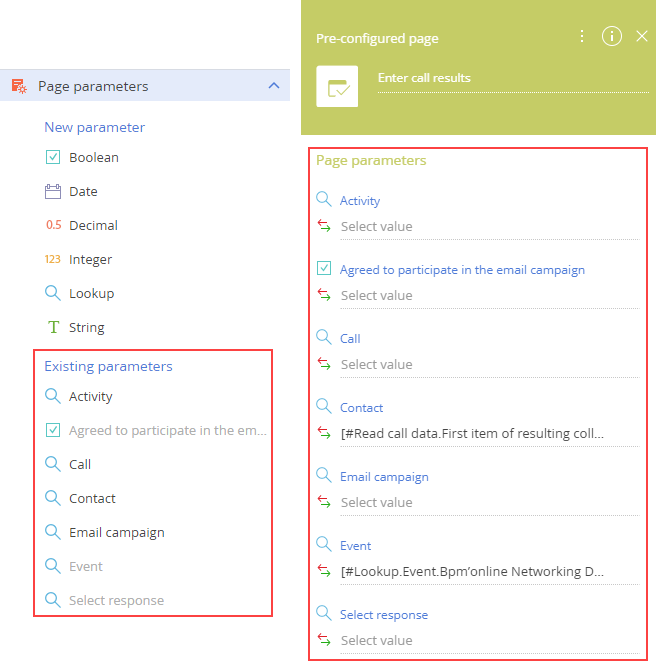
Set up default values for the page parameter fields using the Pre-configured page element parameters. Each field in the Page parameters → Existing parameters menu corresponds to a parameter of the Page parameters block of the Pre-configured page element setup area (Fig.8).
These parameters have several functions:
- The parameter values determine the default values of the corresponding pre-configured page fields when the page opens as part of the process.
- The values entered in the corresponding page fields as part of the process will be recorded as the element parameter values when the element completes its execution. You can map these parameter values further down the process.
For example, a page has a Contact data source and contains several fields from the "Contact" object, as well as the Communication options detail. To populate these fields and the detail with the data of a particular contact, add the ID of the relevant contact to the Contact parameter (Fig. 9).
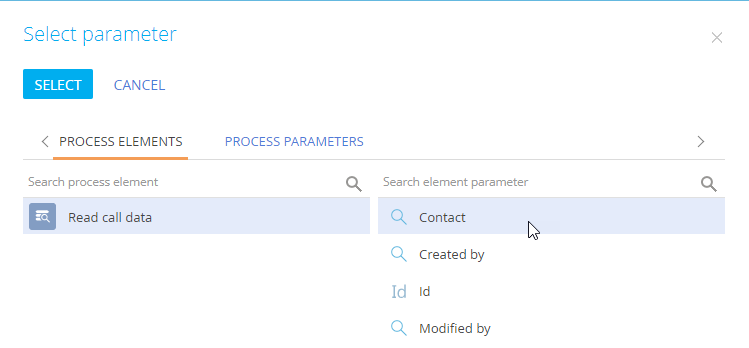
If you leave the Contact parameter empty, Creatio will save any information entered in the "Contact" object fields and the "Communication options" detail as the data of a new contact. Learn more: Process parameters.
Element activation
When Creatio activates the incoming flows if the Pre-configured page element:
- In the regular mode, the element opens the specified page for the user. Creatio adds the corresponding task to the Business process tasks tab of the communication panel.
- In the background mode, the element does not open the page, however, Creatio adds the corresponding task to the Business process tasks tab of the communication panel. The process user can click the task to open the pre-configured page.
Element completion
The element is deemed complete when the user clicks a button that closes the page. If the user leaves the page in any other way, such as by clicking a different section in the sidebar, runs a global search, and more, Creatio will close the page but will not deem the element complete. The process task will remain on the Business process tasks tab of the communication panel.
Upon completion, Creatio will record any values entered on the page to the corresponding parameters or data source objects and activate the outgoing flows.
Set up a Classic UI pre-configured page
Open the Page Designer
You can create custom Classic UI pre-configured pages in the Page Designer (Fig. 10), which is similar to the one used in the Section Wizard.
To open the Page Designer:
- Click in the Which page to open? field to create a new pre-configured page → select “Classic UI page.” If you have already filled out the field, clear it first.
- Click in the Which page to open? field (Fig. 11) to edit an existing page. If the page was created in the Page Designer, the Designer will open.
Select the page template
You can select a template each time you create a new pre-configured page. The template determines the layout of UI elements, e. g., tabs, profile area, etc., on the page. The template cannot be changed after you click the Select button on the template selection box.
The pre-configured page templates are view model schemas, which can be customized using development tools.
Add a data source
If you plan to add or update Creatio records using a pre-configured page, consider adding the corresponding Creatio object as the data source. For example, add the "Contact" object as the data source to add or modify a contact record.
Click Add data source (Fig. 12) in the Page Designer menu to add a page data source.
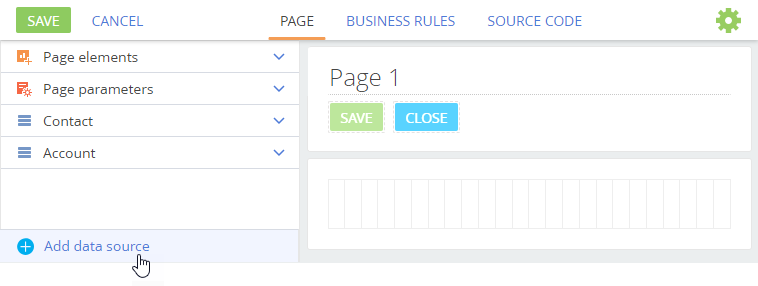
The data source page will open. Fill out the page fields:
The object from which to read data | Select a section, detail, or lookup object, whose records will be added or updated on the pre-configured page. For example, select the "Contact" object to set up a page where the user will be able to add or modify a contact record. |
Data source name | If necessary, enter a custom name for the data source. Creatio will display this name in the Page Designer menu. |
The parameter of the page to which the current record is transferred | Enter the name of the Pre-configured page element parameter that will store the Id of the added or modified data source object's record. Select an existing parameter from the lookup or add a new parameter by entering its name. Creatio will add the corresponding field to the Page parameters menu of the Page Designer, as well as the Page parameters block of the Pre-configured page element setup area. The parameter value depends on whether you need to add a new record to the data source object or modify an existing record.
|
You can add multiple data sources to a single page. The Page Designer displays page data sources in the menu, marked with the  icon.
icon.
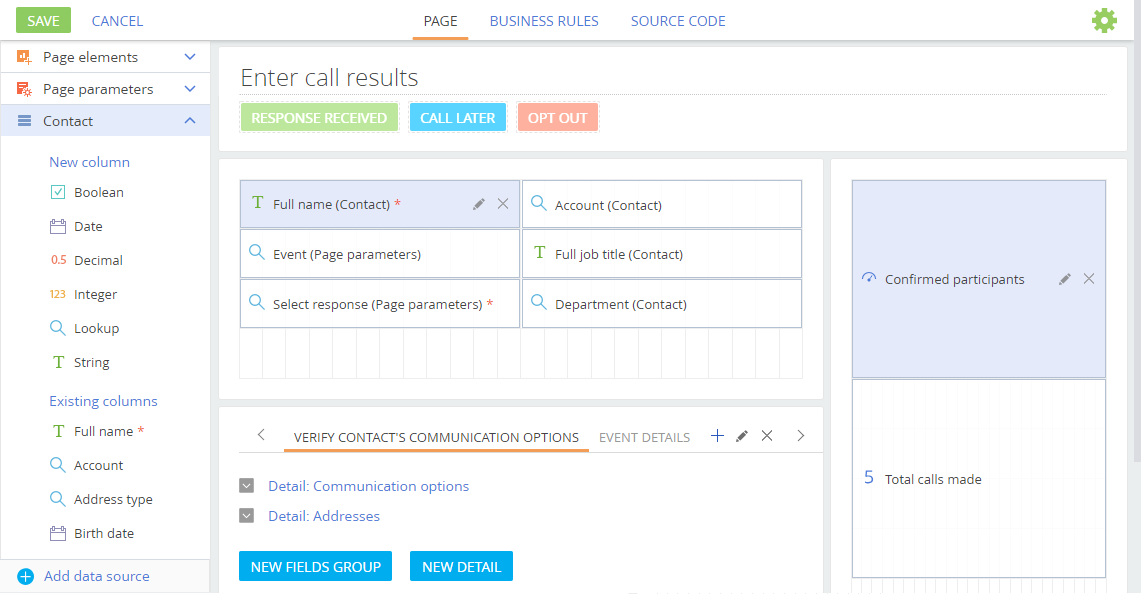
Add fields
To add a field to a page, drag it from the Page Designer menu to the template area. You can add two types of fields to a pre-configured page:
 Data source fields that correspond to the columns of the object selected as the page data source. Use these fields to add or update Creatio records. For example, add a Full name field from the Contact data source to edit the contact's full name.
 Page parameter fields represent parameters of the current Pre-configured page element. If you add a new page parameter field, Creatio will add the corresponding parameter to the Page parameters block in the Pre-configured page element setup area. Use the page parameter fields to pass any information that goes beyond the scope of objects used as page data sources.
Adding fields in the Page Designer is similar to adding fields in the Section Wizard. Learn more: Set up page fields.
For example, add the Contact data source and its Full name and Full job title fields to the pre-configured page to verify the contact name and job title during a call. You can add process-specific information, such as an Agreed to participate in the campaign checkbox, as a page parameter field.
Edit the page view model directly in the Configuration section to set up collection parameters.
Add dashboards (widgets)
You can add summary analytics data from any Creatio section to the pre-configured page. Save the page in the Page Designer for the first time to be able to add dashboards. Adding dashboards is similar to adding dashboards in the Section Wizard. Learn more: Add analytics to a record page.
Add details and field groups
You can add field groups, tabs, and details to the tab area of the pre-configured page. This area is available in all templates, except "Grid page." Add details similarly to adding details in the section wizard. Learn more: Set up page field groups. Create new details to add to a pre-configured page in the Detail Wizard.
When adding details to a pre-configured page, select a pre-configured page parameter, which will be used to filter detail records. Usually, these are the parameters, where the Id of the current data source record is passed.
For example, when you add a Contact data source, Creatio will add the Contact parameter that stores the contact Id as well. If you need to add the Contact addresses detail to display the information of a particular contact, select the Contact parameter in the Object column field on the detail settings page.
Set up buttons
You can add buttons to the pre-configured page and define their logic. Buttons can save and/or close the page, as well as serve as conditions for process branching with conditional flows. Add buttons to the area below the page title. By default, the Save and Close buttons are available on the page in the Classic UI Page Designer at the top of the page.
Double-click a button to modify its properties. Select a button and click "X" in the top right corner to delete it.
The main button functionality properties are as follows:
Completes the process step | If you select this checkbox, the button will close the page and terminate an element with a specific result you can use in conditional flows, similar to the Perform task element. You can use any button that closes the page in a conditional flow. |
Validates and saves the entered data | If you select this checkbox, the button will check if the user filled out the required fields and save the field data once clicked. |
Generates a signal | Enter the signal the button will generate once clicked, similar to the Throw signal element. |
Active | If you select this checkbox, the button will be active when the page opens. For example, add buttons that are inactive by default and become active according to the page business rules. |
Add business rules
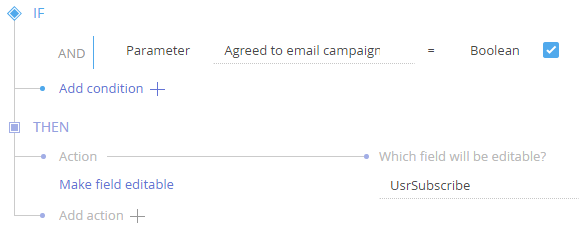
Add business rules to a pre-configured Classic UI page using the Business rules tab of the Page Designer. The procedure is similar to adding business rules in the Section Wizard. Learn more: Set up a new busines rule.
For example, make the Subscribe to bulk email field editable only if the Agreed to email campaign checkbox is selected (Fig. 13).