Customize Portal Creatio in Classic UI
You can set up the portal login page, the portal main page, portal user and organization profiles, as well as add existing and custom sections to the portal.
To turn on Freedom UI for external users, follow the steps in a separate article: Turn on Freedom UI.
Set up the portal login page
The login page is the first page the users see after loading the URL of your Creatio instance. The primary application and the portal have two different login pages. These pages have a few settings in common.
The login page URLs for a Creatio instance with "https://mysite.creatio.com" URL are as follows:
-
Primary application: https://mysite.creatio.com/Login/NuiLogin.aspx
By default, https://mysite.creatio.com redirects to the primary application login page. However, you can redirect this URL to the portal login page.
We recommend adding the following assets to the portal login page:
-
Corporate logo – you can add different logo images for the primary application and portal login pages.
-
Support phone numbers and links to any additional resources, which are displayed both on the primary application and portal login pages.
-
Data privacy notifications, cookie banners, consent checkboxes, or other regulatory tools, etc., to comply with applicable data privacy laws and requirements to provide portal users with access to your portal.
Change the default login page
If you use the portal to communicate with customers actively, you can set the portal login page as default. This is particularly useful if most of your portal users register on their own.
If you use Creatio cloud, contact Creatio support and have the team configure Single Sign-On on your site via a remote connection.
If you use Creatio on-site, perform the following settings in the Creatio configuration files:
-
Modify the Web.config file located in the Creatio root folder.
-
Change the value from NuiLogin.aspx to SSPLogin.aspx. For example:
<authentication mode="Forms"><forms loginUrl="~/Login/SSPLogin.aspx" protection="All" timeout="60" name=".ASPXAUTH" path="/" requireSSL="false" slidingExpiration="true" defaultUrl="ViewPage.aspx?Id=4e342d5e-bd89-4b79-98e2-22e433122403" cookieless="UseDeviceProfile" enableCrossAppRedirects="true" /></authentication><defaultDocument><files><add value="SSPLogin.aspx" /></files></defaultDocument> -
Save the changes.
Set up the logo
You can replace the default image on the login page with your company logo. To do this:
-
Click
 → "System settings."
 -
Open the "SSP Logo" system setting ("SSPLogoImage" code).
-
Click the Clear value button to delete the old logo.
-
Click Select file and upload the new logo. Recommended image size: 37x274 pixels. If you upload a larger image, Creatio will scale it down. We recommend uploading PNG images. However, you can use other standard image formats supported by your browser.
-
Save the changes.
-
Clear the browser cache and refresh the page to see the changes live.
Set up phones and links
You can display contact options on the login page, e. g., sales department or customer support phone numbers, as well as any additional resources. This data will be displayed both on the primary application and on the portal login page.
Add contact options
To add contact options to the login page:
-
Click
→ "Lookups". -
Open the "Communication options for login page" lookup.
-
Click New.
-
Specify the name of the contact option, e. g., "Support", and add a phone number.
-
Click OK.
-
If you need to add multiple contact options, repeat steps 3-5 for each option.
Add links
To add links to the login page:
-
Click
→ "Lookups." -
Open the "Useful links for login page" lookup.
-
Click New.
-
Specify the name of the link, e. g., "Official website," and add a URL.
-
Click OK.
-
If you need to add multiple links, repeat steps 3-5 for each link.
If user self-registration is not required, you can remove the "Register" button from the portal login page:
- For Creatio on-site, change the ShowPortalSelfRegistrationLink parameter in the Web.config file to:
<add key="UseStaticFileContent" value="false" />
- For Creatio in the cloud, contact Creatio support.
Set up the portal main page
The portal main page provides quick access to the most up-to-date information and common functionality. You can configure the main page, e. g., add the list of the user’s cases or the knowledge base article search widget.
All portal users have permission to read the main page data.
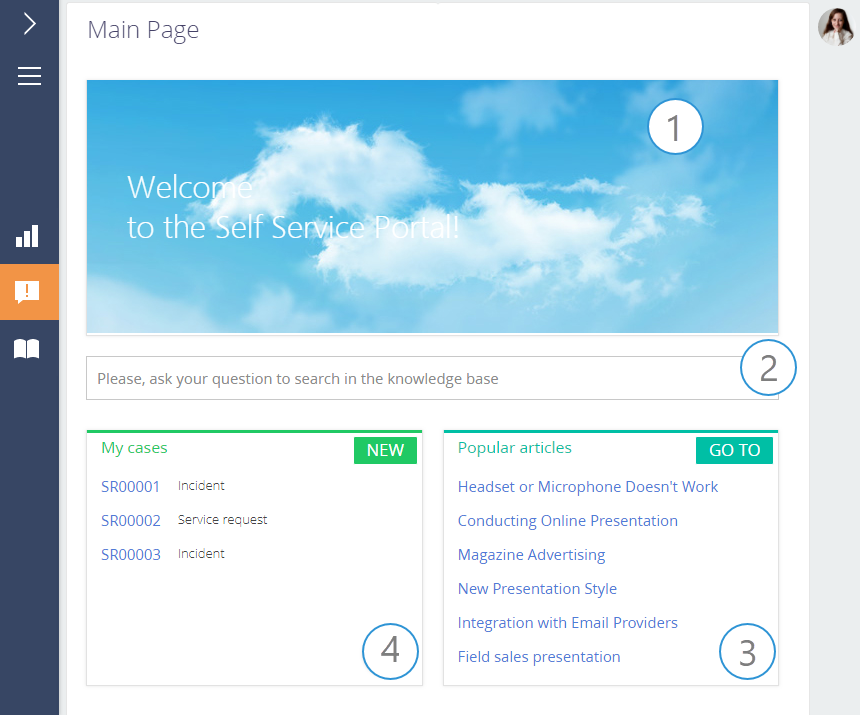
The default portal main page contains the following elements (Fig. 1):
-
A welcome banner (1)
-
A knowledge base article search bar (2)
-
A list of popular knowledge base articles (3)
-
A list of cases the portal users submitted (on the self-service portal) (4)
The main page is displayed right after the login by default. You can choose to display a portal section, e. g., Knowledge base as a start page instead. Specify the start page in the "Portal start page" ("SSPMainPage" code) system setting.
If you change the portal start page, the changes will only affect new portal users. To apply changes to existing portal users, change the value of the Home page field on the user page manually.
System administrators must set up the portal main page in the primary application.
To do this, click → " Portal main page setup ."
You can set up the portal main page only if you have permissions for the "Access to portal main page setup module" ("CanManagePortalMainPage" code) system operation.
As a result, the portal main page setup area will open (Fig. 2).
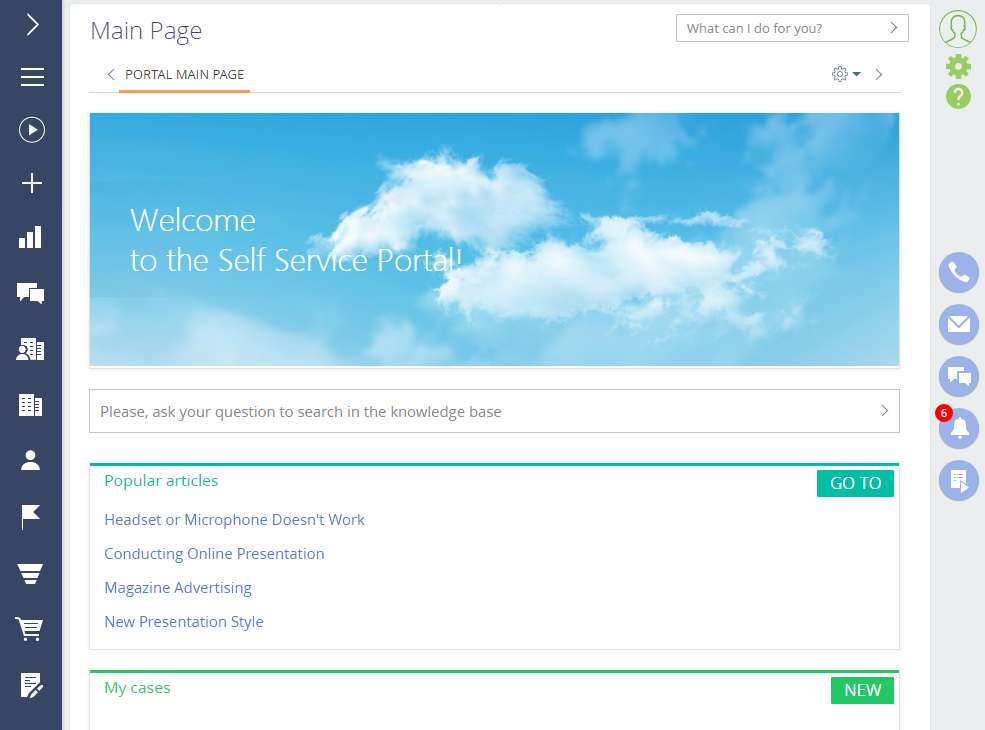
Here you can set up:
-
The welcome banner.
-
Custom lists.
-
Charts and other analytics.
When configuring the portal main page, keep in mind the portal user access permissions. In Creatio, the portal user access permissions are limited by and comply with the "least access" principle, which means users are prohibited to perform any action to which they do not have explicit permission. If the main page contains information that the users do not have permission to read, the portal will not display this information for such users. For example, if the main page contains a chart based on the Contacts section data, the users without permission to read the "Contact" object data will not be able to view this chart.
Therefore, when you configure the portal main page:
-
First and foremost, consider the default permissions granted to portal users. For example, you can set up the list of knowledge base articles liked by the current portal user, and the list will be displayed on the portal main page.
-
If you want to supplement the portal main page with dashboards containing data that portal users have no permission to read, set up the corresponding permissions in the Object permissions section. Learn more in a separate article: Manage Portal Creatio in the main application.
Set up the main page banner
You can display a custom image on the portal main page. It can be a banner that conveys the style and spirit of your company. Configure the banner as a separate web page. Create a separate web page on your website similar to the default banner on the portal to display a custom image.
To do this:
-
Click
→ "Set up portal main page." -
Click
 → Edit.
 -
Double-click the "Website with image" block.
-
Specify the title, the page URL, and styles (optional).
-
Save the changes.
Set up custom widgets on the main page
To make it more convenient for the users, the portal main page displays lists of their records in the main portal sections. The list on the customer portal displays the popular knowledge base articles, while the list on the self-service portal displays the knowledge base articles and customer cases. Configure these lists using developer tools in the "Widget" dashboard tile. Additionally, you can add custom lists with custom sorting, e. g., a list of user requests. However, such lists will not have the Go to button. Configure these lists similar to the "List" dashboard tile in the primary application. Learn more in a separate article: Set up dashboards.
Similar to the base dashboard tiles, you can add the custom widget dashboard tile to the main page using developer tools. Learn more in the developer documentation: Add a custom dashboard widget.
Set up the main page tabs
You can add several tabs to the main page to display additional data, e. g., case stats (Fig. 3).

To add a new tab to the portal main page:
-
Click
→ "Set up portal main page." -
Click
→ Add (Fig. 4).Fig. 4 Add a new tab to the page 
-
The portal tab content setup process is similar to that of dashboard tabs. Learn more in a separate article: Set up dashboards.
As a result, the portal will display all configured tabs on the main page. Navigate the tabs by clicking their titles.
noteThe tabs are displayed in alphabetical order. The user will see the first tab in the list upon login. When setting up the tabs, you need to take their titles into account.
Note that the portal will not display the tab setup area on the main page if there is only one tab in it.
Set up the user and organization profile
Configure the profiles of the portal users and portal organizations in the section wizard to add existing fields and details, as well as create new ones. You can add as many fields and details to the profile as necessary.
This functionality is only available to users who have permission for the "Access to "Access rights" workspace" ("CanManageAdministration" code) system operation.
Since Creatio version 8.0.9 "Portal user" user type and "All portal users" root role were renamed to "External user" and "All external users," respectively.
Set up the user profile
-
Click
 → "Set up portal user profile page."
 -
Add new or delete existing fields and details in the Section Wizard (Fig. 5).
-
Save the changes.
Set up the organization profile
-
Click
→ "Set up portal organization page." -
Add new or delete existing fields and details in the Section Wizard (Fig. 6).
-
Save the changes.
Learn more in a separate article: Set up a homepage.
Set up portal sections
Configure the portal sections in the Section Wizard of the primary application. Section management capabilities depend on the portal configuration:
-
If you use the self-service portal, you can modify the existing portal sections but cannot add new sections.
-
If you use the customer portal, you can add up to 3 custom sections and configure them using the Section Wizard.
You can add any Creatio object to the section page. For example, a detail, a field, etc. The number of available objects depends on the portal configuration and is restricted by the license conditions. For example, you can add up to 300 objects to a self-service portal page, up to 1500 objects to a customer portal page, and up to 3000 objects to a partner portal page. If the number of objects on the section’s record page exceeds these limits, the portal will switch to "read-only" mode.
Add an existing section
The ability to display existing sections on the portal and the number of portal sections are restricted by the terms of the user license.
To add an existing section to the portal:
-
Click
→ "Set up view" → "Workplace setup." -
Select the needed workplace with a "Portal" type from the list → Open.
-
On the Sections detail, click
 → select the section → Select.
As a result, the section wizard will open. You will be able to set up the section properties on the Portal tab (Fig. 7).
Fig. 7 Portal section setup page in the Section Wizard page 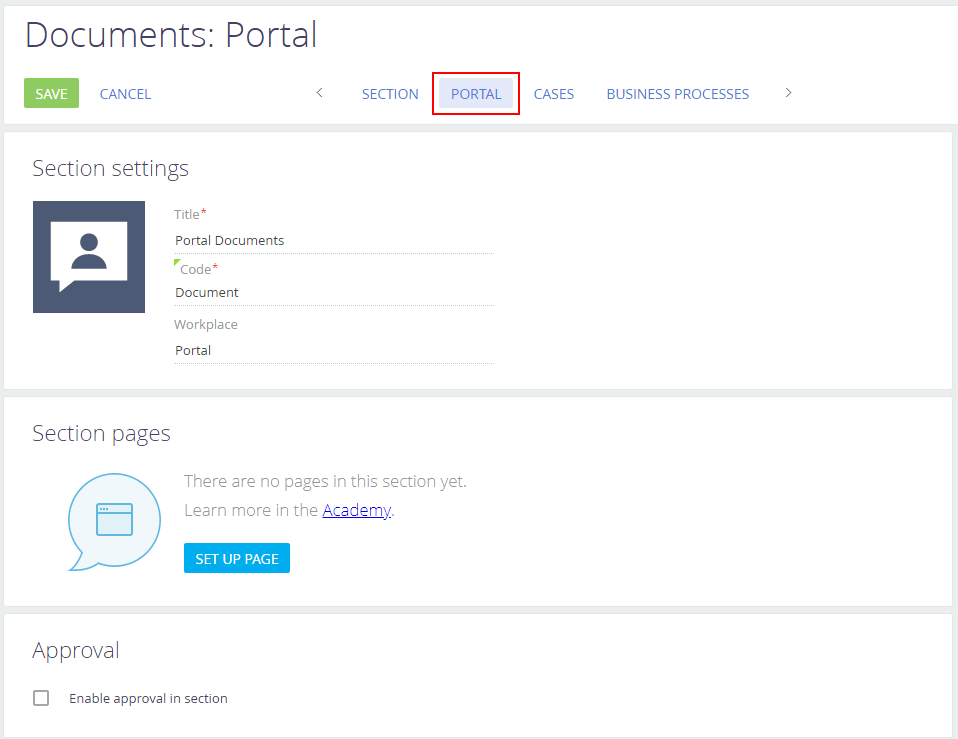
As a result, the section wizard will open. You will be able to set up the section properties on the Portal tab:
-
Creatio populates the Title field with the name of the section that is visible to portal users. You can specify a different title, if necessary.
-
Creatio also populates the Code field, and it cannot be edited. The Code field contains the section code developers use when editing the section’s source code.
-
You can change the standard section icon, which will be displayed in the portal’s side panel. Hover over the current icon and click
 to change the section icon. We recommend using a white icon on a transparent background. Icon format: *.png or *.svg, size: 38x38 px.
 -
Click Set up page to open a blank editor page. Set up the page in the same manner as a primary application page. Learn more in a separate article: Set up a homepage.
-
Select the Enable approval in section checkbox to enable approval functionality in the section.
noteCreatio grants access permissions for fields and details added to the portal page automatically when you edit the portal sections in the Section Wizard. To allow a user to access a new portal section, make sure that the necessary object is managed by records and the portal user has sufficient object permissions. Learn more in a separate article: Manage Portal Creatio in the main application.
-
-
Save the changes in the window and the Section Wizard.
As a result, the selected section of the primary application will be added to the portal workplace (Fig. 8).
Fig. 8 TheDocumentssection on the portal 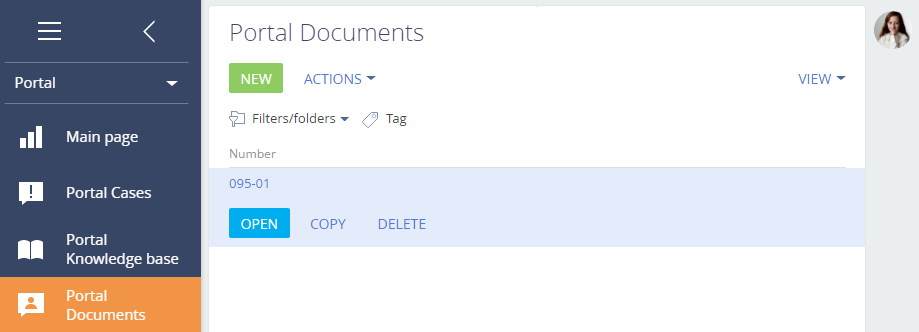
Add a new section
You can add new custom sections to the portal only in the customer and partner portal configurations.
To add a custom section to the portal:
-
Create a new section in the primary application using the Section Wizard. Learn more in a separate article: Create a new section.
Specify any workplace of the primary application, e. g., "General" in the Workplace field in the main properties of the section (Fig. 10).
notePlease do not specify the "Portal" workplace, since you must create a new section in the primary application before adding the section to the "Portal" workplace.
Fig. 9 Select the workplace for a new portal section 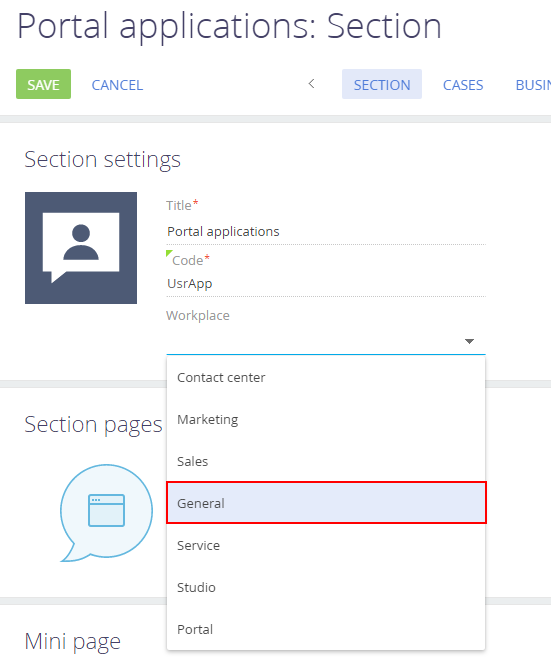
-
Click
→ "Set up view" → "Workplace setup." -
Select the needed workplace with a "Portal" type from the list → Open.
-
Add the new section to the "Portal" workplace.
-
Save the changes in the window and the Section Wizard.
noteCreatio grants access permissions for fields and details added to the portal page automatically when you edit the portal sections in the Section Wizard. To allow a user to access a new portal section, make sure that the necessary object is managed by records and the portal user has sufficient object permissions. Learn more in a separate article: Manage Portal Creatio in the main application.
As a result, a new custom section from the primary application will be added to the portal.
Edit the existing section settings
While working with a portal section, you may need to change the set of fields or details on the record page. To do this, edit the portal version of the section page. For example, to add two new fields to the section page:
-
Click
→ "Set up view" → "Workplace setup." -
Select the workplace with a "Portal" type from the list → Open.
-
Click the name of the section, e. g., Portal knowledge base → Section wizard.
The Portal tab of the Section Wizard will open. You will be able to set up the properties of the section’s portal version.
Fig. 10Portal Knowledge basesection in the Section Wizard 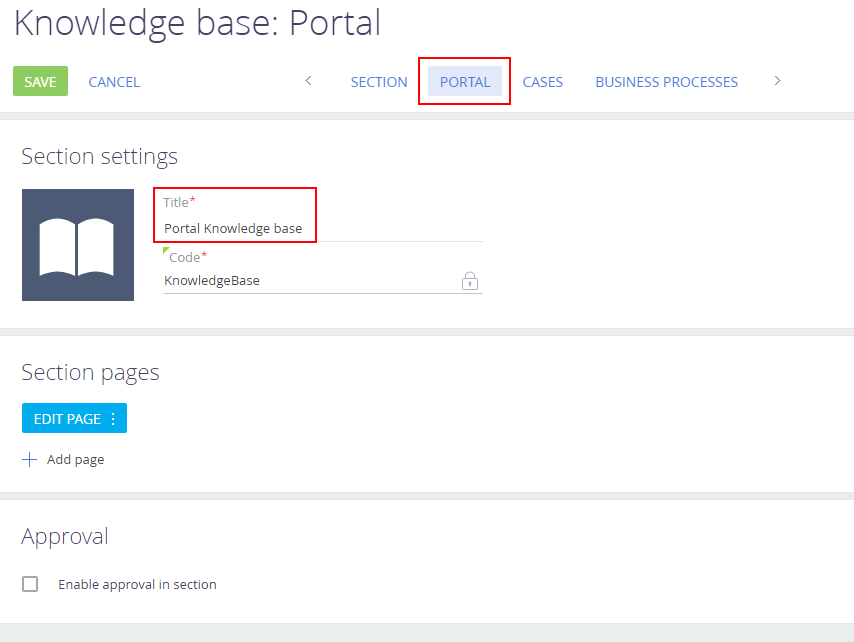
-
Click Edit page. This will open the Page Designer.
-
Edit the page, e. g., add new fields (Fig. 11). Learn more in a separate article: Set up page fields.
Fig. 11 Add theCreated byandCreated onfields to thePortal knowledge baserecord page. 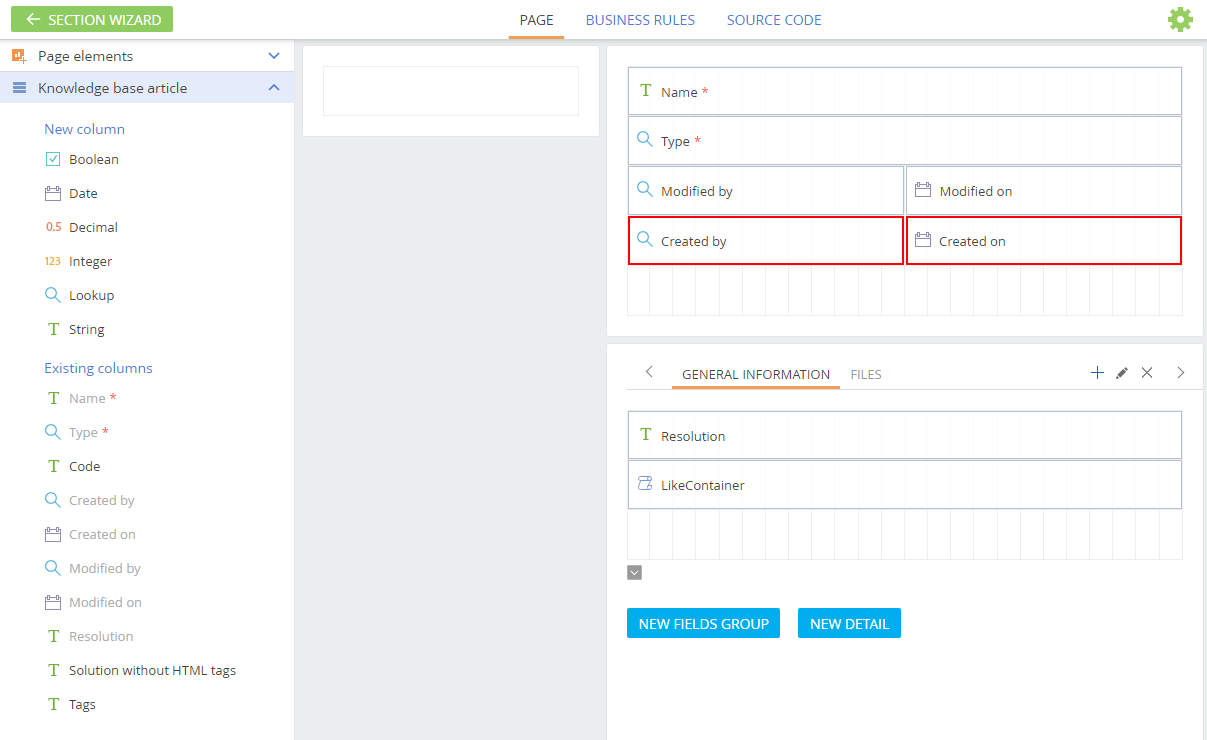
-
Save the changes in the window and the Section Wizard.
As a result, the new fields will be added to the record page on the portal (Fig. 12).
Fig. 12 New fields on thePortal knowledge basesection record page 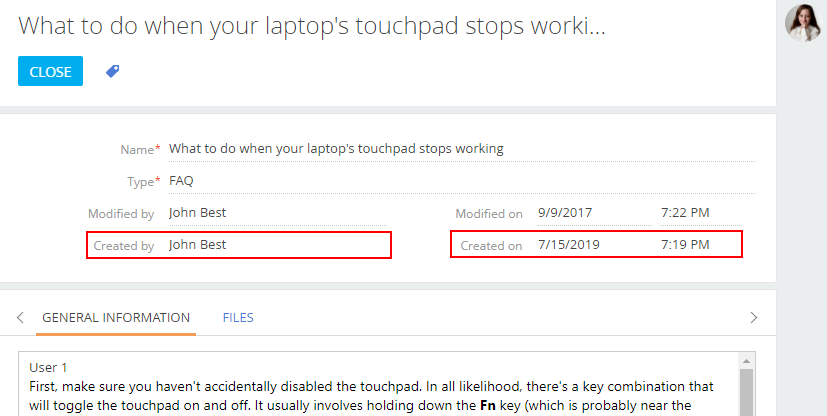
Set up portal workplaces
To set up the sections of a portal workplace:
-
Click
→ "Set up view" → "Workplace setup." -
Select the needed workplace with a "Portal" type from the list → Open (Fig. 13).
Fig. 13 Open a portal workplace 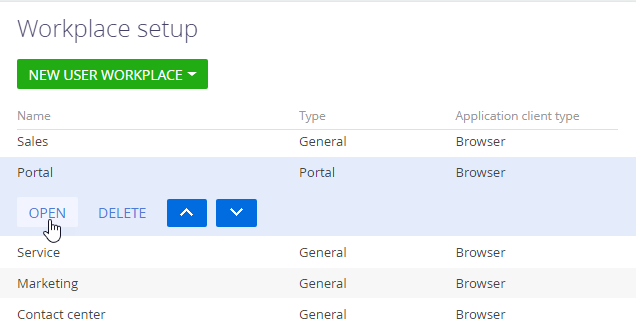
As a result, the workplace setup page will open. From here, you can add an existing section to the portal, create and add a new custom section, or edit an existing portal section.