You can manage access rights to the information that you add in Creatio. For example, when registering a new account record, you can specify users who have access to it.
You can manage access rights to certain operations with the records. There are three groups of such operations: read, edit, and delete. For example, the access to the “read” operation means that the user or user group can view the record in the section and open its page.
For each operation, you can choose one of two permissions:
-
Granted – the right to read, change, or delete a record.
-
Granted/Delegation permitted – the right to perform the operation on the record, as well as to manage access rights to this operation.
Note
If some access level is disabled it means that you don’t have access to a record.
By default, the user who has created a record has the right to perform and delegate all operations with the record. The default access rights to records are defined by the system administrator.
To manage access rights to a record, open the page of the record and select the [Access rights] command in the [Actions] menu.
Contents
1.Open the page of the record whose access rights must be changed.
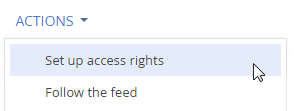
2.Select the [Set up access rights] command (Fig. 1) in the [Actions] menu.
Fig. 1 Switching to access rights setup

3.On the opened access rights page, click the [Add] button and select the operation for which permissions must be set. For example, to grant the right to edit the record, select the [Edit access right] command.
4.In the opened window, select the user or user group for which access rights must be granted. For example, to grant the edit permission to all employee users, select the “All employees” user group. As a result, a new rule will be added to the corresponding page detail. The rule will determine access rights for the selected user or user group to the selected operation on the current record. By default, the access rights to the operation are always defined as “Granted”.
5.Tap the [Save] button.
1.Open the edit page of the record whose access rights must be changed.
2.Select the [Set up access rights] command in the [Actions] menu.
3.On the opened access rights page, in the Read, Edit, or Delete detail, select the record to modify. For example, to allow the user to delegate the right to edit the record, in the Edit detail, select the record that contains the name of this user.
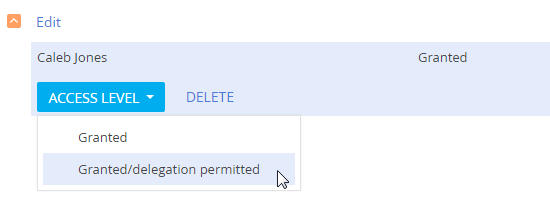
4.In the [Permission] menu, select the permission that must be set. For example, to allow the user manage access rights to the selected operation, select the [Granted/Delegation permitted] command (Fig. 2).
Fig. 2 Changing access rights for the record

5.Tap the [Save] button.
1.Open the edit page of the record whose access rights must be changed.
2.Select the [Set up access rights] command in the [Actions] menu.
3.On the opened access rights page, on the Read, Edit, or Delete details, select the access rights to be canceled and delete it. For example, to restrict the right to edit the record for all users, select the “All employees” record in the Edit detail and click [Delete].
Video tutorials
•User and role management, access permissions


