To use Windows authentication via the NTLM protocol, first add system users (manually or by importing from LDAP) and license them. Users will need to allow writing local data to cookie files in their browsers to be able to store the data locally.
The authentication setup is performed on the application server and consists of two steps:
-
IIS server setup that activates authentication using the NTLM protocol. Read more >>>
-
Web.config file setup of the loader application that defines authentication providers and users availability check order among those registered in Creatio. Read more >>>
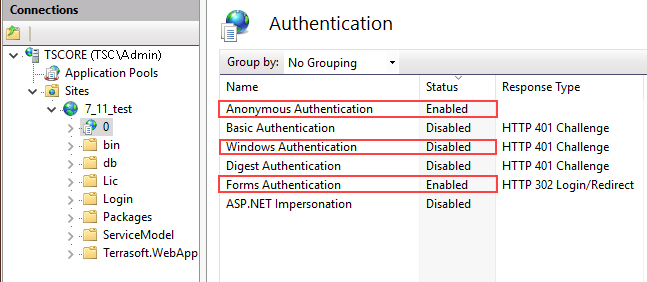
1.Enable anonymous authentication and form authentication for both the web application and loader application (Fig. 1).
Fig. 1 Authentication settings for the loader application in IIS
Note
Make sure you disable the “Windows Authentication” setting that is enabled in IIS by default.
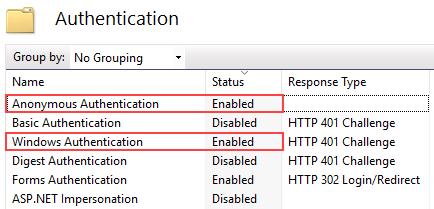
2.Disable the form authentication; enable anonymous authentication and Windows authentication for the “Login” directory within the loader application (Fig. 2).
Fig. 2 Login directory settings
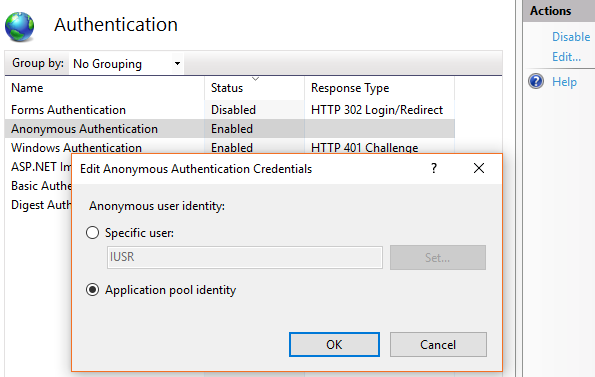
Please note that anonymous authentication of the loader application and working applications must be conducted under application pool identity. To enable this, edit anonymous authentication credentials by clicking the [Edit] button in the [Actions] area of the IIS manager and select [Application pool identity] (Fig. 3).
Fig. 3 Entering credentials for anonymous authentication in IIS
Note
Read more about Windows Authentication in the Microsoft documentation.
Setting up Web.config file of the loader application
1.Open the Web.config file of the loader application to be edited.
2.In this file, specify the Windows Authentication providers:
auth providerNames="InternalUserPassword,SSPLdapProvider,Ldap"
autoLoginProviderNames="NtlmUser,SSPNtlmUser"
[InternalUserPassword] – provider that is specified in the Web.config file by default. If you want to provide NTLM authentication only for the users who are not synchronized with LDAP, do not specify an additional value for the providerNames parameter.
[Ldap] – add this provider to the [providerNames] parameter values. As a result, the users who are synchronized with LDAP will be able to perform NTLM authentication.
[SSPLdapProvider] – add this parameter to the [providerNames] parameter value for the users of the self-service portal who are synchronized with LDAP to be able to perform NTLM authentication.
[NtlmUser] – add this provider to the [autoLoginProviderNames] parameter value. As a result, the users will able to perform NTLM authentication regardless of their synchronization with LDAP and the authentication type configured for these Creatio users.
[SSPNtlmUser] – add this parameter to the [autoLoginProviderNames] parameter value for the users of the self-service portal to be able to perform NTLM authentication regardless of their synchronization with LDAP and the authentication type configured for these Creatio users.
The record order of the [autoLoginProviderNames] parameter defines the order, in which Creatio checks if the system users are available in the list of application users (NtlmUser) or in the list of the self-service portal users (SSPNtlmUser). For example, if you want the check to be performed among the main application users primarily, place the [NtlmUser] provider at the top of the list of the values of the [autoLoginProviderNames] parameter.
Attention
You can specify the [SSPNtlmUser] provider as an [autoLoginProviderNames] parameter value only if the [NtlmUser] provider is specified additionally. You can use the [NtlmUser] provider separately.
3.If you want to authenticate in Creatio at once, specify the “true” value for the [UsePathThroughAuthentication] parameter of the <appSettings> element:
<appSettings>
<add key="UsePathThroughAuthentication" value="true" />
...
</appSettings>
If you want the login page to be displayed with the available [Log in as domain user] link, specify the “false” value for the [UsePathThroughAuthentication] parameter. The end-to-end authentication will be performed only when accessing application main page. Add “/Login/NuiLogin.aspx” to Creatio website address.
As a result, users will be able to log in to Creatio as domain users. They may still be required to enter their credentials in a domain authentication window, which will pop up on login attempt ().
To prevent displaying of the domain authentication window:
a.Click “Start” –> “Settings” –> “Control Panel” –> “Network and Internet” menu and select “Internet options” (Fig. 4).
Fig. 4 Accessing Internet options of Windows Explorer

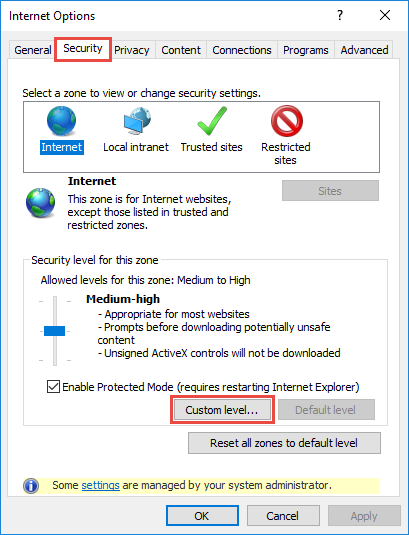
b.In the opened window, select the “Security” tab and click the “Custom level” button to go to security settings (Fig. 5).
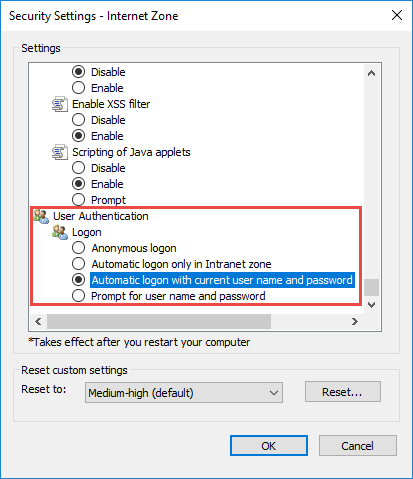
c.In the “User authentication” group of settings, select the “Automatic logon with current user name and password” authentication method (Fig. 6).
Fig. 6 Selecting user authentication method
d.Click “OK”.
As a result, the domain authentication window will not pop up and the users will not have to re-enter their domain credentials each time they access Creatio.
See also


