Base modules
Creatio implements the following base modules:
- ext-base. Implements the ExtJs framework functionality.
- terrasoft in the Terrasoft namespace. Implements access to system operations, core variables, etc.
- sandbox. Implements a mechanism that exchanges messages among modules.
Most client modules use base modules. You do not have to specify base modules in dependencies. After you create a module object, the Ext, Terrasoft, and sandbox objects become available as the this.Ext, this.Terrasoft, and this.sandrenderbox object properties.
Client modules
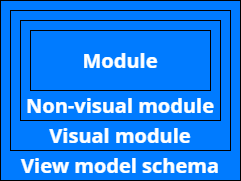
Client module types
- non-visual module
- visual module
- replacing module
View the client module hierarchy below.
Non-visual module
The purpose of a non-visual module is to implement Creatio functionality that is usually not related to binding data and displaying data in the UI. For example, business rule modules (the BusinessRuleModule schema in the NUI package) and utility modules that implement service functions are non-visual modules.
To implement a non-visual module, follow the instructions in a separate article: Client module.
Visual module
Visual modules are modules that implement view models (ViewModel) in Creatio based on the MVVM pattern. Learn more about the MVVM pattern in Wikipedia.
The purpose of a visual module is to encapsulate data visualized in the UI controls and the methods of working with data. For example, section, detail, and page modules are visual modules.
To implement a visual module, follow the instructions in a separate article: Client module.
Replacing module
The purpose of a replacing module is to extend the base module’s functionality. Modules that replace base functionality modules do not support inheritance in its traditional sense. You cannot use the resources of the replaced module in the replacing module. Instead, recreate resources in the replacing schema.
To implement a replacing module, follow the instructions in a separate article: Client module.
Client module methods
Creatio lets you implement the following methods in client modules:
- init(). Implements the logic executed as part of loading the module. The client core calls this method first automatically when loading the module. The init() method usually subscribes to events of other modules and initializes the module values.
- render(renderTo). Implements the module visualization logic. The client core calls this method automatically when loading the module. To ensure data is displayed correctly, the mechanism that binds the view (View) and view model (ViewModel) must be triggered before data visualization. As such, this mechanism is usually initiated in the render() method. by calling the bind() method in the view object. If the module is loaded into a container, Creatio passes the link to that container to the render() method as an argument. The render() method is required for visual modules.
Utility modules
Although module is an isolated software unit, it can use the functionality of other modules. To do this, import the needed module as a dependency. Use a factory function argument to access an instance of a dependency module.
During development, you can group auxiliary and service general-purpose methods into separate utility modules</141>. Import the utility module into a module to use the functionality.
Work with resources
Resources are additional schema properties. Add resources to the client module schema in the properties area of the Module Designer (the /scr_add_button.png) button).
button).
Creatio lets you use the following resources:
- localizable strings (the Localizable strings property)
- images (the Images property)
The [ClientModuleName]Resources module contains the resources that the Creatio core generates for each client module automatically.
To access the resource module from the client module, import the resource module into the client module as a dependency.
Create a visual module
- Open the Configuration section and select a custom package to add the schema.
- Click Add → Module on the section list toolbar.
/scr_add_module.png)
-
Fill out the schema properties in the Module Designer.
- Set Code to "UsrExampleStandardModule."
- Set Title to "ExampleStandardModule."
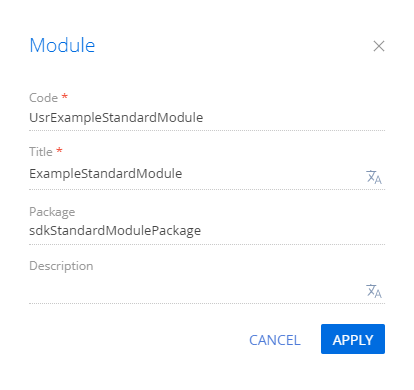
Click Apply to apply the changes.
-
Add the source code in the Module Designer.
- Click Save on the Module Designer’s toolbar.
Outcome of the example
To view the outcome of the example, create the following request string.
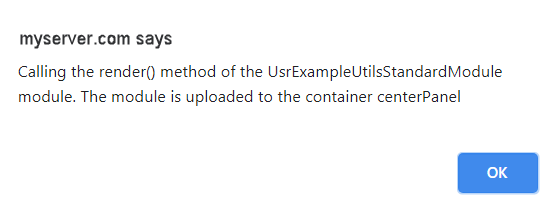
When loading the module, the client core must call the init() method, then the render() method. Each method calls a message box.


1. Create a utility module
- Open the Configuration section and select a custom package to add the schema.
- Click Add → Module on the section list toolbar.
/scr_add_module.png)
-
Fill out the schema properties in the Module Designer.
- Set Code to "UsrExampleUtilsModule."
- Set Title to "ExampleUtilsModule."
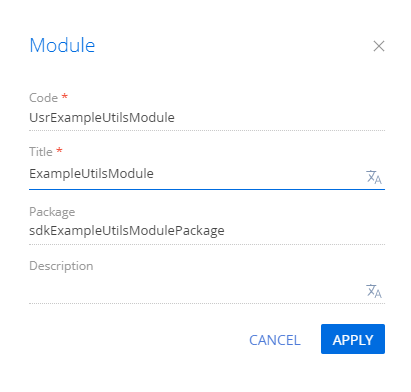
Click Apply to apply the changes.
-
Add the source code in the Module Designer.
- Click Save on the Module Designer’s toolbar.
2. Create a visual module
- Open the Configuration section and select a custom package to add the schema.
- Click Add → Module on the section list toolbar.
/scr_add_module.png)
-
Fill out the schema properties in the Module Designer.
- Set Code to "UsrExampleUtilsStandardModule."
- Set Title to "ExampleUtilsStandardModule."
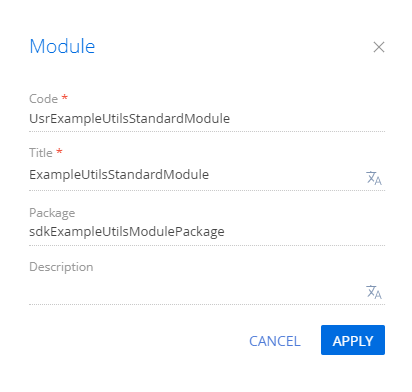
Click Apply to apply the changes.
-
Add the source code in the Module Designer.
- Click Save on the Module Designer’s toolbar.
Outcome of the example
To view the outcome of the example, create the following request string.
When loading the module, the client core must call the init() method, then the render() method. Each method calls a message box.

