Retrieve a webhook in Creatio
To retrieve a webhook in Creatio, prepare your Creatio site, configure the sending service, and connect the two with a Webhook URL. The preparation depends on whether your Creatio is deployed in the cloud or on-site.
Store Webhook URLs in a secure place and limit access to trusted users.
General procedure
- Add the target object to the Webhook entities lookup. Read more >>>
- Set up OAuth 2.0 authorization. Read more >>>
- Grant permissions to the webhook technical user. Read more >>>
- Set up your service to send a webhook. Read more >>>
- Get the Webhook URL. Read more >>>
- Add the Webhook URL to the third-party service. Read more >>>
Add the target object to the Webhook entities lookup
To create records from incoming webhooks, register each target Creatio object in the Webhook entities lookup. The target object can be a section object, an out-of-the-box product object, or a custom entity. Out of the box, the lookup contains the codes of the Contact, Lead, Order, and Submitted form objects.
For security reasons, Creatio parses webhooks only for objects registered in the Webhook entities lookup. Creatio stores incoming webhooks for 90 days by default and then deletes them. To change the retention period for each status, adjust the values in the Webhook status lookup.
To register an object, open the Webhook entities lookup (Manage lookup values) and add the code of the target Creatio object.
Set up OAuth 2.0 authorization
Creatio uses OAuth 2.0 to authorize the webhook service.
- If you use Creatio in the cloud, the OAuth 2.0 settings are included out of the box.
- If you use Creatio on-site, set up OAuth 2.0 authorization for the webhook service (Set up client credentials grant) using the following credentials:
Parameter | Parameter value |
|---|---|
Name | Webhook Account Service Identity |
Application URL |
|
Then verify that the following system settings are populated:
- "Identity server Url" (
IdentityServerUrlcode) system setting - "Identity server client id" (
IdentityServerClientIdcode) system setting - "Identity server client secret" (
IdentityServerClientSecretcode) system setting - "SocialAccountServiceUrl" (
SocialAccountServiceUrlcode) system setting
If the values of these settings are empty, contact Creatio support.
Grant permissions to the webhook technical user
The "Creatio Webhook Service" (WebhookService code) technical user authenticates and processes incoming webhooks. This user has no permissions out of the box — grant it explicit object permissions for every target object you added to the Webhook entities lookup. Learn more: Manage technical users, Object operation permissions.
Set up your service to send a webhook
Configure the sending service to POST each webhook to the Webhook URL with a JSON or FormData body. Webhooks carry structured parameters — use a dedicated file-transfer mechanism if you need to send attachments. For security reasons, avoid passing special characters in the webhook body.
To create a Creatio record automatically, include the parameters described below. To run your own processing instead, omit the EntityName parameter and build a custom business process.
Required webhook structure
For Creatio to create a record automatically, include the following parameters in the webhook body:
EntityName— the value matches an object code registered in the Webhook entities lookup.- Codes of the target Creatio object columns and their values.
For example:
"Name": "John Best",
"Email": "j.best@ourcompany.com",
"MobilePhone": "+1 212 542 4238",
"CountryId": "f8af0e88-f36b-1410-fa98-00155d043204",
"EntityName": "Contact"
where:
EntityNameis "Contact" — the code of the target "Contact" Creatio object.Name,Email,MobilePhone, andCountryIdare the codes of the "Full name", "Email", "Phone", and "Country" columns of the "Contact" object.- "John Best", "j.best@ourcompany.com", "+1 212 542 4238", and "f8af0e88-f36b-1410-fa98-00155d043204" are the values to write into those columns.
To store the webhook in Creatio without creating a record, send it without the EntityName parameter. Use this when you want to handle the data with a custom business process.
Map webhook fields to Creatio columns
-
Match the field type in the sending service to the column type in Creatio. For example, use a "Date" type field to pass a birth date.
-
For lookup columns, use the column code with the
Idsuffix as the field name and pass the lookup value's ID as the field value. For example, to set the value of the Country field on a contact to "Canada," include the following parameter:"CountryId": "f8af0e88-f36b-1410-fa98-00155d043204"where
f8af0e88-f36b-1410-fa98-00155d043204is the ID of the "Canada" value in the Countries lookup. -
If the sending service cannot pass a specific value to a "Dropdown" column, pass the value through a separate text column such as Notes instead. Do not pass the value through a "Lookup" column.
Use custom processing
To run your own logic on incoming webhooks — for example, to validate data, send a notification, or skip record creation — build a custom business process and deactivate the out-of-the-box "Create object records based on incoming webhooks" business process. Instructions: Process webhooks in Creatio.
Get the Webhook URL
The Webhook URL is the endpoint that the sending service posts data to. To get it:
-
Open the needed section. For example, Contacts.
-
Open the Web forms and pages settings. To do this, click Data import → Web forms and pages in the top right.
-
Click Other landing pages in the right menu.
-
Click Get the Webhook URL (Fig. 1). The URL is copied to your clipboard automatically.
Fig. 1 Get the Webhook URL 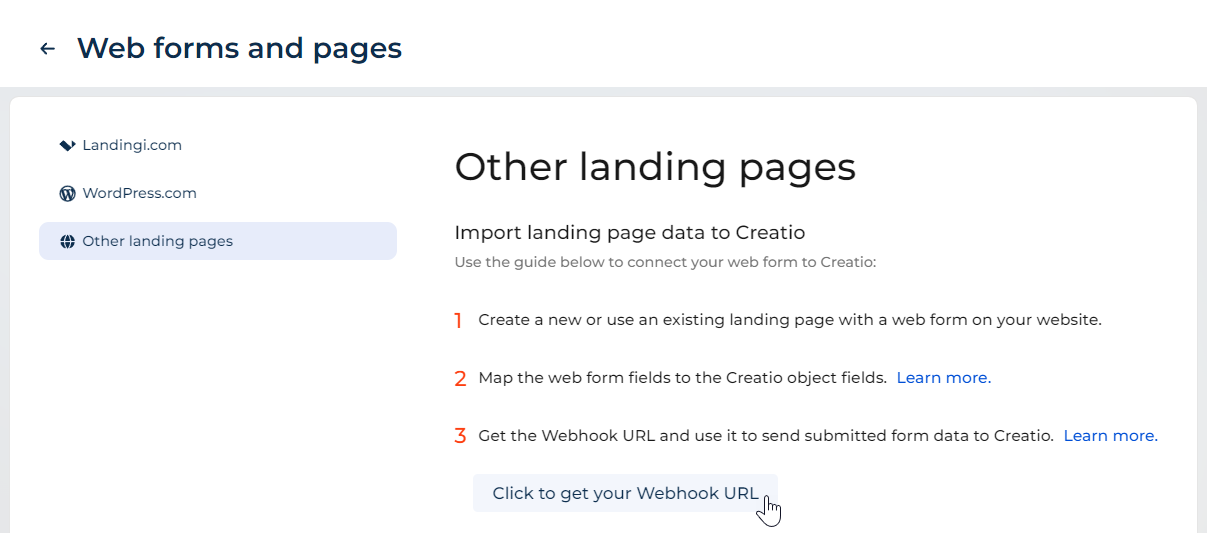
Get a unique Webhook URL for each sending service. Sharing a URL across services makes it harder to monitor traffic and trace incidents.
Add the Webhook URL to the third-party service
Paste the Webhook URL into the webhook configuration of the sending service, following the vendor's setup steps. To verify the connection before going live, you can send a test webhook from the sending service and confirm it appears in the Webhooks section of the Studio workplace.
As a result, the sending service can deliver webhooks to Creatio. New webhooks appear in the Webhooks section of the Studio workplace, where you can review parsed results and any parsing errors.
See also
Set up client credentials grant
Integrate with landing pages and web forms
Tech Hour: Webhooks. Integrating with Landingi, Wordpress and MS Forms