Implement a subscriber to a WebSocket message
Publish the NewMessage message in the back-end when you save a contact. Send the message via WebSocket. The message must include the contact birthday and name. Implement the NewMessage message sending in the front-end. Display messages in the browser console.
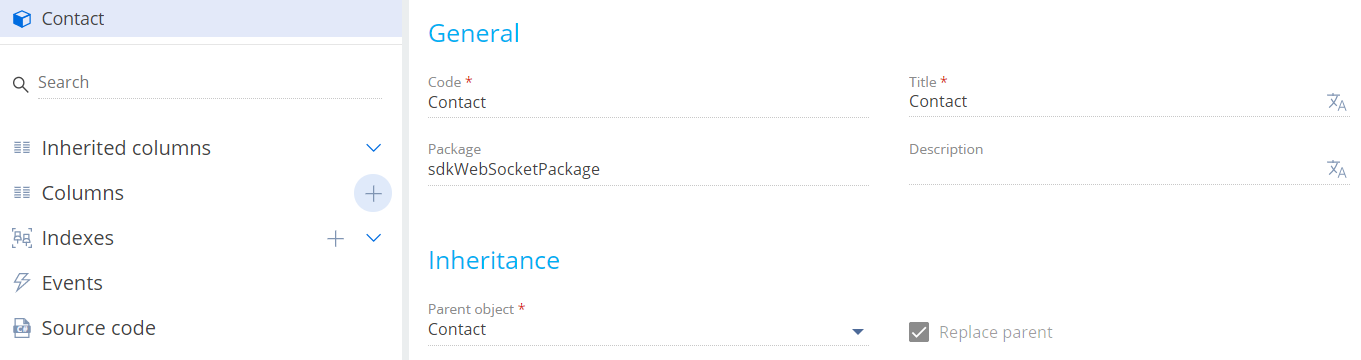
1. Create a replacing object schema
-
Open the Configuration section and select a custom package to add the schema.
-
Click Add → Replacing object on the section list toolbar.
/scr_add_entity_schema_replaced.png)
-
Fill out the schema properties.
- Set Code to "Contact."
- Set Title to "Contact."
- Select "Contact" in the Parent object property.
-
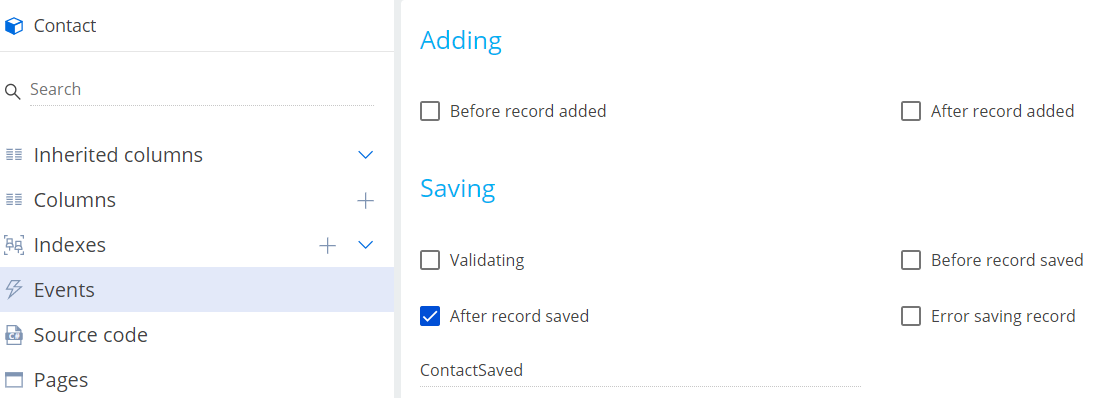
Add an event to the schema.
-
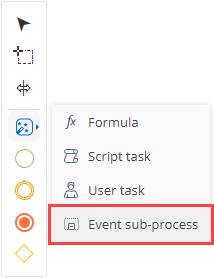
Implement an event sub-process.
-
Click Open process on the Object Designer's toolbar.
-
Click System actions in the element area of the Designer and drag the Event sub-process element to the working area of the Process Designer.
-
Set the Title property in the element setup area to "Contact Saved Sub-process."
-
Set up the event sub-process elements.
-
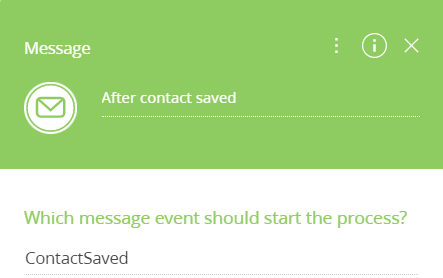
Set up the Message start event.
- Set Title to "After contact saved."
- Set Which message event should start the process? to "ContactSaved."
-
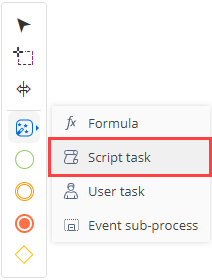
Add the Script task system action.
-
Click System actions in the element area of the Designer and drag the Script task system action to the working area of the sub-process.
-
Name the Script task system action "Publish a message via WebSocket."
-
Add the code of the Script task system action.
Code of the Script task system action/* Receive the contact name. */
string userName = Entity.GetTypedColumnValue<string>("Name");
/* Receive the date of the contact birthday. */
DateTime birthDate = Entity.GetTypedColumnValue<DateTime>("BirthDate");
/* Generate the message text. */
string messageText = "{\"birthday\": \"" + birthDate.ToString("s") + "\", \"name\": \"" + userName + "\"}";
/* Set the message name. */
string sender = "NewMessage";
/* Publish the message via WebSocket. */
MsgChannelUtilities.PostMessageToAll(sender, messageText);
return true; -
Click Save on the Process Designer's toolbar.
-
-
-
Set up the sequence flow. Click
 in the menu of the Message start event and connect the Message start event to the Publish a message via WebSocket system action.
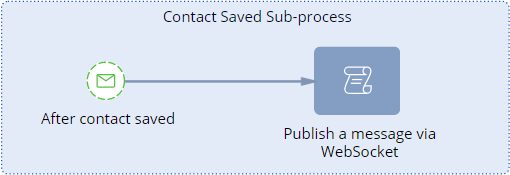
View the event sub-process in the figure below.
-
-
Click Save then Publish on the Process Designer's toolbar.
2. Implement message sending in Creatio
-
Open the Configuration section and select a custom package to add the schema.
-
Click Add → Replacing view model on the section list toolbar.
/scr_add_replacing_module.png)
-
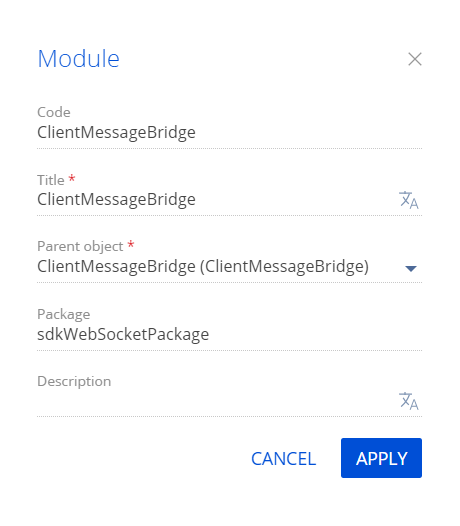
Fill out the schema properties.
- Set Code to "ClientMessageBridge."
- Set Title to "ClientMessageBridge."
- Select "ClientMessageBridge" in the Parent object property.
-
Implement sending of the
NewMessagebroadcast message.-
In the
messagesproperty, bind theNewMessagebroadcast message that can be published in Creatio. -
Overload the following parent methods in the
methodsproperty:init(). Adds a message received via WebSocket to the schema's message configuration object.afterPublishMessage. Monitors the message sending.
View the source code of the replacing view model schema below.
ClientMessageBridgedefine("ClientMessageBridge", ["ConfigurationConstants"], function(ConfigurationConstants) {
return {
/* Messages. */
messages: {
/* Message name. */
"NewMessage": {
/* Broadcast message. */
"mode": Terrasoft.MessageMode.BROADCAST,
/* The message direction is publishing. */
"direction": Terrasoft.MessageDirectionType.PUBLISH
}
},
/* Methods. */
methods: {
/* Initialize the schema. */
init: function() {
/* Call the parent method. */
this.callParent(arguments);
/* Add a new configuration object to the collection of configuration objects. */
this.addMessageConfig({
/* The name of the message received via WebSocket. */
sender: "NewMessage",
/* The name of the WebSocket message sent in Creatio via sandbox. */
messageName: "NewMessage"
});
},
/* Method executed after the message is published. */
afterPublishMessage: function(
/* The name of the message used to send the message. */
sandboxMessageName,
/* Message body. */
webSocketBody,
/* Result of sending the message. */
result,
/* Configuration object that sends the message. */
publishConfig) {
/* Verify that the message matches the message added to the configuration object. */
if (sandboxMessageName === "NewMessage") {
/* Save the body to local variables. */
var birthday = webSocketBody.birthday;
var name = webSocketBody.name;
/* Display the body in the browser console. */
window.console.info("Published message: " + sandboxMessageName +
". Name: " + name +
"; birthday: " + birthday);
}
}
}
};
}); -
-
Click Save on the Designer's toolbar.
3. Implement subscription to the message
-
Open the Configuration section and select a custom package to add the schema.
-
Click Add → Replacing view model on the section list toolbar.
-
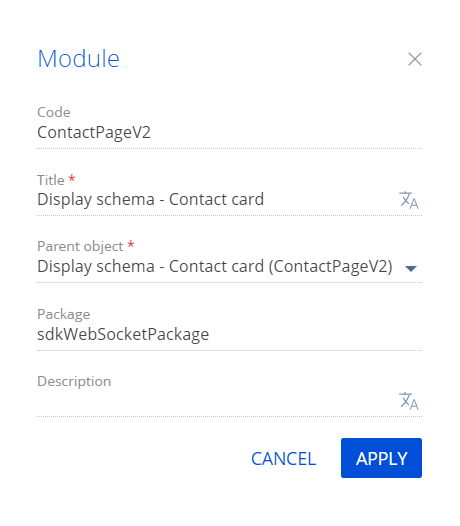
Fill out the schema properties.
- Set Code to "ContactPageV2."
- Set Title to "Display schema - Contact card."
- Select "ContactPageV2" in the Parent object property.
-
Implement subscription to the
NewMessagebroadcast message.- In the
messagesproperty, bind theNewMessagebroadcast message to subscribe. - Overload the
init()parent method in themethodsproperty. The method subscribes to theNewMessagemessage. Implement theonNewMessage()handler method that handles the object received in the message and returns the result to the browser console.
View the source code of the replacing view model schema below.
ContactPageV2define("ContactPageV2", [], function(BusinessRuleModule, ConfigurationConstants) {
return {
/* Object schema name. */
entitySchemaName: "Contact",
messages: {
/* Message name. */
"NewMessage": {
/* Broadcast message. */
"mode": Terrasoft.MessageMode.BROADCAST,
/* The message direction is subscription. */
"direction": Terrasoft.MessageDirectionType.SUBSCRIBE
}
},
/* Methods. */
methods: {
/* Initialize the schema. */
init: function() {
/* Call the parent method. */
this.callParent(arguments);
/* Subscribe to the NewMessage message. */
this.sandbox.subscribe("NewMessage", this.onNewMessage, this);
},
/* Handle the reception event of the NewMessage message. */
onNewMessage: function(args) {
/* Save the message body to local variables. */
var birthday = args.birthday;
var name = args.name;
/* Display the body in the browser console. */
window.console.info("Received message: NewMessage. Name: " +
name + "; birthday: " + birthday);
}
}
};
}); - In the
-
Click Save on the Designer's toolbar.
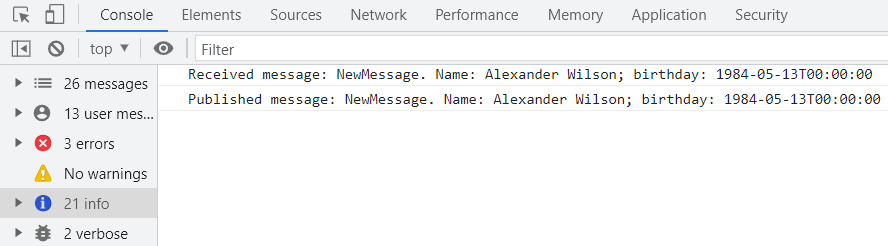
Outcome of the example
To view the outcome of the example:
- Clear the browser cache.
- Refresh the Contacts section page.
- Open the contact page. For example, Alexander Wilson.
- Open the Console tab in the browser console.
- Modify an arbitrary field.
- Save the contact.
As a result, the browser console will display the received and sent NewMessage messages.