Import data from other web pages
You can import data to Creatio from any web pages with web forms that support webhook functionality. For example, you can import records into Creatio from web pages using Microsoft forms. This method of registration or data collection is often used within companies or for closed events that have a few participants.
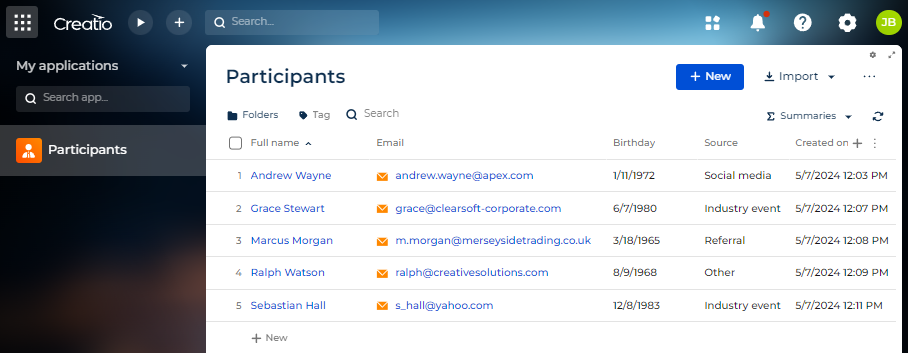
Register participants to the event using web form and import registration data of all the participants to the Participants custom section of Creatio (Fig. 1). To do this, use the Power Automate app as a webhook service and the Microsoft Forms app as an example of landing page. To use the functionality of business Microsoft apps, you need Microsoft office business license.
General procedure to set up data import:
- Create and set up the Participants custom app.
- Set up the "Participant registration form" Microsoft form.
- Automate the processing of Microsoft form responses.
- Connect the Power Automate app to Creatio.
- Map the Creatio object columns to the Microsoft form fields.
- Check how the integration works.
Step 1. Create and set up the Participants custom app
You can import data to the existing Creatio object only. For this example, create a Participants custom app that includes one section. To do this:
-
Create an app based on the Records & business processes template. Instructions: Create an app manually.
-
Set up the participant page that includes the following fields (Fig. 2):
- Full name field of "Text" type. Includes first and last names of participant.
- Email field of "Email" type. Includes email of participant.
- Birthday field of "Date/Time" type. Includes birthday of participant.
- Source field of "Dropdown" type. Includes the source from which the participant came to register for the event. Create and fill out the Participant source lookup that stores the sources. Available sources: "Industry event," "Referral," "Social media," "Other."
Fig. 2 Participant page example 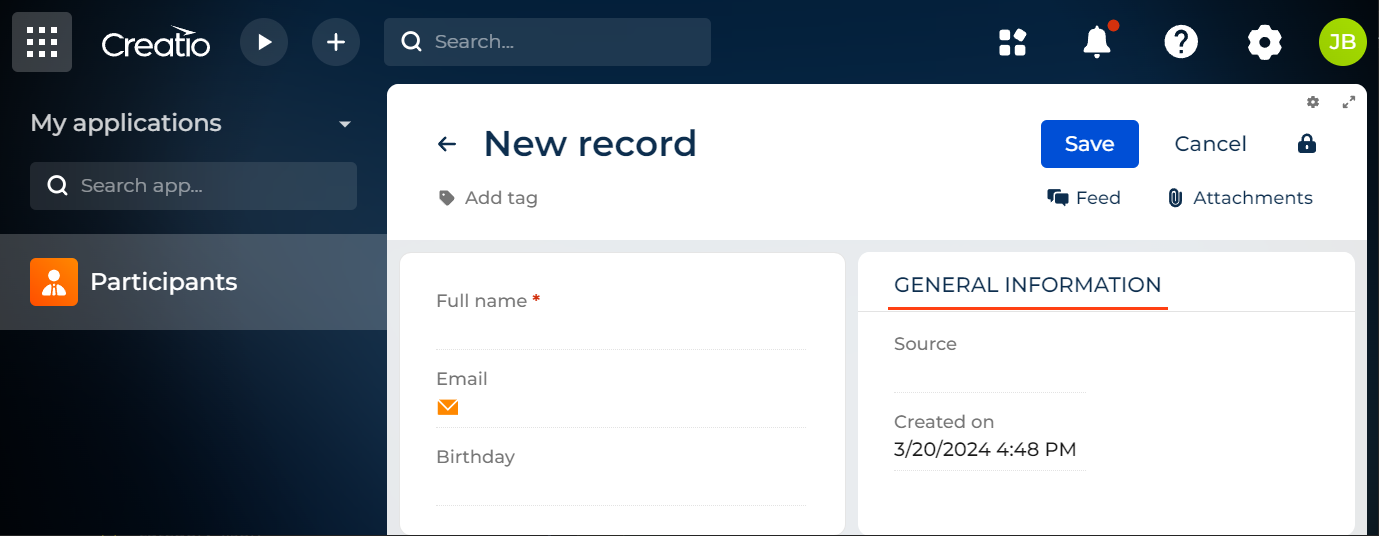
Step 2. Set up the "Participant registration form" Microsoft form
Create a web page that includes the registration form. This page will be available for participants to sign up for the event.
For this example, set up the "Participant registration form" that includes the following fields (Fig. 3):
- Full name field of "Text" type. Includes first and last names of participant.
- Email field of "Text" type. Includes email of participant.
- Birthday field of "Date" type. Includes birthday of participant.
- How did you hear about us? field of "Choice" type. Includes the source from which the participant came to register for the event. Available sources: "Industry event," "Referral," "Social media," "Other."
Instructions: official vendor documentation.

Step 3. Automate the processing of Microsoft form responses
-
Create a new flow for the Microsoft form.
-
Open the Power Automate app → My flows → New flow → Automated cloud flow. This opens the list of flow properties.
-
Fill out the flow properties.
Property
Property value
Flow name
Flow of participant registration form
Choose your flow's trigger
When a new response is submitted
-
Click Create.
As a result, the flow will be created without connection to any Microsoft form (Fig. 4).
Fig. 4 Flow for Microsoft form 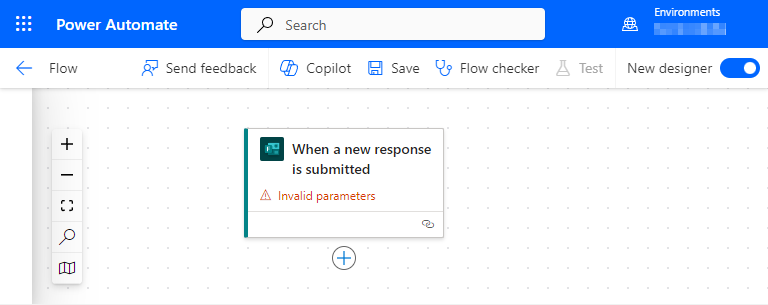
-
Add the operation that triggers a flow when a new response is submitted (Fig. 5).
-
Click on the When a new response is submitted operation. This opens the list of operation parameters.
-
Fill out the operation parameters.
Parameter
Parameter value
Form Id
Participant registration form
Fig. 5 Parameters of the When a new response is submitted operation 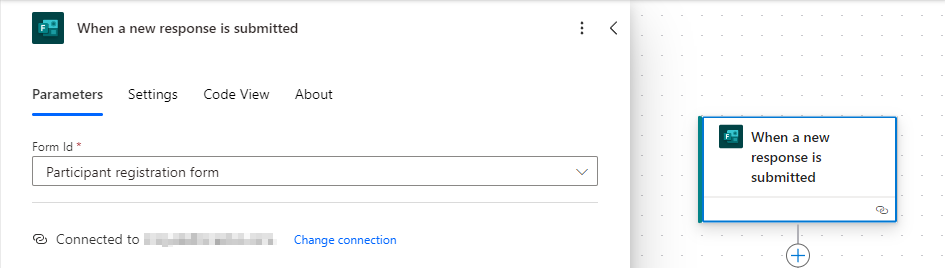
-
-
-
Add an action that retrieves a form response.
-
Click + → Add an action → Microsoft Forms → Get response details. This opens the list of response parameters.
-
Fill out the response parameters (Fig. 6).
Parameter
Parameter value
Form Id
Participant registration form
Response Id
 → Response Id
Fig. 6 Response parameters 
-
-
Add an action that replaces a value specified in the How did you hear about us? field by an appropriate ID specified in the Participant source lookup (Fig. 7). It helps to create the webhook of an identifiable structure that the Creatio can parse.
-
Click + → Add an action → Compose. This adds the Compose action.
-
Implement the function that replaces a string with a given string. To do this, click
 → Function tab →
 replace(text, oldText, newText)function.Where:
textis the list of available values specified in the How did you hear about us? field. To select the value, open the Dynamic content tab → select Body.oldTextis a single value specified in the How did you hear about us? field.newTextis an ID specified in the Participant source lookup that corresponds to the value specified in theoldTextparameter.
View the example of the function that replaces the "Industry event" value specified in the How did you hear about us? field by the appropriate ID specified in the Participant source lookup below.
replace(body('Get_response_details')?['re0ff0fa4569848d8a8f8d92b35dd48eb'], 'Industry event', '6af5dffe-4326-4c7a-9175-9c0e09cf8a35')View the example of the function that replaces values specified in the How did you hear about us? field by the appropriate ID specified in the Participant source lookup step-by-step below.
replace(replace(replace(replace(body('Get_response_details')?['re0ff0fa4569848d8a8f8d92b35dd48eb'], 'Industry event', '6132dc0a-c00c-47dc-a3e3-7e801afd6596'), 'Referral', '150dfd80-b889-4843-b7f9-d8a50d9d0268'), 'Social media', '3b938856-94cd-4146-9c12-42ae52205fb9'), 'Other', 'f9b5333d-473d-461d-9701-72881596c5d7')
Fig. 7 Compose action 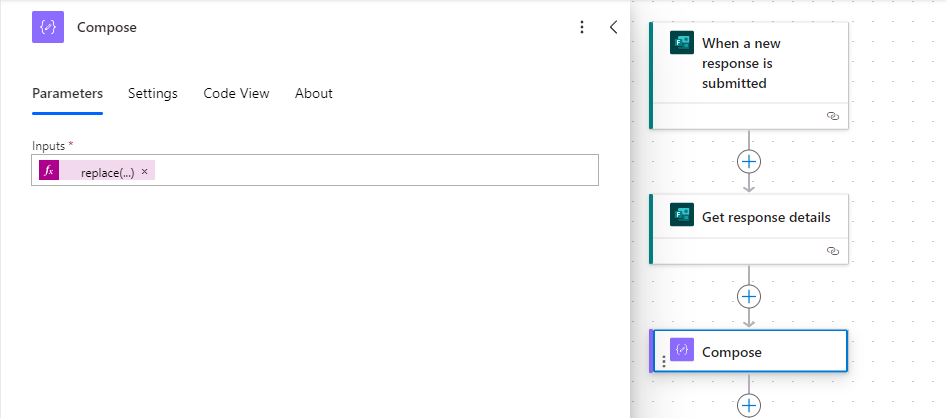
-
As a result, the Power Automate app will automate a flow that determines the order of processing the Microsoft form responses. The flow will create the webhook of an identifiable structure that Creatio can parse.
Step 4. Connect the Power Automate app to Creatio
The Microsoft form sends data to Creatio using webhooks. Therefore, set up retrieval of this data in Creatio. To do this:
-
Set up the request method for the webhook service in the Power Automate app.
-
Click + → Add an action → HTTP webhook. This opens the list of integration parameters.
-
Fill out the integration parameters.
Parameter
Parameter value
Subscribe Method
POST
-
-
Get the Webhook URL to connect the Microsoft form to Creatio to import data.
-
Add the Webhook URL to connect the Microsoft form to Creatio. To do this, open the "Flow of participant registration form" flow in the Power Automate app and set the Subscribe URI parameter to the value from the previous step (Fig. 9).
Fig. 9 Add the Webhook URL to the Microsoft form 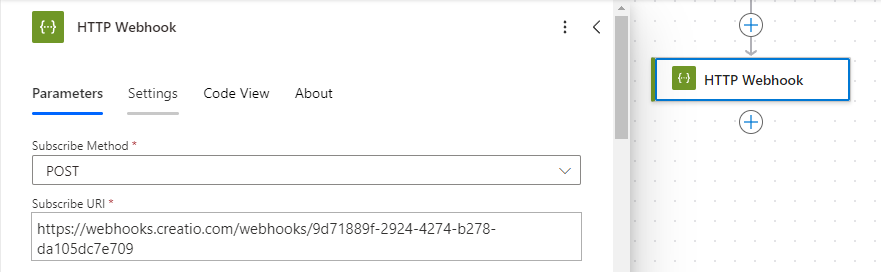

As a result, the webhook service will be connected to Creatio. Creatio will be able to receive webhook from your Microsoft form, but not process it.
We recommend storing your API key in a secure place.
Step 5. Map the Creatio object columns to the Microsoft form fields
Map the Creatio object columns to the Microsoft form fields. This lets Creatio add a record to the Participants custom section based on the incoming webhook. To do this:
-
Receive the code of the Creatio object column. To find the code of the column, open the "Participants form page" using the Freedom UI Designer → element setup area. For example, it is "UsrName" for the Name field (Fig. 10).
Fig. 10 Receive the code of the Name field 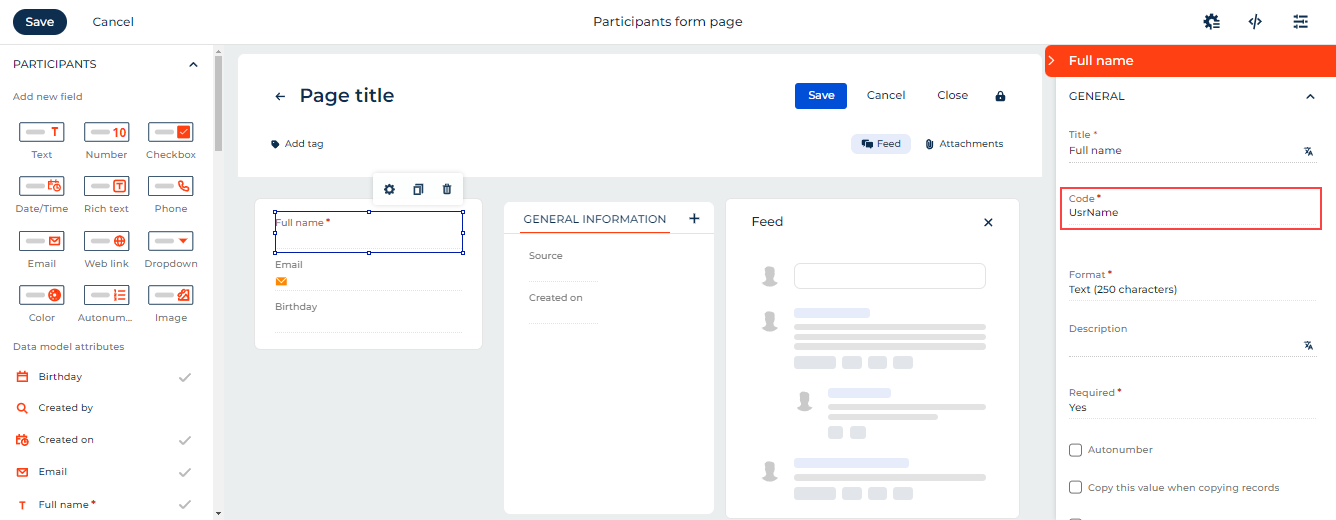
-
Receive the name of appropriate field specified in the Microsoft form. To find the name of the field, click
→ Get response details → select the appropriate field. For example, Full name. -
Map the Creatio object column to the Microsoft form fields in the Subscribe body parameter. Use the following template:
"SomeCreatioObjectColumn": "SomeMicrosoftFormField",For example, it is
"UsrName": "Full name"for the Name field. -
Repeat steps 1-3 to map the values of text and numeric fields.
-
Receive the name of the How did you hear about us? field. To do this, click
→ Compose → Outputs. Use the ID of the Creatio lookup value in the form as the value of the field that has the "Lookup" type. -
Connect the Microsoft form to the Creatio object of the Participants section. To find the code of the section, open the app in the Application Designer → app properties → Application code. For example, it is "UsrParticipants" for the Participants custom app (Fig. 11).
Fig. 11 Receive the code of the Participants app 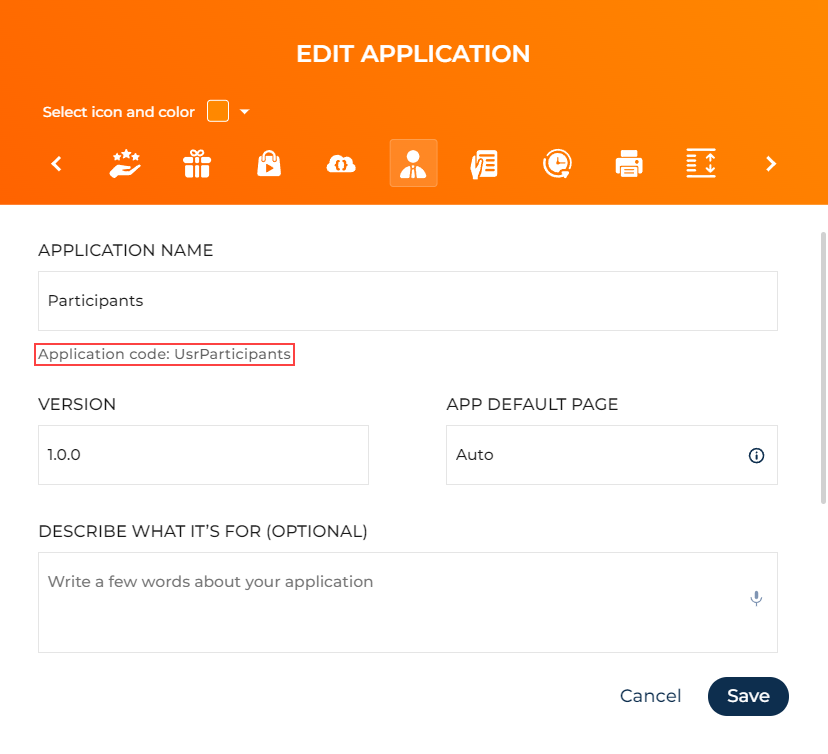
Set the
EntityNameparameter to "UsrParticipants."View the example that maps the columns of the Participants section object to the fields of the "Participant registration form" form below (Fig. 12).
Fig. 12 Subscribe Body parameter 
-
Set up the request headers.
-
Click Advanced parameters → Subscribe Headers. This opens the list of request header parameters.
-
Fill out the parameters of the request header.
Parameter
Parameter value
Key
Content-Type
Value
application/json
-
-
Save the flow (Fig. 13).
Fig. 13 HTTP webhook action 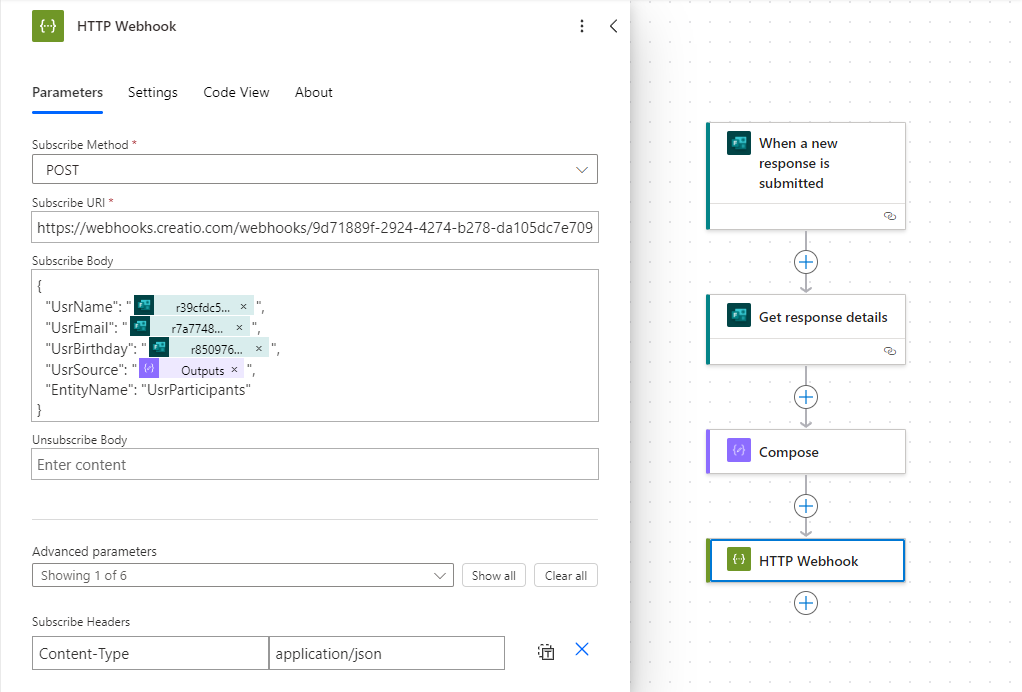
-
Add the Participants object to the Webhook entities lookup. Learn more: Manage lookup values.
As a result, the Microsoft form will be integrated with Creatio and you can start importing data.
Step 6. Check how the integration works
Before you start importing data, check how the integration works using arbitrary data. To do this:
-
Open the "Participant registration form" form.
-
Register an arbitrary participant (Fig. 14).
Fig. 14 Register an arbitrary participant 
-
Check whether Creatio added the registered participant to the Participants section.
If the Participants section does not display the participant, check the incoming webhook in the Webhooks section. Learn more: Check whether data was imported to Creatio successfully.