Creatio implements the "Change management" ITSM process in the Changes and Releases sections.
Use the Changes section to register all changes emerging from the IT infrastructure and affecting the provided services. You can also classify the changes by source or goal, track changes implementation, and define the final information about actual working hours.
Use the Releases section to plan the implementation of changes to your IT infrastructure.
Plan changes
In Creatio, you register changes to resolve the problems identified as part of the problem management process. When making changes in the IT infrastructure, it is vital to adequately estimate all possible risks. Making a change to an item in the infrastructure may affect the availability of other configuration items and services.
Relationships and interdependencies between services and configuration items form a common service model, which enables analyzing possible consequences of changes to any of the IT infrastructure components.
To plan the changes to the IT infrastructure, add a record to the Changes section:
-
Open the Changes section → click New change.
-
Populate the change page:
Subject
Brief description of the change. This is a required field.
Description
A detailed description of the change.
Status
Current status of the change. For example, "New" or "In progress". This is a required field.
Priority
The relative importance of the current change. For example, “Low,” “Medium,” “Critical,” etc.
Number
The number of the change. Creatio automatically generates numbers in accordance with a specified pattern. Use the “Change number mask” (ChangeCodeMask) system setting to customize the automatic numbering of the changes. This is a non-editable required field.
Owner
The name of the employee responsible for change implementation.
Assigned team
A group of employees responsible for change implementation. The field lookup contains the list of administration objects: users and user groups. You can customize user groups as the elements of the organizational structure in the System users section.
-
On the Classification tab, populate information about the classification feature of the change.
Goal
The goal of the change. For example, "Innovations and improvements" or "Adjustments."
Category
Change category. For example, "Standard" or "Emergency."
Release
That will include the change.
Source
The origin of the change. For example, select "Customer" if you register the change based on a customer case or select "Legislation" if the change assumes regulated corrections.
Author
The user who registered the current change.
Reported on
Date and time when the change was registered. The field is non-editable and is populated automatically with the current date and time.
-
On the Configuration items detail, specify the list of configuration items connected to the change. This detail displays information from the Configuration items section. To connect a configuration item to the change, populate the Change detail on the History tab of the corresponding configuration page. Click
 and select the needed configuration items.
 -
On the Services detail, specify the services connected to the current change. This detail displays information from the Services section. To connect a service to a change, populate the Changes detail on the History tab of the corresponding service page. Click
 and select the needed services.
 -
On the Cases detail, specify the cases that are the source for the current change from the Cases section. To connect a case to a change, fill in the Change field on the Resolution tab of a case page. Click
 and the needed cases.
 -
On the Problems detail, specify the problems that are used as a source for the current change from the Problems section. To connect a problem to a change, populate the Change field on the Resolution tab of the problem page. Click
 and select the needed problems.
-
To remove a problem from the list, click the needed record in the detail list → right click
 → select the Delete option.
-
-
On the Execution tab, populate summary information about the change.
Due date
The planned date of change completion.
Estimated working time (hours)
Planned time required for the change completion.
Parent change
The change that includes the current change. For example, the "Server upgrade" change may include subordinate "OS upgrade" and "Memory boost" changes.
-
On the Activities detail, populate the tasks that are connected to the current change. This detail displays information from the Activities section. To connect an activity to a change, populate the Change field on the Connected to field group of the activity page.
-
On the Email tab, display the emails connected to the current change. To do this, populate the Change field on the Connected to detail of the email page.
-
Click Save.
As a result, a new change record with the connected configuration items, services, and problems will be created in the section list.
Determine the scope of a change
Use the Display dependencies action on a service or configuration item page to view the IT infrastructure items that may be affected by the change:
-
Go to the Changes section and open the needed record.
-
Select the configuration item or service in the corresponding detail on the Classification tab.
-
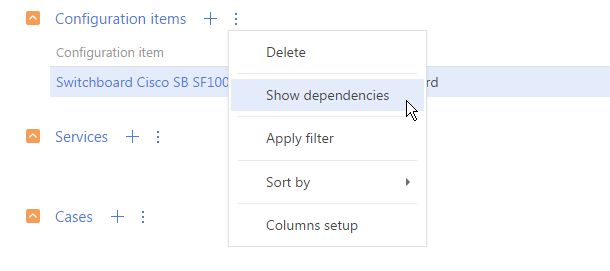
Select the Show dependencies action from the menu of the corresponding detail (Fig. 1).
The service model diagram will open displaying the dependency connections for the configuration item or service (Fig. 2).
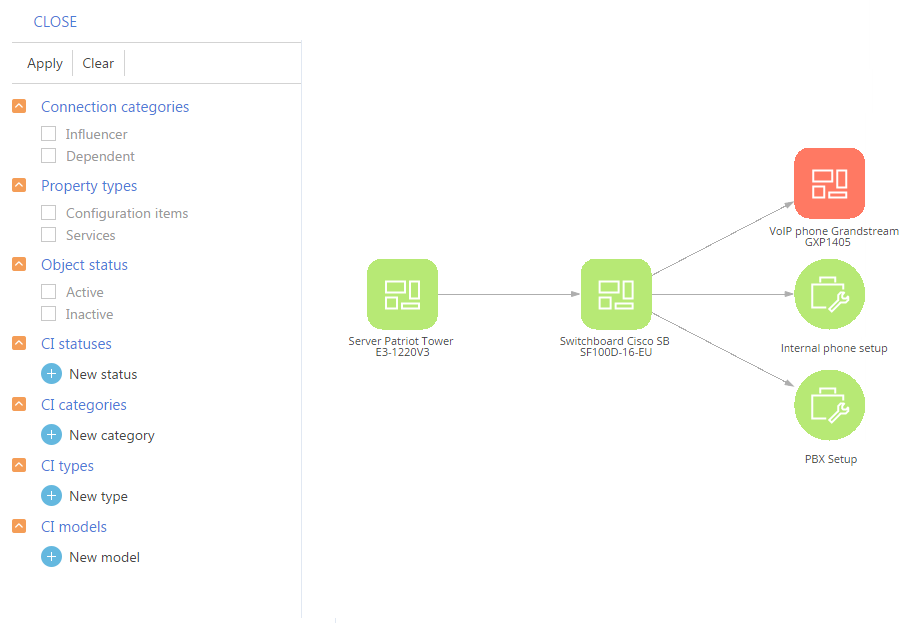
The diagram displays all incoming and outgoing dependencies of the selected configuration item or service. The item at the center of the diagram represents the current configuration item or service. The influencer services and configuration items are to the left, the depending ones are to the right. For example, the diagram (Fig. 3) shows that the switchboard depends on the server, while the “PBX setup” and “Internal phone number setup” services depend on the switchboard.
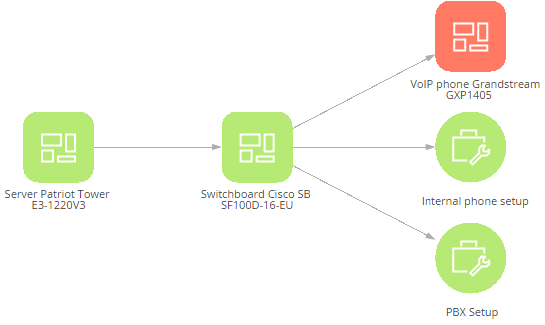
In this case, when planning a change to the switchboard configuration item, you can easily see which depending services (i.e. “PBX setup” and “Internal phone number setup”) and configuration items (i.e. “IP phone”) may be affected.
Release changes
Use the Releases section to manage the updates of products and configuration items, organize the list of new versions (“releases”), monitor the release dates, and manage the list of implemented changes.
To register a new release:
-
Open the Releases section and click New release.
-
Populate additional information about the release on the release page that opens:
Number
The number of the release. Creatio automatically generates numbers in accordance with a specified pattern. Use the "Release number mask" (ReleaseCodeMask) system setting to customize the automatic numbering of releases. This is a non-editable field.
Title
Name of the release.
Description
Short description of the release. The list of all requests fulfilled in the current release.
Status
Current status of the release, for example, “Planned”, “Development” or “Released”.
Priority
Comparative importance of the release.
Type
Type of the release, for example, “Major”, “Minor” or “Emergency fixes“.
-
On the Release profile tab, add information about CIs and services involved in the current release:
-
On the Configuration items detail specify the configuration items that are either updated within the release or connected to it. The detail displays information from the Configuration items section. The information about releases connected to the CI is displayed on the configuration item page, on the Releases detail of the History tab. Click
 and select the needed configuration items.
-
To remove a CI from the detail, click the needed record in the detail list → right click
 → select the Delete option.
-
-
On the Services detail, specify the services that are either updated as part of the release or connected to it. This detail displays information from the Services section. The information about releases connected to the service is displayed on the service page, on the Releases detail of the History tab. Click
 and select the needed services.
 -
On the Team detail, specify the list of contacts and accounts that are involved in the release on certain stages.
Stage
Release stage, for example, “Development“ or “Testing“.
Assignee / Assigned team
One or several employees that are involved in the release. The field lookup contains the list of administration objects: system users and user groups.
-
On the Planning and implementation tab, add information about the scheduled release date, the estimated working time and the team.
Scheduled release date
Estimated date of the release.
Estimated working time (hours)
Working time pre-required to complete the release.
-
On the Scheduling detail, add all scheduled release stages:
Stage
Release stage, for example, “Development“ or “Testing“.
Start
Planned date and time for the release stage.
End
-
On the Activities detail, create a list of tasks for the release implementation.
-
On the Changes detail, specify the list of changes that were the basis of the release. The detail displays information from the Changes section. To connect a change to the release, populate the Release field of the change page.
-
Click Save.
As a result, a new release record with the connected Creatio objects will be added to the section list.