Use data import in Creatio to add large numbers of records. You can add customer databases, lists of products, lookup records and other data in a matter of minutes using .xlxs files.
Use data import to populate your database with records before you start working with Creatio You can also use import for updating existing records.
To import information from an Excel spreadsheet to Creatio:
-
Prepare the imported file in the *.xlsx format. Learn more in the How to prepare a file article. Use the following excel files as templates:
-
Run the Import Wizard: go to a section in which you need to import data and select the Data import action from the Actions button menu. You can import data to details or lookups in the same way. In this case, the object for import will be selected automatically.
-
Add an imported file: drag and drop your Excel file on the Import Wizard page, or click Select file and locate the file. Specify the column mapping by connecting the columns from the Excel file to the fields in the Creatio import object.
-
Select the columns for identifying duplicate records: select columns whose data must be unique for each of the imported records. Depending on whether the value of a column in the imported file coincides with the database value, Creatio either creates a new record or updates the existing record. For example, such a column can be a contact’s “Full name”: if a contact record with the same full name already exists in the database, Creatio updates the existing record, if a contact record with such a full name does not exist, Creatio creates a new record.
-
Run the import process. The process runs in the background.
You can abort data import by stopping the “FileImportProcess“ process in the Process log section. When you cancel the import, the process status changes to “Canceled” and the data import terminates.
Prepare a file
To successfully upload data, make sure the file meets the following criteria:
-
The file is in *.xlsx format.
-
The file is not damaged.
-
The file does not contain active hyperlinks. Disable all active hyperlinks in the file before importing.
-
The file contains a header row of column headers and at least one row of data. If the column headings in your imported file match the field names in Creatio, it will save you time on column mapping during import.
-
The file contains no additional data except for column headers in the first row.
-
The file contains no hidden sheets or rows.
-
The file contains no more than 50,000 rows. This number is an average and may be more or less depending on the number of columns and the amount of information in each column.
-
The file does not contain duplicate data. Creatio will only check the database for duplicate records when importing, but not the file.
Follow these recommendations while entering values in the columns of the imported file:
-
Make sure that the cell formats in the file correspond to the columns in Creatio. For example, for the Full name column, specify "Text" format, and for the Start column, specify "Date" format.
-
If you are importing website addresses, social network page addresses or any other URLs, they must not be active hyperlinks. Disable all active hyperlinks in the file before importing.
-
Specify one of the following date formats for the values:
Here, “MM” is for month, “DD” is for day and “YYYY” is for year.
-
If you import a value to the date/time column, specify the time after the date using a space.
Below are the correct value formats for the date/time fields.
-
The values of Boolean fields, such as Do not use email must be specified in one of the following formats (not case sensitive):
-
Specify the values in the required fields. For example, specify the Full name field for contacts and the Name field for accounts. The exceptions are the required fields, which are automatically populated by default, such as the Status and the Owner fields. If you leave these fields blank, they will be automatically populated with default values. For example, these are the Status and the Owner fields.
-
Be aware that lookup values not found in Creatio will be created automatically. When checking the values, the opening and closing spaces and letter case are not taken into account, while special characters are important. For example, if the imported file has the "customer" value and the Contact types lookup contains the "Customer" value, new values will not be added to the lookup and the record will be linked to the existing lookup value. However, if the “Client” contact type is specified in the import file, a new “Client” value will be added to the Contact types lookup. To avoid duplicates in the Creatio lookups, check the lookup values in the imported file.
Import a customer database
Let's have look at an example of importing customer database from an Excel file.
To import data, go to the Contacts section and perform the Data import action from the Actions button menu. The import page with automatically selected object will open in a new browser tab.
1. Upload a file
Use the first page of the wizard to upload the Excel file to the automatically selected object.
Click the Select file button and choose the Excel file containing your customer database. You can also drag-and-drop the file.
Click the Next button.
2. Set up columns
On the next wizard step, you need to specify the column mapping in your file. Match columns in the selected Creatio object to the columns in the imported file. On this step:
-
If the name of the column in the file corresponds to the name of the column in Creatio, it will be mapped automatically. For example, if the name of the contact in your file is specified in the "Full name" column, the system will automatically map the Full name column on the contact page in Creatio. Automatic mapping is performed for the columns of the main object.
-
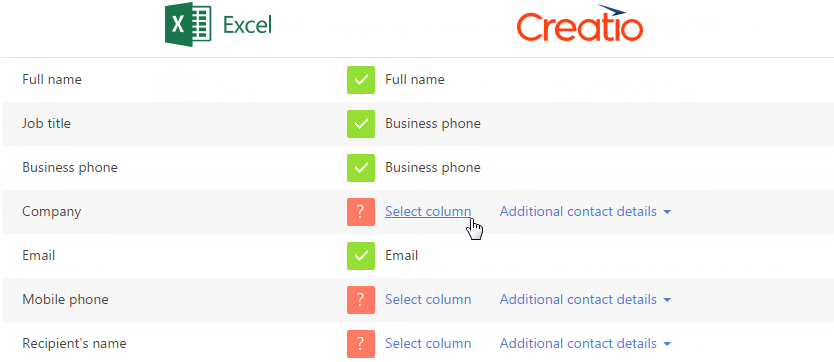
If the column name in the file differs from the column name in Creatio, you need to map that perform column manually. For example, if the imported file with contacts has "Company" column where the contact’s employer company is specified, you need to map the "Company" column from the Excel file to the Account column in Creatio. To do this, click the Select column link (Fig. 1) and select the Account column from the list of contact columns.
3. Import additional information
When importing contacts and accounts, you can also upload additional details of the objects, e.g., records from the Communication options and Addresses details. Use this feature if you need to upload multiple addresses or different communication options of one type, for example, several mobile phone numbers.
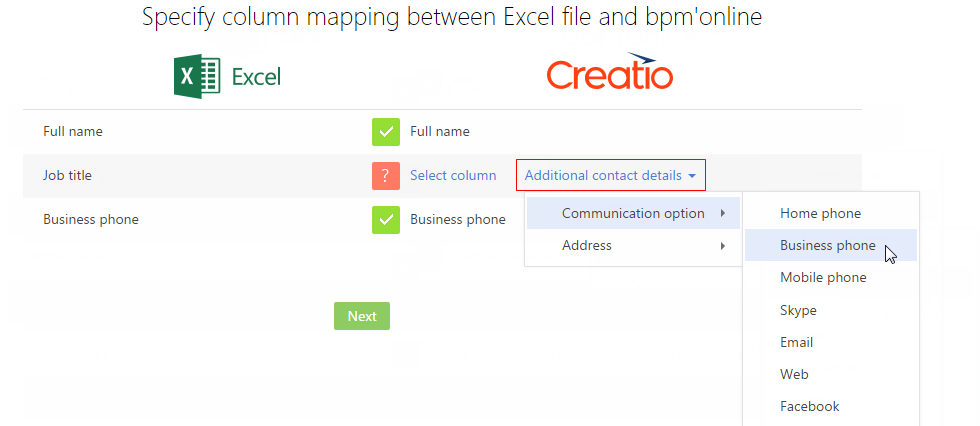
When mapping Communication options and Addresses detail, click the Additional contact details and select the required column (Fig. 1).
Click the Next button to start importing the file.
4. Set up duplicate search parameters
Use the Duplicate management page to specify duplicate search parameters. If duplicate records are found in the import file, only the first record will be uploaded. Duplicates will not be imported.
You can perform a duplicate search by the values of one or several columns.
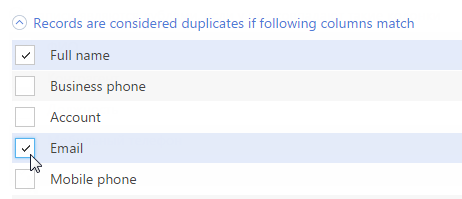
To use a column for duplicate search during import, select the checkbox for this column on the Duplicate management page of the Import Wizard. When selecting several columns for the duplicate search, they are joined using the "AND" logical operator which means that duplicate records will have similar values in both selected columns. For example, you can set the duplicate check for the contacts in the Full name and Email columns (Fig. 1). If several contacts are found with the same full name and email address, only one contact will be uploaded into the system.
5. Upload data
Click the Start data import button after specifying columns for duplicate search. The import process will start. If you close the page, the import will proceed in background mode.
After the import is completed, you will receive a confirmation message with the number of uploaded records. You will also receive a system notification with file name and the number of imported records in the notification center.
Check the import result in the Contacts section. You can go to the list of imported records from the “import finished” message. All imported records will be automatically tagged with the time and date of import. Later you will be able to easily find all imported records, using a filter by the corresponding tag.
You can view information about errors during import in the Excel import log lookup. This lookup contains data about those records that were not imported.
Please note that Creatio will add all lookup values that were specified in the imported file but are not found in Creatio lookups, e.g., cities, contact and account types, etc. If you have not specified the values for the auto-fill fields in the imported file, these fields will be filled with the default values.
Import contact communication options
In addition to the primary contact details of your customers, you can import additional information, such as communication options and addresses. They are located both in the primary object (Contact, Account) and on details on the General information tab.
-
If communication options are contained in the same import file as the primary object records (contacts or accounts), they will be imported along with primary object information. These communication options will be saved both in the primary object (“Contact” or “Account”) and on the Communication options detail. In this case, you can upload only one communication option and address of each type. Communication options and addresses that are located in the primary object can be used to search duplicates during import. For more information, please see the Customer base import article.
-
If communication options and addresses are located in a separate file, they can be imported after importing the customer database. To do this, select “Contact communication option” or “Account communication option” object.
Below is an example of importing communication options from a single file.
Prepare the import file. To do this, enter the contact full names in the first column, enter communication option types, such as “mobile phone” in the second column and the phone numbers in the third column. To import several communication options of the same type for a single contact, add a new row for each phone number in the imported file. The records in the Full name column must match the records of the similar column in the customer database file imported earlier.
Import the prepared To do this:
-
Open the System Designer by clicking the
 button in the top right corner of the application window.
 -
Click the Data import link in the Import and integration block. A data upload page will open in a new tab of your browser.
-
Click the Select file button and specify the prepared import file or drag the file directly to the Import Wizard page.
-
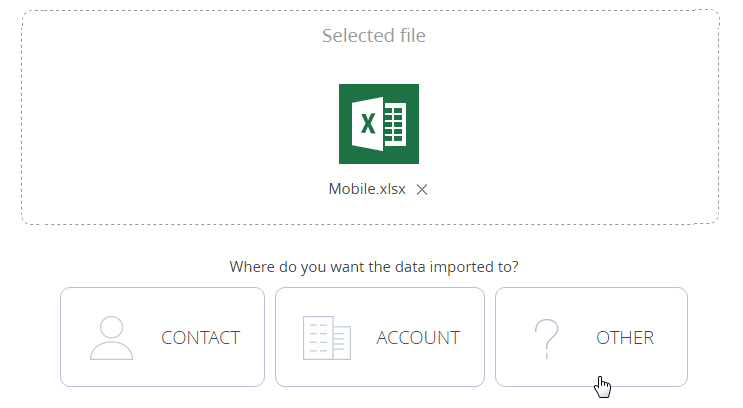
Click the Other button to select an import file (Fig. 1).
-
Select “Contact communication options” from the drop-down list and click the Next button.
-
On the next wizard step, specify the column mapping in your file. In this case, the “Number” and “Type” columns are mapped automatically, and the “Contact name” column must be mapped to the Contact column.
-
On the Duplicate management page, select the “Contact” and “Number” columns. The selected columns will be used to check if the imported records already exist in Creatio. Click the Start data import button.
If you close the page after starting data import, the import will continue on the background. You will receive a notification from the notification center when the import is complete. Check the import result in the Contacts section.
Import contact addresses
Contact records can contain information about several addresses of different types: business, home, delivery, etc. Only one of these addresses can be set as the primary address and copied to the address column of the Contact object.
First, prepare the import file. Each row in the Excel file must contain a contact’s full name that must be identical to the full name value of the contact record, one address and its type. Select the contact’s primary address in the Primary column and set the “True” value. For the rest of addresses, set the “False” value. Specify country, city and postal code in the separate columns of the imported file (Fig. 1).

To import prepared data on the addresses detail:
-
Enter the record of a random contact in the Contacts section.
-
Click the
 button of the Addresses detail and select the Data import action.
 -
Click the Select file button and specify the prepared import file or drag the file directly to the Import Wizard page.
-
On the next step, the “Address”, “City”, “Country”, “ZIP/postal code”, “Primary” and “Address type” columns are determined automatically, and the “Full name” column must be mapped to the Contact column. Click the Next button.
-
Select the Contact, Address type and Address columns on the “Duplicate management” page of the Import Wizard. Click the Start data import button.
The import process runs on the background. After the import is complete, you will receive a message in the notification center. Check import results.
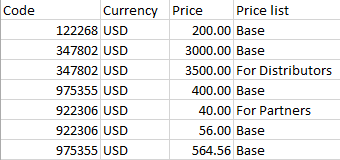
Update product prices
To update multiple product prices, import data on the Prices detail of the Prices and availability tab on the product page. To do this, prepare the import file that contains the following columns:
-
Unique codes of products whose prices must be updated.
-
Currency.
-
New product prices.
-
Price list from which the prices originate.
If the same product is part of several price lists, each price list must have a separate row in the imported file (Fig. 1).
To import data on the Prices detail:
-
Open the record of a random product in the Products section.
-
Click the
 button of the Prices detail and select the Data import action.
 -
Click the Select file button and specify the prepared import file or drag the file directly to the Import Wizard page and click Next.
-
On the next step, map all file columns to corresponding Creatio columns. If the column names in the Excel file are identical to those in Creatio, they will be mapped automatically. Click the Next button.
-
Select the duplicate search parameters: the “Product” (by a unique code) and “Price list” columns. Click the Start data import button.
Creatio will notify you when the import process is complete. You can view the results in the Products section and the detailed information about the import can be found in the Excel import log lookup.
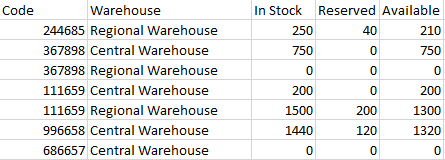
Update information about product availability
To add up-to-date information about product availability in warehouses to Creatio, you can import data to the Availability detail of the Prices and availability tab on the product page.
First, prepare the import file with the following columns:
-
Unique codes of products whose prices must be updated.
-
Warehouse where the product is stored.
-
Number of units available.
-
If several products were ordered but not paid for, specify their quantity in a separate column.
-
Quantity of products in stock.
If identical products are stored in different warehouses, then each of them has to be specified in the import file as a separate row. Products with zero availability must also be specified in the import file (Fig. 1).
To import data from the prepared file to the Availability detail:
-
Open the record of a random product in the Products section.
-
Click the
 button of the Availability detail and select the Data import action.
 -
Click the Select file button and specify the prepared import file or drag the file directly to the Import Wizard page and click Next.
-
On the next page, map all file columns to corresponding Creatio columns. If the column names in the Excel file are identical to those in Creatio, they will be mapped automatically. Click the Next button.
-
Specify the duplicate search parameters by the “Product” (by a unique code) and “Warehouse” columns. Click the Start data import button.
The import process runs on the background. After it is completed, you will receive appropriate notification. The import results can be viewed in the import log or on the Prices and availability tab on the product page.
Excel data import FAQ
Will the field values be overwritten when I reimport data from Excel?
When you import, Creatio analyzes the imported file, identifies the columns (using the title row) and then analyzes the data itself. Creatio checks whether imported records are duplicates, using the columns that you selected on the corresponding step of the import wizard. It is recommended to select columns that contain unique values (those that uniquely identify each record) to avoid errors and save the data. If the records are identified as duplicates, all field values from the file will overwrite the current values. Otherwise, Creatio will create new records with the values from the Excel file. If the file contains empty values for imported columns, the corresponding field values in Creatio will not be deleted.
Why do duplicate records appear after import?
During the import process, Creatio checks imported records for duplicates. To do this, the system uses the columns that you select on the corresponding step of the import wizard. For the records that were identified as duplicates, existing field values will be replaced with those from the imported file (unless the value in the imported file is empty). If you select the columns that contain values that are not unique, duplicate records will not be identified as such. As a result, Creatio will import the records from the Excel file as new Creatio records, thus creating duplicates.
How do I import records to page details?
To import the data on the page detail, go to the detail and select the Data import action from the  button menu. The import page with automatically selected object will open in a new browser tab.
How do I import products with characteristics?
Unlike communication options and addresses, product characteristics cannot be imported along with the product records. The proper import process is divided into several stages.
-
Import a file with all products and general product information, including the Name column, as well as additional Code and Price columns.
-
Next, populate in the Characteristics lookup. If there are only a few characteristics, you can add them manually, by specifying name, type and notes. To import characteristics, open the Characteristics lookup and run the Data import action from the Actions button menu. The file for import must contain at least two columns: The “Name” column, which will contain the names of all characteristics, and the “Value type” column with values like “String”, “Integer”, “Decimal”, etc.
-
After adding all product characteristics to the lookup, you can start importing records on the Features detail of the Products section. This table must contain separate columns for product name, feature name and feature value.
How do I import opportunities with products?
Importing opportunities with products is done in two stages: first import opportunities, then import opportunity products. Prepare an excel file with opportunity records and another file with opportunity products that has columns for opportunity and product names.
-
Go to the opportunities section and run the Data import action from the Actions button menu. Upload the table with opportunities.
-
Open a random opportunity record and run the Data import action from the
 button of the Products detail. Please note that opportunity names must be unique and match the names of imported opportunities. If you have several opportunities with identical names, the corresponding products will be added to the first opportunity in the list. Likewise, the product names must match the products in the Product section. Otherwise, new product records will be added in the Products section.
How do I import leads with customer need types?
To import leads with the Customer need field, add the corresponding column to the imported Excel file. If the customer need column was not automatically mapped by the Import Wizard, you will need to map it manually. The customer need values in the imported Excel file must match the values in the Need types lookup. If the values in the imported Excel file are different from those in the lookup, they will be added to the lookup as new values.
How to import the lookup contents?
To import a lookup contents, populate the columns in the import file that correspond to columns displayed in the lookup (for example the “Name” and “Description” columns). Enter the lookup in which you need to import the data and perform the Import data action from the Actions button menu. After mapping columns and setting parameters for deduplication, start the data import.
The percentage of profile completion displayed in the list after import is incorrect. How can I update it?
The percentage of profile completion is updated when you open the corresponding account or contact page, save a record or modify calculation rules in the corresponding lookup. Because of this, after importing the displayed percentage of profile completion may be out of date. To update the percentage, run the Update the profile data population business process.
How do I update a single column without modifying other columns during import?
To modify values of a single column, add at least one column for connection with section records and duplicate search, and a column with imported data. Any fields that are not represented in the imported Excel file, will not be modified during import.
How do I import records, view results and then roll back any changes made during the import?
Creatio is aimed at data accumulation and analysis. In most cases, DBMS functions are used to roll back changes and restore a database to a previous state. There are several options you can use to safely view changes that will be implemented after import:
-
Test import and settings by importing small batches of data (2-3 records). In this case, you can delete imported records to roll back the changes.
-
You can request a database backup to test and configure the system on a separate site.
-
You can use development options to implement automatic regular deletion of unnecessary data.
My import file has separate columns for first, last and middle names, while Creatio has a single [Full name] field. How do I import contacts?
The Full name column in the Contact object is required and must be specified in the imported file. If your imported Excel file has separate columns containing first, last and middle names, perform the following simple steps:
-
Create a “Contact name” column in the imported Excel file.
-
Fill in the “Contact name” column. You can use a simple Excel formula to combine text from several cells into one.
-
Save and import the resulting file.
Which columns should I include in the import file?
There are two ways to check which columns your import file needs.
The simplest way is to open the section, copy the names of the fields you need updated and paste them to your spreadsheet as column headers.
You can also add all the relevant columns to the record list, go back to the section page, click Actions → Export to Excel and use the exported file as a template.
Import file examples:
How do I import users from Excel?
You can import Creatio users and portal users from Excel. Learn more in the “Setting up LDAP integration” article.