The Redis Sentinel mechanism is used to provide fault tolerance for the Redis repositories used by Creatio. It provides the following features:
-
Monitoring. Sentinel makes sure that the Master/Slave instances work correctly in Redis.
-
Notifications. Sentinel alerts system administrators if any instance–related errors occur in Redis.
-
Automatic failover. If the Redis Master instance is not working correctly, Sentinel promotes one of the Slave instances to a Master, and reconfigures the rest to work with the new Master instance. Creatio is also notified about the new Redis connection address.
Redis Sentinel is a distributed system that is designed to run multiple instances that cooperate together. This approach has the following advantages:
-
The fault is registered only if multiple Sentinel instances (which form a quorum) agree that the Master instance is unavailable in Redis. This is done to reduce the number of false alerts.
-
The Sentinel mechanism will still be available even if multiple Sentinel instances are not responding or do not work altogether. This is done to increase fault tolerance.
Notable Sentinel specifics
-
At least three Sentinel instances are required for a robust deployment. These instances should be placed into computers or virtual machines that are believed to fail in an independent way, i. e., the faults registered by these Sentinel instances should be caused by different sources. For example, the computers are located in different network zones.
-
Due to asynchronous replication, the distributed system (Sentinel + Redis) does not guarantee that all data will be saved if a failure does occur.
-
The fault tolerance of the configuration should be regularly monitored and further confirmed through tests that simulate failures.
-
Docker port remapping creates certain issues with Sentinel processes (see the Sentinel, Docker, NAT, and possible issues block of the Sentinel documentation).
Minimal fault tolerance requirements for Redis Sentinel
Legend:
-
M1, M2 are Redis Master instances.
-
R1,R2, R3 are Redis Slave instances.
-
S1, S2, S3 are Sentinel instances.
-
C1 is Creatio application.
-
[M2] is promoted instance (e. g., from Slave to Master).
We recommend using a configuration with at least three Redis and Sentinel instances (see the Example 2: basic setup with three boxes block of the Sentinel documentation). This configuration is based on three nodes (computers or virtual machines), each containing running instances of both Redis and Sentinel (Fig. 1). Two Sentinel instances (S2 and S3) form a quorum (the number of instances required to ensure the fault tolerance of the current Master instance).
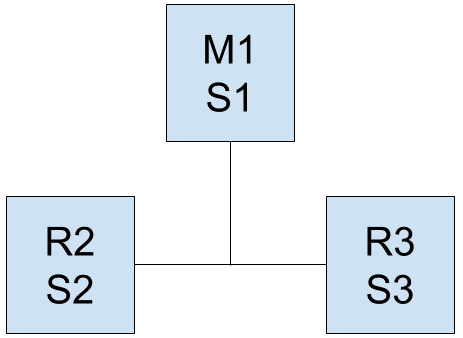
During regular operation, the Creatio client application writes its data to a Master instance (M1). This data is then replicated asynchronously to the Slave instances (R2 and R3).
If the Redis Master instance (M1) becomes unavailable, the Sentinel instances (S1 and S2) consider this a failure and start the failover process. One of the Redis Slave instances (R2 or R3) is promoted to the Master, enabling the application to use it instead of the previous Master instance.
Network separation issues
If the network connection is lost, there is a risk that Creatio will continue to work with the old Redis Master instance (M1), while the newly promoted Master instance ([M2]) has already been assigned (Fig. 2).
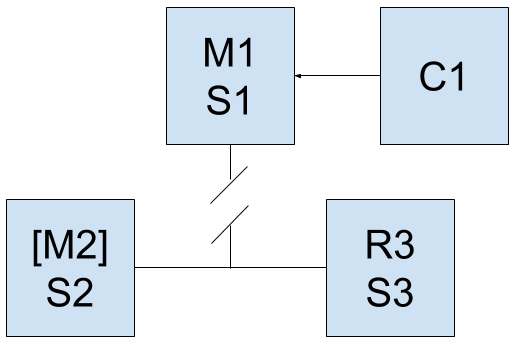
This is easily avoided by enabling the option to stop writing data in case the Master instance detects that the number of Slave instances has decreased. To do this, set the following values in the redis.conf configuration file of the Redis Master instance:
As a result, if the Redis Master instance (M1) will not be able to transfer data to at least one Slave instance, it will stop receiving data in 10 seconds after the first attempt. Once the system is recovered by Sentinel instances that form a quorum (S2 and S3), the Creatio application (C1) will be reconfigured to work with the new Master–instance (M2).
System requirements
Redis is an in-memory database, therefore RAM capacity and performance rate are the main requirements for its correct operation. Since Redis is a single–threaded application that uses a single processor core, a single node (computer or virtual machine) with a dual-core processor is required to work with a single Redis instance. Sentinel instances require relatively few resources and can run on the same node as Redis.
It is recommended to deploy Redis and Sentinel on Linux OS.
The table below shows the recommended system requirements for a single node (computer or virtual machine), depending on the number of Creatio users.
|
Number of users |
CPU |
RAM |
|---|---|---|
|
1–300 |
Intel Xeon E3-1225v5 |
2 GB |
|
300–500 |
4 GB |
|
|
500–1000 |
6 GB |
|
|
1000–3000 |
12 GB |
|
|
3000–5000 |
18 GB |
|
|
5000–7000 |
26 GB |
|
|
7000–10000 |
36 GB |
Install and configure Sentinel
Redis Sentinel comes bundled up with the Redis distribution. The installation process is described in the Redis documentation. We recommend using the latest version of Redis.
Learn more about configuring Sentinel in the Quick tutorial section of the Sentinel documentation.
Configure Creatio to work with Redis Sentinel
Obtain customized libraries and set up ConnectionStrings.config
Contact Creatio support to obtain customized libraries.
Specify the following in the "redis" connection string:
-
sentinelHosts. The unlimited number of comma-separated addresses and ports of Sentinel instances in the <address>:<port> format.
-
masterName. The name of the Redis Master instance.
Connection string example:
Web.config
Make sure the appSettings section includes the following parameters:
-
Feature-UseRetryRedisOperation enables the internal Creatio mechanism that will retry any Redis operations that ended with errors.
-
SessionLockTtlSec – the lifespan of the session lock key.
-
SessionLockTtlProlongationIntervalSec – the period for which the lifespan of the session lock key is prolonged.
These settings must have the following values:
Please make sure that the redis section includes the following parameters:
- enablePerformanceMonitor. Enables the mechanism for monitoring the execution time of Redis operations. We recommend enabling this mechanism for debugging and troubleshooting. Default value: “Off” (enabling this mechanism might affect application performance).
- executionTimeLoggingThresholdSec. If the execution of a Redis operation exceeds this threshold, it will be recorded in the log. By default, “5 seconds.”
- featureUseCustomRedisTimeouts. Enables the use of timeouts specified in the configuration file. Default value: “Off.”
- clientRetryTimeoutMs. All Redis operations that result in errors will be retried using the same client until they reach the timeout specified in this parameter. This parameter is used to eliminate errors caused by short network interruptions. At the same time, getting a new client from the pool is not required. By default, “4000 milliseconds.”
- clientSendTimeoutMs. The time allocated for sending requests to the Redis server. By default, “3000 milliseconds.”
- clientReceiveTimeoutMs. The time allocated for receiving responses from the Redis server. By default, “3000 milliseconds.”
- clientConnectTimeoutMs. The time allocated for establishing a network connection to the Redis server. By default, “100 milliseconds.”
- deactivatedClientsExpirySec. Delay in deleting failed Redis clients after they are removed from the pool. The “0” value represents immediate removal. By default, “0.”
- operationRetryIntervalMs. If the process for retrying a failed operation does not result in successful execution, it will be postponed for the time period specified here. The operation will be performed with a new client, which may have already established a connection to the new Master instance. By default, “1000 milliseconds.”
- operationRetryCount. The number of repeated attempts to perform an operation with a new Redis client. By default, “10.”
These settings must have the following values: