Schedule visits of your pharmaceutical reps to physicians and pharmacies and build routes on the map using the Visit scheduling view of the Activities section.
The Visit scheduling view has the following functional areas:
-
Contact list. The area displays the list of doctors with scheduled visits. To display a list of contacts with a certain system user as owner, specify the owner’s full name in the schedule quick filter. The records in the list of contacts can be filtered via the Apply filter command of the
 menu.
menu. -
Account list. The list displays pharmacies and hospitals where you can schedule visits. To display a list of accounts with a certain system user as owner, specify the owner’s full name in the schedule quick filter. You can filter the records in the accounts list by selecting the Apply filter option from the
button menu. -
Med rep's calendar. The calendar in the Visit scheduling view is similar to the standard user calendar. The titles of days in the calendar contain additional buttons that allow the user to build the pharmaceutical rep's daily route.
-
Route map. The map that displays the pharmaceutical rep's daily route.
Schedule visits automatically
Use the Cyclic tasks section in Pharma Creatio to automatically plan medical rep visits to pharmacies and physicians. A cyclic task is an activity that includes multiple visits planned for a certain period of time. You can create cyclic tasks in the Cyclic tasks section. One cyclic task may schedule multiple visits over a certain period.
1. Add a cyclic task
-
Go to the Cyclic tasks section.
-
Click the New task button.
-
On the displayed page, fill in the required fields. On the displayed page, populate the required fields: specify the name of the cyclic task, the start and the end dates, and the owner. The owner must be a contact for which the system user is created.
-
On the General information tab:
-
Add the visit category. Specify the name of the category in the Name field.
-
In the Quantity field, specify the total number of visits you want to schedule for the selected time frame. The Days between visits and the Visits frequency per month field values are populated automatically.
-
Select the lookup value in the Visit rule field to specify the rule according to which the visit will be performed. The field is populated from the Field sales rules lookup.
-
Select the contacts and accounts in the Doctors and Pharmacies details.
-
-
-
In the Products tab, specify a list of products, which the medical rep will promote for physicians and pharmacies.
-
Save the cyclic task (Fig. 1).
Fig. 1 Populated cyclic task page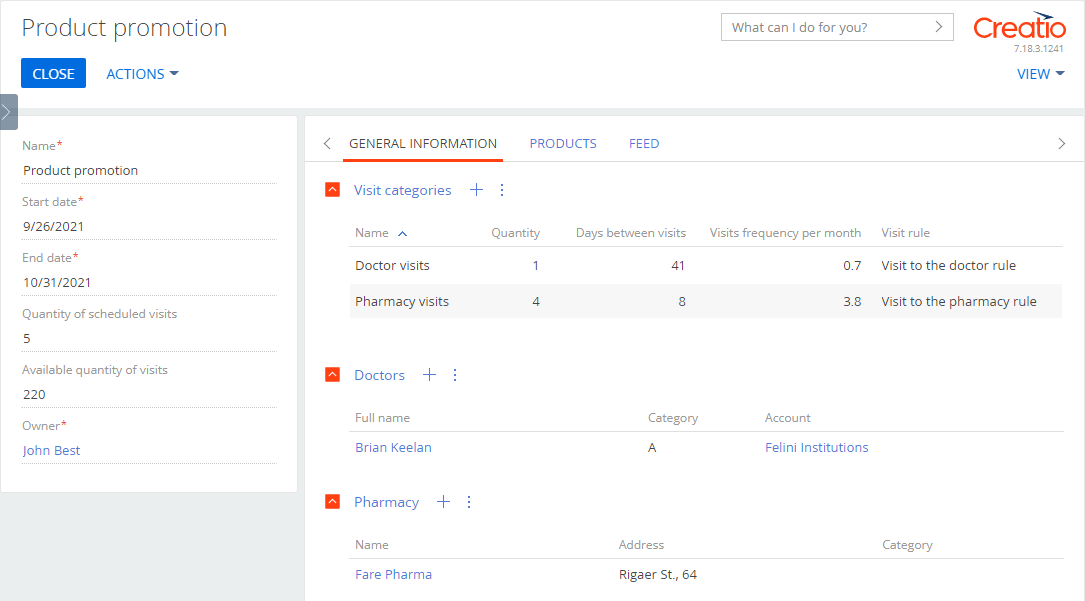
2. Schedule med rep visits using cyclic tasks
After adding a cyclic task. proceed to schedule visits. To do so:
-
Open the cyclic task created on the previous step. Use the Calculate available visits command of the Actions menu on the cyclic task page to calculate available visit slots. As a result, Creatio will populate the Available quantity of visits field of the cyclic task page (Fig. 2)
Fig. 2 Available visit quantity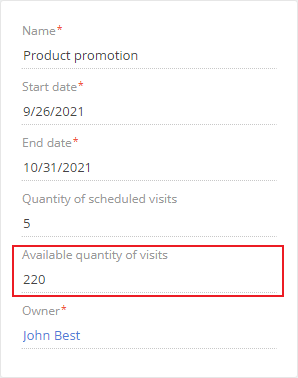
-
When the calculation is finished, the Schedule visits action will become available on the cyclic task page (Fig. 3).
Fig. 3 The Schedule visits action
-
Run the Schedule visits action to start the process of automatic visits scheduling in accordance with the configured parameters and physician and medical rep calendars. You will receive a notification when the visits are scheduled. The Quantity of scheduled visits will display the number of scheduled visits. The visit activities will appear on the Activity detail of the corresponding contacts and accounts.
Automatic scheduling of visits
The algorithm for automatic visit planning is as follows:
-
Creatio determines the route starting point. The current location of a sales rep responsible for the visit can be a starting point. The location is determined based on the information from the Addresses detail of the corresponding contact page. If the contact’s address is not specified, the system will use the address from the connected account page.
-
Creatio determines the closest sales outlet to the starting point. The optimal car route is determined within the 200 km radius.
-
Creatio checks the working hours of both the physician (pharmacy) and the medical rep.
-
The system will create the first visit if the schedules of the medical rep and the physician (pharmacy) coincide.
If the visit time is outside of the working hours of both parties, the system will look for the next closest location. Further planning and creation of visits is carried out in the same way.
Schedule visits manually
To schedule a visit:
-
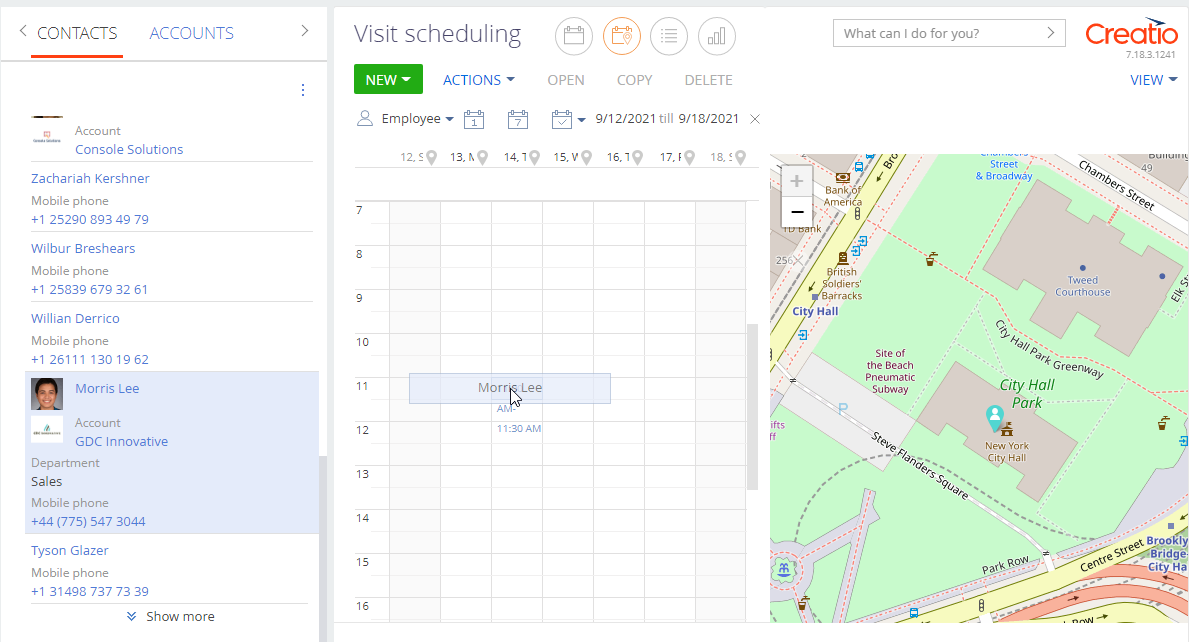
In the Activities section, select the Visit scheduling view (Fig. 4).
Fig. 4 Selecting the Visit scheduling view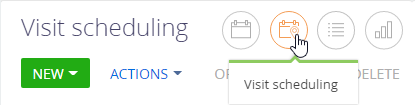
-
On the opened page, in the calendar filter area select the time period and the employee to schedule visits for.
- If you plan a physician visit, select that physician’s contact and drag it to the calendar area (Fig. 5).
Fig. 5 Adding a visit to the calendar
If more than one rule is set up for the period, a rule selection window will open (Fig. 6).
Fig. 6 Selecting a visit rule
As a result, the calendar will contain a new activity with the “Visit“ type. The contact that you dragged on the schedule area will be specified in the corresponding visit. The list of actions set up in the Field sales rules lookup will be added to the visit. The duration of the visit will correspond to the value from the corresponding visit rule. If necessary, you can change the visit duration manually.
- Pharmacy visits are scheduled in a similar way, by dragging an account to the schedule.
To automatically connect a manually created visit to a cyclic task, the following parameters must coincide:
-
visit time frame
-
promoted product
-
physician and/or pharmacy
If the above parameters are the same in the Cyclic task field of the Connected to detail of the Basic Information tab of the manually scheduled visit, the name of the associated cyclic task is displayed.
Configure a personal calendar
When planning visits, weekends and business hours are taken into account. Therefore, it is required to configure calendars prior to planning visit dates. By default, a single basic calendar with the following characteristics is set up in the system:
-
Time zone GMT 0, without daylight saving time.
-
5-day workweek (from Monday till Friday).
-
8-hour workday (from 9:00 AM to 6:00 PM), without lunch break.
-
Workdays with irregular business hours and holidays are not included.
This calendar is specified as default in the Base calendar system setting (“BaseCalendar” code). You can modify the standard calendar according to the working schedule of your company, or create a new one and add it to the system setting as the default one. Additionally, you can create personal calendars for pharmacies and doctors who your medical representatives are going to visit. The Base calendar system setting (“BaseCalendar” code) must be filled in for correct work of calendars. The system will refer to the Base calendar system setting if a contact’s calendar is not configured.
To create a new calendar:
-
Select “Calendar” in the Actions menu on the contact page.
-
Confirm adding a new personal calendar by clicking Yes.
The page for setting up the personal calendar of the contact will open. The Name and Time zone fields are populated automatically he Name field is read-only, but you can change the time zone if necessary. -
In the User field, specify the company rep who will perform visits to the contact. Their working hours will be taken into consideration when planning visits.
-
Edit the workweek settings. The default week parameters match the parameters of the base calendar. Set the day type as “Work” for all days from Monday to Friday, “Reduced” for Saturday and “Day off” for Sunday.
-
Set up work time. Set the technical break by separating the work time into two intervals, before and after the break: 9:00 AM – 1:00 PM and 2:00 PM – 6:00 PM.
-
Specify all holidays on the Days off tab.
 button at the top right corner of the application window.
Build a route for a med rep
Using the map allows you to save your pharmaceutical reps' time when moving around the city.
Med outlet is displayed on the map in accordance with the GPS coordinates specified on the account page. By default, when building routes, Creatio used the last added address of the pharmacy account.
In case of a physician visit, last added address of the corresponding hospital account is used. The address is displayed on the Addresses detail of the Contact info tab of the contact page.
When all the visits are added to the map, build a route.
To view routes for one day, tap the  button located in the day title of the calendar (Fig. 8).

As a result, the map will display all visits for the selected day. The order of visits on the map will correspond to their order in the schedule. The  button in the day title will change its color. The button color will correspond to the color of the route on the map. The route color is different for each day.
You can view routes for several days by clicking for multiple dates.