Use events for branching processes
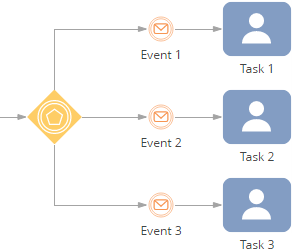
To branch processes depending on an activated event, the Event-based gateway operator is used. Events used for process branching are placed on the gateway outgoing flows (Fig. 1).
To create a contract, use the Open edit page element. Settings here are identical to the settings used when creating a new document.
To send a contract for approval, you must use the Auto-generated page element. Working with the Read data element is covered in the Auto-generated page process element article. After the contract has been sent to approval, add the approval to the contract page. Use the Add data element to automatically add new system records.
A schema with branching is displayed on Fig. 2.
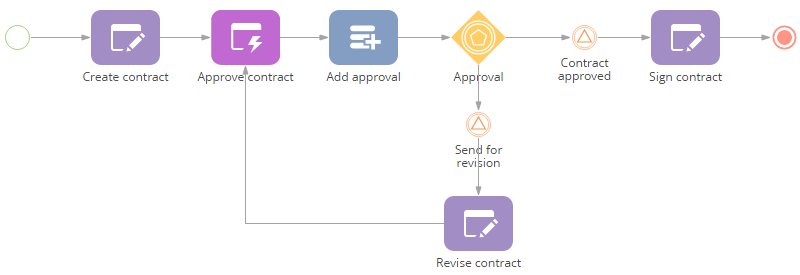
To build a process branching, the outgoing flow of each branch has to be activated depending on the result:
-
Place the Event-based gateway operator after the "Add approval" action and connect them with a sequence flow.
-
Place the Wait for signal element after the gateway and connect them with a sequence flow.
-
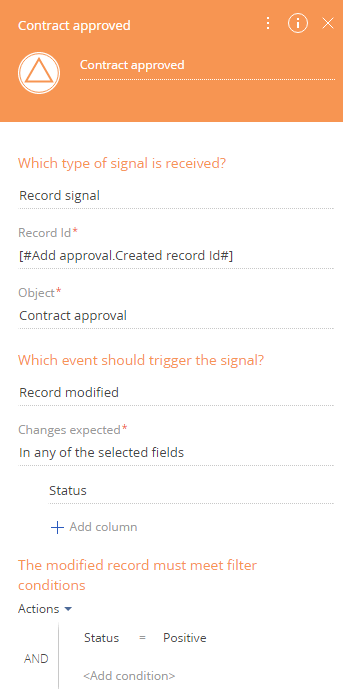
Populate the Wait for signal element settings page if the contract has been approved (Fig. 3):
-
In the Which type of signal is received? field, select “Object signal”.
-
Click the Record ID field to open the parameters window.
-
Select the Add approval element on the Process elements tab.
-
Double-click the Record ID parameter. The corresponding value will be added to the text field at the top of the parameter value window.
-
- Click Save.
- Specify the object to receive a signal from. For example, "Contract approval".
- In the Which event should trigger the signal? field, set "Record modified".
- Select the column whose event must activate the signal. For example, the "Status" column.
- Specify the filter conditions that the modified record must meet. For the signal to activate after the approval and the previously created contract page to open, the contract status has to be "Approved".
-
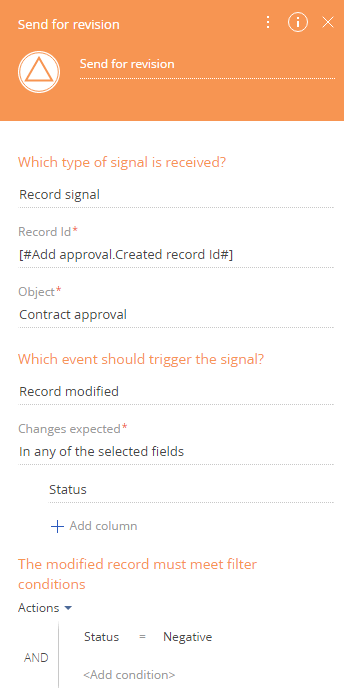
Place one more Wait for signal element after the gateway and connect them with a sequence flow. This signal should activate when a contract has not been approved.
-
Populate the Wait for signal element setup area (Fig. 4): Settings are identical to the signal which is triggered after obtaining an approval, however you must specify “Status=Negative” in the filtering criteria.
-
Add the Open edit page element after the “Contract approved” and “Send for revision” elements. If a contract has been approved, the previously created contract opens in which you must change the status to "Approved". If a contract was rejected, the previously created contract page will open for revision.
-
Save the process.
Run a process automatically upon changes in Creatio
Business processes can start automatically, whenever a Creatio record is added, modified or deleted. To set up such a process, use the Signal element as the process start event. More information is available in the Signal start event article.
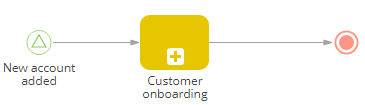
For example, a customer onboarding process can start automatically, each time a new customer account is added in Creatio.
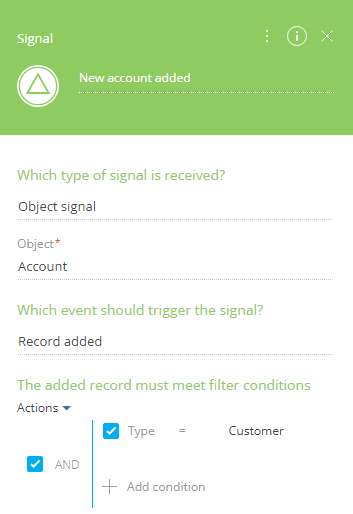
- To run a process automatically, based on changes in Creatio, add the Signal element as the process initial event (Fig. 5) and populate the Signal element setup area (Fig. 6):
-
In the Which type of signal is received? field, select “Object signal”.
-
In the Object field, select the object (section, detail or lookup), whose changes will automatically initiate the process. For example, to run a process in response to changes in the Accounts section, select the “Account” object.
-
In the Which event should trigger the signal? field, select the type of event (adding, editing or deleting a record) in the chosen object that will automatically run the process. For example, to run the process each time a new account is added, select “Record added”.
-
Specify any additional requirements to the record that must initiate the signal. For instance, to activate the signal only when adding an account of the “Customer” type, set the “Type = Customer” filter.
-
-
Save the process diagram.
As a result, the process will launch automatically each time the corresponding changes occur in Creatio records. For example, a customer onboarding process can start automatically whenever a new account of the “Customer” type is added.
Run a process from another process using signals
To run a process from another process using signals, add intermediate Throw signal event to the parent process and have the triggered process start with a custom Signal event.
For example, a “Preparation for webinar” business process must initiate a number of parallel independent business processes, such as sending reminders, collecting feedback, etc.
-
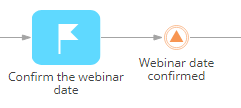
Add the Throw signal intermediate event element on the diagram of the business process that must trigger the associated processes. For example, associated processes must run after the “Confirm the webinar date” task is complete. Thus, a Throw signal event, (e.g.,“Webinar date confirmed”), must be added to the process flow after this task (Fig. 7).
-
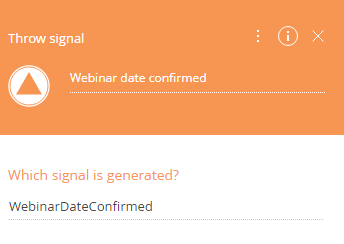
Populate the Which signal is generated? field of the Throw signal setup area with the name of the custom signal which will be generated. Make sure that different custom signals do not have matching texts. You can use any custom text, for example, use the “WebinarDateConfirmed” signal name (Fig. 8).
-
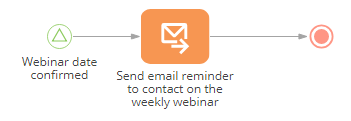
Add the start Signal event on the diagram of the triggered process (Fig. 9)
-
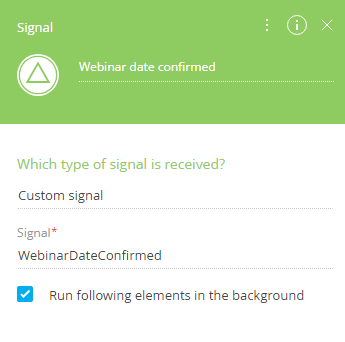
Set up the Signal element properties (Fig. 10):
-
In the Which type of signal is received?, select “Custom signal”.
-
In the Signal field, copy the name from the Throw signal element of the main process, e.g. “WebinarDateConfirmed”.
-
-
Save the process diagram.
As a result, the associated processes will be run automatically upon generating a corresponding signal in another process.
Run a process on a schedule
You can run a business process once, on a specific date, using the Start timer element. More information is available in the Start timer event article.
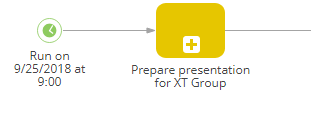
For example, you can schedule preparation of a customer presentation for specific date and time.
To set up a process that runs on specific date:
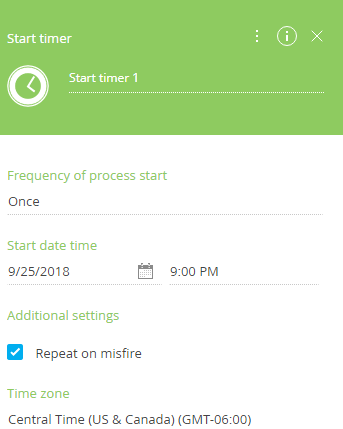
- Add the Start timer event element on the process diagram as the initial event (Fig. 11) and populate the Start timer element setup area (Fig. 12):
-
In the Frequency of process start field, select “Once”.
-
In the Start date time field, select the date and time when the process should run.
-
Select the Repeat on misfire checkbox in the Additional settings section to ensure that the business process launches even if the Start timer element cannot be triggered at the intended time, e.g., due to a server downtime. In this case, the process will run automatically at the nearest time available after the intended time has passed.
-
Select the needed time zone in the Time zone field. The process will run according to the time in that time zone.
-
-
Save the process diagram.
As a result, the process will run automatically at the time specified in the parameters of the Start timer element.
Run a process weekly
You can set up a process that starts automatically, on a regular weekly basis, on the specified day and at the specified time.
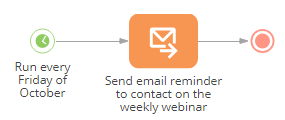
For example, a business process can send reminders about a weekly webinar held regularly on Fridays in October.
To set up a process that runs automatically on a weekly basis:
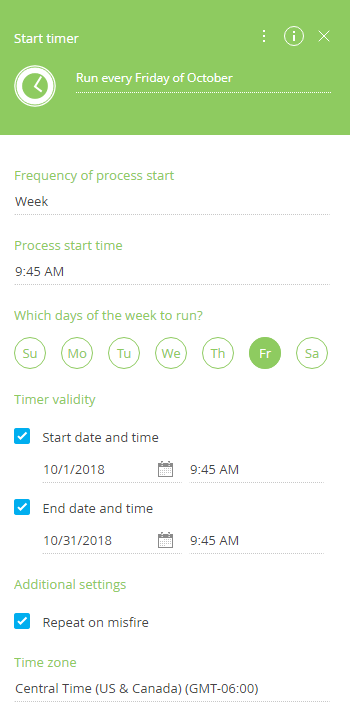
- Add the Start timer event element on the process diagram as the initial event (Fig. 13) and populate the Start timer element setup area (Fig. 14):
-
In the Frequency of process start field, select “Week”.
-
In the Process start time field, select the time when the process should run.
-
In the Which days of the week to run? field, select the days of the week on which the process should run.
-
In the Timer validity fields, specify the period of time during which the process run schedule will repeat. For example, if you need to run your process during October, select 10/1/2018 in the Start date and time field and 10/31/2018 in the End date and time field.
-
Select the Repeat on misfire checkbox in the Additional settings section to ensure your business process launches even if the Start timer element cannot be triggered at the intended time, e.g., due to a server downtime. In this case, the process will run automatically at the nearest time available after the intended time has passed.
-
Select the needed time zone in the Time zone field. The process will repeat according to date and time in that time zone.
-
-
Save the process diagram.
As a result, the process will run automatically, according to the specified custom schedule within the specified period. For example, the process will run every Friday in October, at 9:45 AM, Central Time.
Run a process on a custom schedule (using cron expressions)
You can set up custom schedules for running business processes using cron-expressions in Creatio. Cron-expressions support flexible long and short-term schedules and use the cron syntax (digits, words, and/or special characters in a specific order). Learn more about syntax of cron-expressions in QUARTZ documentation.
For example, a business process must run at a certain time on the 15th day of every month during October, November and December.
To run a process on a custom schedule:
- Add the Start timer on the process diagram (Fig. 15). Set up the element properties (Fig. 16):
Fig. 15 Run a business process on a custom schedule
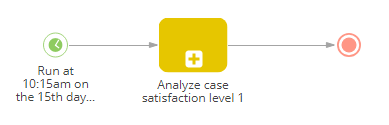 Fig. 16 Start timer element setup area for running the process according to custom schedule
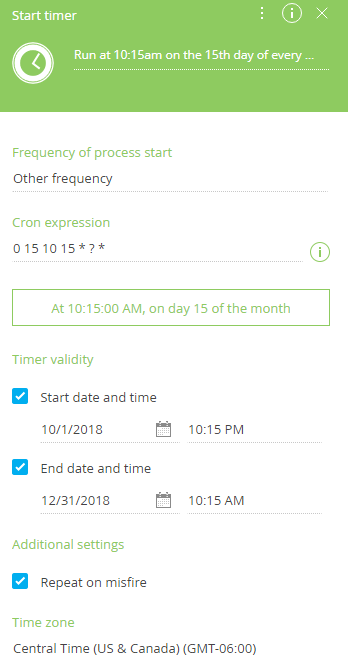
-
In the Frequency of process start field, select “Other frequency”.
-
In the Cron expression field, type in the cron-expression implementing your custom schedule. If the cron-expression is correct, you will see the time/date of the process launch in the traditional format under the Cron-expression field. For example, use the “0 15 10 15 * ?” expression to run the process at 10:15am on the 15th day of every month. Learn more about using cron expressions in QUARTZ documentation.
-
In the Timer validity fields, specify the period of time during which the process run schedule will repeat. For example, if you need to run your process October through December 2018, select 10/1/2018 in the Start date and time field and 10/31/2018 in the End date and time field.
-
Select the Repeat on misfire checkbox in the Additional settings section to ensure your business process launches even if the Start timer element cannot be triggered at the intended time, e.g., due to a server downtime. In this case, the process will run automatically at the nearest time available after the intended time has passed.
-
Select the needed time zone in the Time zone field. The process will run according to the time in that time zone.
-
-
Save the process diagram.
As a result, the process will run automatically, according to the specified custom schedule within the specified period. For example, the process will run on the 15th day of every month, October through December 2018, at 10:15 AM, Central Time.
Run a process using a message
Use intermediate messages to synchronize independent flows within one process. You can set up a business process that stops at a certain point and waits for the corresponding message before activating its next element.
For example, a business process must wait until invoice payment has been received before initiating a task to dispatch the goods.
To set up a process that resumes using a message:
-
Add the two intermediate message events on the diagram (Fig. 17).
-
Add Throw message event after the process task which is supposed to trigger the event.
-
Add Wait for message event before the process task which is supposed to be executed after the event.
Fig. 17 Resuming a process using a message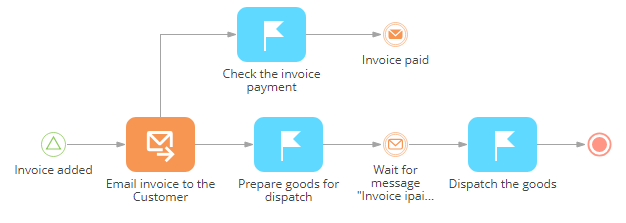
-
-
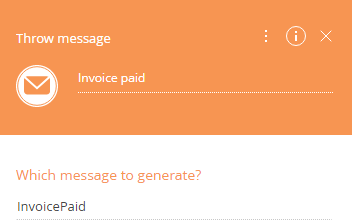
In the Throw message element setup area (Fig. 18), specify the custom message in the Which message to generate? field. You can use any custom text, for example, “InvoicePaid”.
-
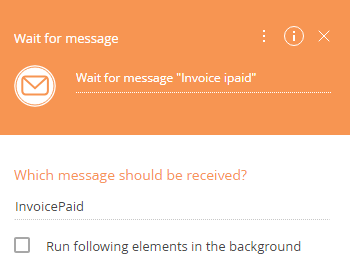
Populate the Wait for message element setup area (Fig. 19):
-
In the Which message should be received? field, copy the message from the Throw message element.
-
If you select the Run following elements in the background checkbox, all the following system operations of the process will be performed in the background, without displaying the loading mask.
-
-
Save the process diagram.
As a result, the process will stop at the Wait for message element and will be resumed only after the message specified in the Throw message element is caught