
Development in the file system
Using an Integrated Development Environment (IDE) maximizes development speed. Examples of the IDE include Visual Studio, WebStorm, and other tools. An IDE usually enables you to create, modify and compile the source code, debug it, run team development, use version control systems, etc. IDEs usually use text files stored in the file system to work with the source code.
Development in Microsoft Visual Studio became possible after implementing the configuration packages in the file system mechanism in Creatio. With this mechanism, you can export the packages from the database to a set of files, edit the package source code using an IDE and upload the updated packages back to the database.
The WorkspaceConsole utility integrated into Visual Studio is used to compile applications. The WorkspaceConsole has the following benefits:
- Significantly speeds up the compilation process because the whole configuration assembly is split into independently compiled modules. Only the modules that contain modified packages are compiled.
- Compilation does not require exiting the debugging mode or disconnecting from the IIS process.
You can configure Creatio configuration packages in the file system. With this mechanism, you can export the packages from the database to a set of files, edit the package content using an IDE and upload the updated packages back to the database. Using Visual Studio, you can debug custom source code of the schemas of the “Source code” (SourceCodeSchema) type.
Use Creatio built-in tools if there is no need or possibility to develop in the file system.
Main limitations of development in the file system
When the development in the file system mode is enabled, a full-fledged development is supported only for schemas of the “Source code” (SourceCodeSchema) and “Client schema” (ClientUnitSchema) types.
For other package elements (such as resources and SQL scripts), the following rules are used:
- When exporting packages from the database to the file system, the package elements stored in the database will replace the corresponding items in the file system. The source code schemas and client schemas will not be replaced.
- When uploading packages to the database, source code schemas and client schemas will replace the database's corresponding items. The application will keep using source code schemas and client schemas from the file system.
Integration with the version control system (SVN) with enabled development in the file system is performed with third-party tools. Creatio built-in mechanism of working with SVN is not used. It is still possible to install packages from the SVN repository in the Configuration section (this simplifies working with related packages). Use third-party utilities, such as TortoiseSVN, to install separate packages.

Visual Studio configuration steps
1. Enable compilation mode in the IDE
To enable compilation mode in the IDE, edit the Web.config file (located in the root folder with the installed application) and set the enabled attribute of the fileDesignMode element to true.
If the development mode in the file system is enabled, IIS will use the Terrasoft.Configuration.dll library only from the file system.
After switching to the file system development mode for the first time, the user is redirected to the "Configuration" section upon logging in. At this time, "The "Default" workspace assembly is not initialized" error appears. To eliminate this error, run the "Compile all items" action.
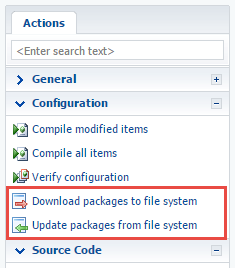
After enabling the development in the file system, two buttons will appear on the Actions tab in the Configuration section.
- [Download packages to file system] – exports the packages from the database to the following folder: [path to the installed application]\Terrasoft.WebApp\Terrasoft.Configuration\Pkg.
- [Update packages from file system] – uploads the packages to the database from the following folder: [path to the installed application]\Terrasoft.WebApp\Terrasoft.Configuration\Pkg.
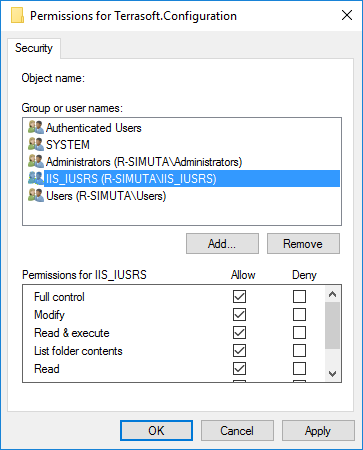
To integrate the application with the configuration project, grant full access to the path to the installed application\Terrasoft.WebApp\Terrasoft.Configuration\Pkg folder for the OS user who runs the IIS application pool. Usually, this is the built-in IIS_IUSRS user.
2. Configure the WorkspaceConsole to compile the application.
Configuration projects are compiled via the WorkspaceConsole utility, which is included in the application setup files. The utility should be configured before use. In addition to the settings covered in the "WorkspaceConsole parameters” article, you must also enable the development mode in the file system in the Terrasoft.Tools.WorkspaceConsole.exe.config configuration file.
To speed up the compilation by splitting the configuration assembly into independently compiled modules, set the CompileByManagerDependencies setting to “true” in the “internal” Web.Config (located in the Terrasoft.WebApp directory) and in the Terrasoft.Tools.WorkspaceConsole.exe.config file of the WorkspaceConsole utility.
3. Configure Microsoft Visual Studio
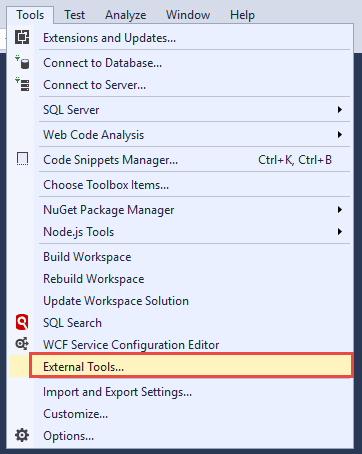
To use the WorkspaceConsole utility for compilation in Visual Studio, set up External Tools. To do this, execute the Tools > External Tools... command in the Visual Studio.
In the opened dialog window, add and set up three commands for calling the WorkspaceConsole utility. The Build Workspace and Rebuild Workspace commands initiate compilation of changes and full compilation of configuration projects. The Update Workspace Solution command updates the Visual Studio solution of the configuration package from the application database. It applies all changes made by the users within the application. Select the Use Output window checkbox for all three commands.
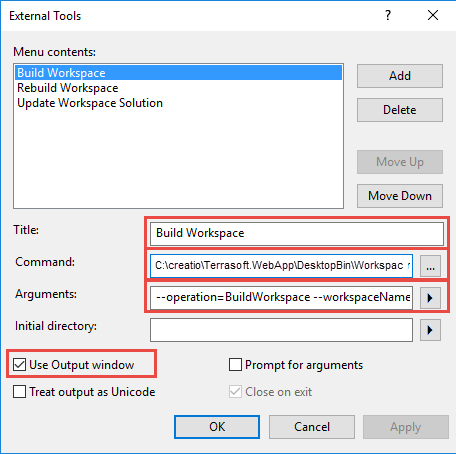
| Title | Update Workspace Solution |
|---|---|
| Command |
Path to the catalog with installed application\Terrasoft.WebApp\DesktopBin\WorkspaceConsole\Terrasoft.Tools.WorkspaceConsole.exe Example: C:\Creatio\Terrasoft.WebApp\DesktopBin\WorkspaceConsole\Terrasoft.Tools.WorkspaceConsole.exe |
| Arguments |
--operation=UpdateWorkspaceSolution --workspaceName=Default --webApplicationPath="Path to the catalog with installed application\Terrasoft.WebApp" --confRuntimeParentDirectory="Path to the catalog with installed application\Terrasoft.WebApp" Example: --operation=UpdateWorkspaceSolution --workspaceName=Default --webApplicationPath="C:\Creatio\Terrasoft.WebApp" --confRuntimeParentDirectory="C:\Creatio\Terrasoft.WebApp" |
| Title | Build Workspace |
|---|---|
| Command |
Path to the catalog with installed application\Terrasoft.WebApp\DesktopBin\WorkspaceConsole\Terrasoft.Tools.WorkspaceConsole.exe Example: C:\creatio\Terrasoft.WebApp\DesktopBin\WorkspaceConsole\Terrasoft.Tools.WorkspaceConsole.exe |
| Arguments |
--operation=BuildWorkspace --workspaceName=Default --webApplicationPath="Path to the catalog with installed application\Terrasoft.WebApp" --confRuntimeParentDirectory="Path to the catalog with installed application\Terrasoft.WebApp" Example: --operation=BuildWorkspace --workspaceName=Default --webApplicationPath="C:\creatio\Terrasoft.WebApp" --confRuntimeParentDirectory="C:\creatio\Terrasoft.WebApp" |
| Title | Rebuild Workspace |
|---|---|
| Command |
Path to the catalog with installed application\Terrasoft.WebApp\DesktopBin\WorkspaceConsole\Terrasoft.Tools.WorkspaceConsole.exe Example: C:\creatio\Terrasoft.WebApp\DesktopBin\WorkspaceConsole\Terrasoft.Tools.WorkspaceConsole.exe |
| Arguments |
--operation=RebuildWorkspace --workspaceName=Default --webApplicationPath="Path to the catalog with installed application\Terrasoft.WebApp" --confRuntimeParentDirectory="Path to the catalog with installed application\Terrasoft.WebApp" Example: --operation=RebuildWorkspace --workspaceName=Default --webApplicationPath="C:\creatio\Terrasoft.WebApp" --confRuntimeParentDirectory="C:\creatio\Terrasoft.WebApp" |
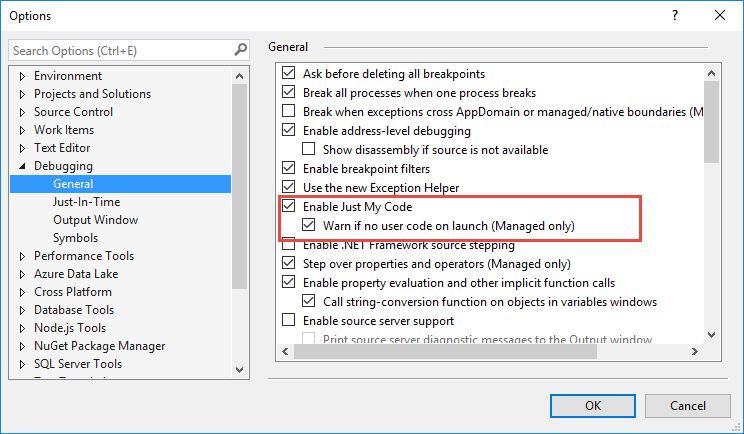
To prevent the debugger from accessing the source code that is disabled in the project, execute the Debug > Options... menu command and enable the Enable Just My Code option in the opened dialog. For more information about the Enable Just My Code, please refer to this page.
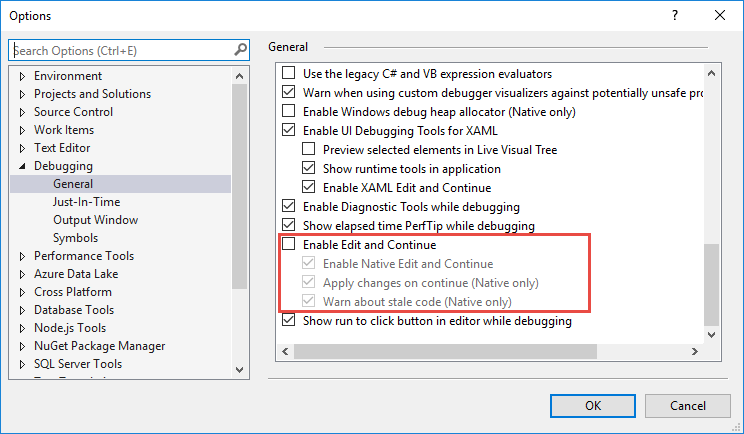
After the configuration is compiled, the application is automatically restarted. The Enable Edit and Continue option is not supported and should be disabled.
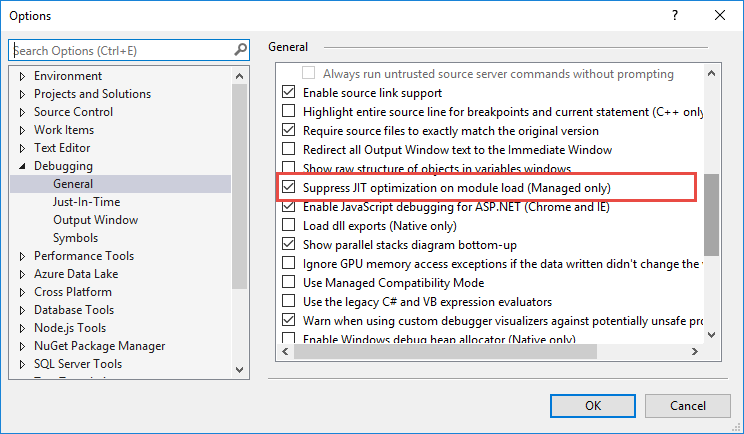
For the debugger to stop correctly on breakpoints, ensure that the Suppress JIT optimization on module load option is enabled.
Application settings for development in the file system
To enable development in the file system, edit the Web.config file (located in the root folder with the installed application) and set the enabled attribute of the fileDesignMode element to true.
Terrasoft.Configuration package
A configuration project is a Visual Studio solution supplied with Creatio setup files. The solution can be found here: [path to the installed application\Terrasoft.WebApp\Terrasoft.Configuration.
To start development in the file system, open the following file in Visual Studio: path to the installed application\ Terrasoft.WebApp\Terrasoft.Configuration\Terrasoft.Configuration.sln.
The configuration project structure is available in table 1.
| Folder | Purpose |
|---|---|
| Lib | The folder where package-bound third-party class libraries are exported. |
| Autogenerated\Src | The folder with files that contain auto-generated source code of the preset package schemas. These files cannot be edited. |
| Pkg | The folder where the packages for development in the file system are exported from the database. |
| bin | A folder for compiled configuration and third-party libraries. |
Getting Started with the configuration
Creating a package
If you do not intend to use SVN in the development process, then creating a package in the file system development mode is the same as that in the normal mode. For more information on creating packages, please refer to the Create a package for development article.
More information about creating a custom package and binding it to the SVN repository can be found in the "Create a package in the file system development mode” article.
Working with new package elements
It is recommended to add new elements (schema or resource) to the package only from the Configuration section. To create and edit a new item in a custom package:
- Select a custom package in the [Configuration] section and add a new element to it (see Create a client schema, “Create the [Source code] schema”).
- Add resources (such as localized strings) to the schema if needed.
- Click [Download packages to file system] (Fig. 1).
- Use an IDE (such as Visual Studio) to edit the source code of the schema or localized resource in the files (located in the [Path to the installed application]\Terrasoft.WebApp\Terrasoft.Configuration\Pkg\[Package name] folder). The package properties are described in the Package structure article.
- Click [Update packages from file system] to upload changes to the application database (Fig. 1).
- If you changed a source code schema, then you must compile the application.
1. Preconfigure Creatio
Set up the IDE for file system development.
2. Create, read, or update a package from the SVN repository
Create a sdkPackageInFileSystem custom package in the Configuration section using SVN or not using SVN.
3. Create a Source code schema
Create a Source code schema in the package:
- Set Code to "UsrGreetingService."
- Set Title to "UsrGreetingService."
- Set Package to "sdkPackageInFileSystem."
4. Develop the solution in Visual Studio
- Download the existing schemas from the database to the file system.
To do this, execute the Download packages to file system action of the Actions drop-down list in the Configuration section toolbar.
/scr_download_to_fs.png)
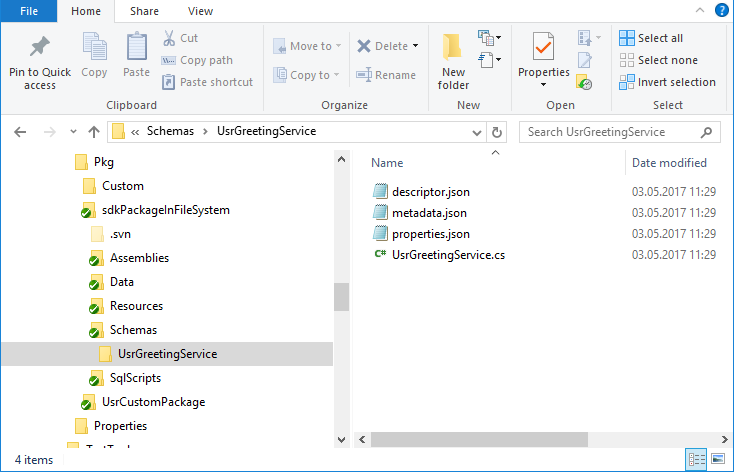
As a result, Creatio will add the UsrGreetingService.cs file of the schema source code to the Pkg\sdkPackageInFileSystem\Schemas\ directory in the file system. In this case, the UsrGreetingServiceSchema.sdkPackageInFileSystem_Entity.cs schema file generated by Creatio is placed in the Autogenerated\Src directory.
- To develop in Visual Studio, open the Terrasoft.Configuration.sln solution.
- Go to the Explorer of the Visual Studio solution, enable the display of all file types (1), open the UsrGreetingService.cs (2) file, and add the needed source code (3).
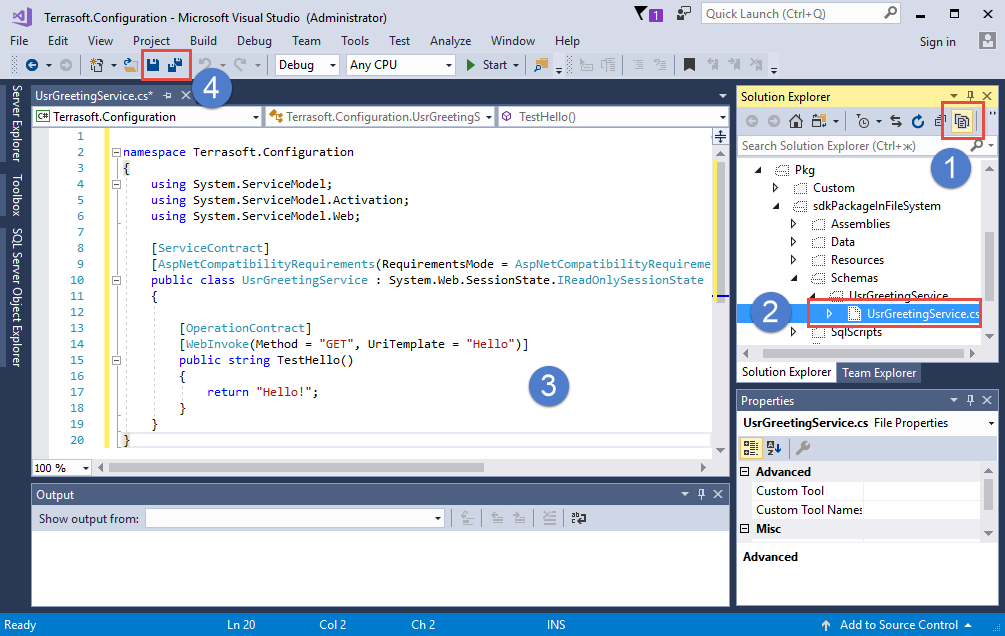
Example of the source code that must be added to the UsrServiceGreeting.cs file contents to implement a custom web service.
5. Save, compile, and debug the source code
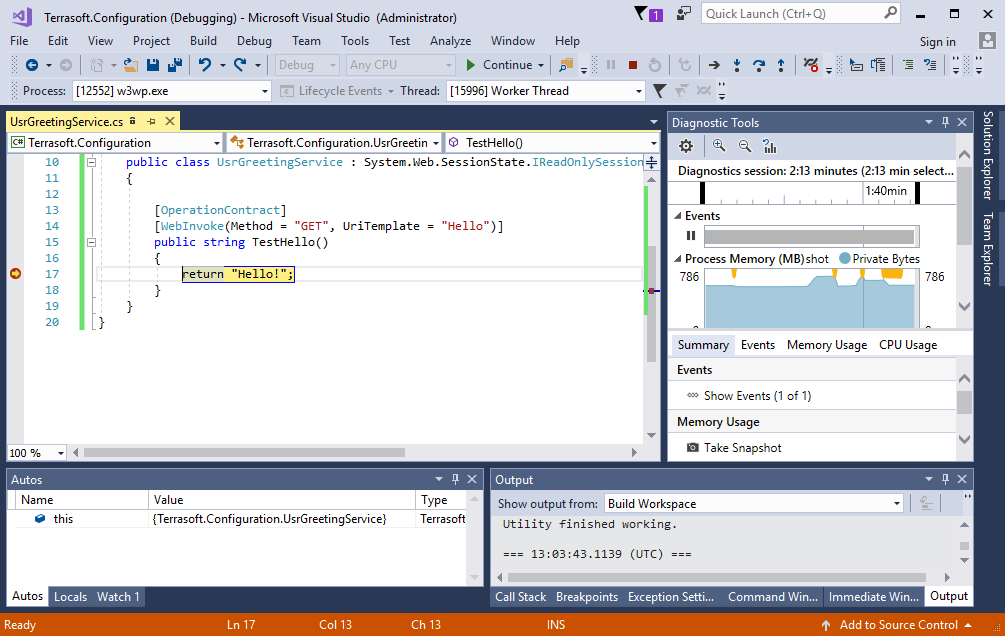
- Save the source code (4) after you change it and before you compile and debug it.
Usually, Visual Studio saves code automatically, but since the Visual Studio compiler is not used, you must save the code manually.
- Compile the changed source code by running the Build Workspace or Rebuild Workspace command after saving the code. If the compilation is successful, the web service becomes available.

- Attach the debugger to the process of the IIS service that runs Creatio to start debugging. To do this, execute the Debug → Attach to process menu command. This opens a window.
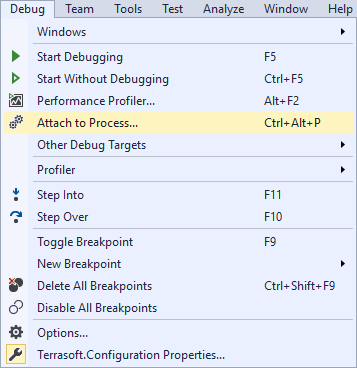
Select the IIS worker process that runs the Creatio application pool from the list of processes.
Recompile the code after attaching the debugger to the IIS worker process.
After that, you can start debugging using Visual Studio means, for example, set breakpoints, view the values of variables, call stack, etc.
For example, after you set the breakpoint on the line that returns from the TestHello() method, recompile Creatio, and execute the service request, the debugger stops the program execution on the breakpoint.
Preliminary setup
We recommend using a local Creatio instance to connect the libraries of Creatio classes, deploy the local database from an archive copy, and use the WorkspaceConsole utility. The examples in this article assume Creatio is installed into the C:\Creatio local directory.
The examples for Creatio in the cloud use the Executor utility in the C:\Executor directory. You can download the utility set up to execute the example via the following link: Download the utility.
Write C# code for Creatio on-site
1. Restore the database from backup (if needed)
Deploy the Creatio database from backup. The archived Creatio database backup is in the C:\Creatio\db directory.
2. Set up the WorkspaceConsole utility
To manage the deployed database, set up the WorkspaceConsole utility using Creatio files:
- Open the C:\Creatio\Terrasoft.WebApp\DesktopBin\WorkspaceConsole directory.
- Execute the PrepareWorkspaceConsole.x64.bat or PrepareWorkspaceConsole.x86.bat batch file depending on the Windows version.
- Specify the database connection parameters in the Terrasoft.Tools.WorkspaceConsole.exe.config file in the C:\Creatio\Terrasoft.WebApp\DesktopBin\WorkspaceConsole directory. For example, if the CreatioDB database is deployed on the dbserver server, the connection string looks as follows:
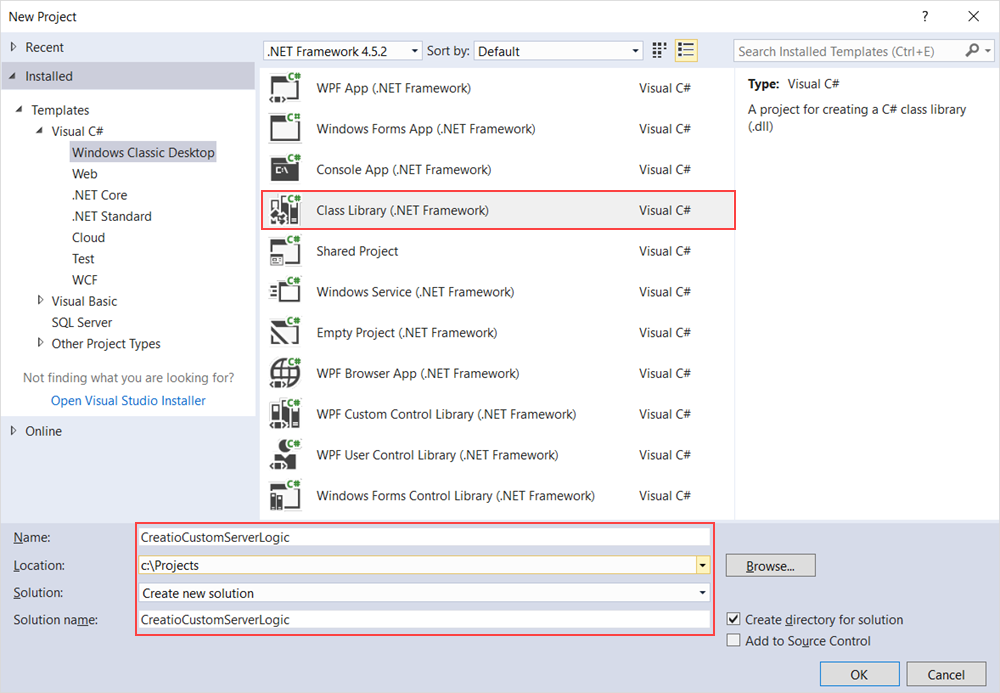
3. Create and set up a Visual Studio project
Create a standard class library project in Visual Studio.
Use the Debug tab of the class library project's properties window to specify the full path to the configured WorkspaceConsole utility in the Start external program property. The WorkspaceConsole utility is used as an external debugger of the developed software logic.
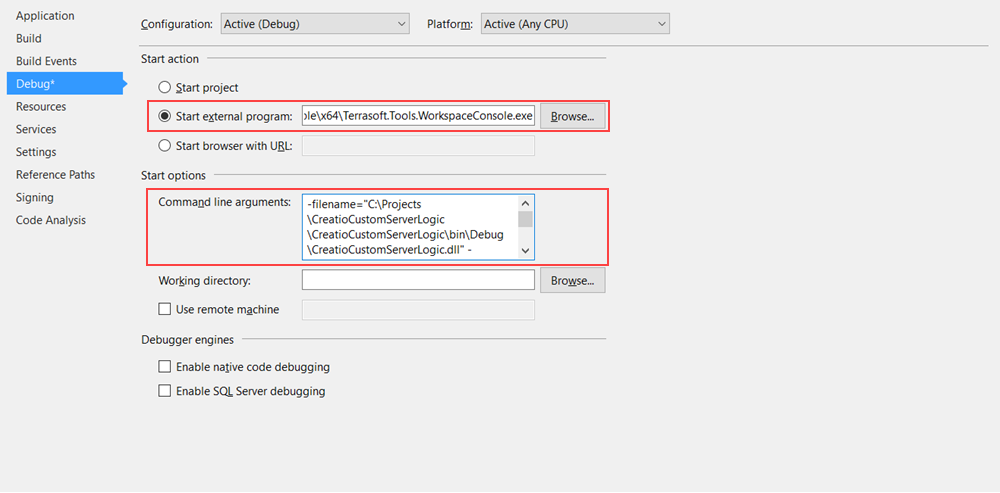
Set the following WorkspaceConsole launch arguments in the Command line arguments property:
- Specify the full path to the debug version of the developed class library in the -filename argument, for example, "C:\Projects\CreatioCustomServerLogic\CreatioCustomServerLogic\bin\Debug\CreatioCustomServerLogic.dll."
- Specify the full name of the class to implement the developed software logic, including the names of every namespace, in the -typeName argument, for example, "CreatioCustomServerLogic.MyContactCreator."
- Specify the WorkspaceConsole operation in the -operation argument, for example, "ExecuteScript."
- Specify the workspace name in the -workspaceName argument, for example, "Default."
- Specify the path to the parent directory of the conf directory in the -confRuntimeParentDirectory argument, for example, "C:\creatio\Terrasoft.WebApp."
To use the Creatio core’s server-side classes, set up dependencies from the appropriate Creatio class libraries in the created project. For example, add a dependency from the Terrasoft.Core.dll library.
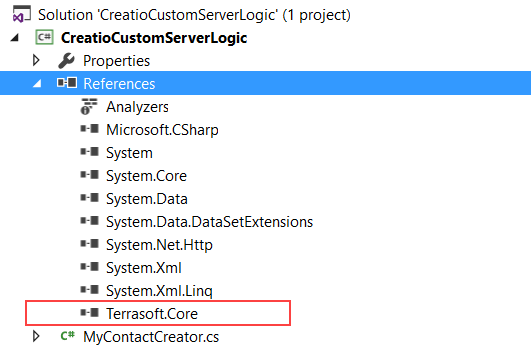
You can find class libraries of the Terrasoft namespace in the Terrasoft.WebApp\DesktopBin\WorkspaceConsole directory of the Creatio distribution.
4. Develop the functionality
Add a class to the created class library project. The full class name must match the name specified in the -typeName argument of the WorkspaceConsole utility’s launch argument string. For example, "CreatioCustomServerLogic.MyContactCreator." The class must implement the Terrasoft.Core.IExecutor interface.
After you run the project (F5 key), the WorkspaceConsole window that contains the corresponding message appears.
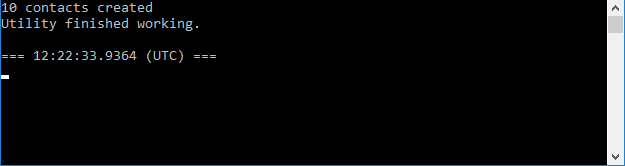
You can also set a breakpoint on any line of code and see what the values of variables are while the program is running (i. e., debug the program).
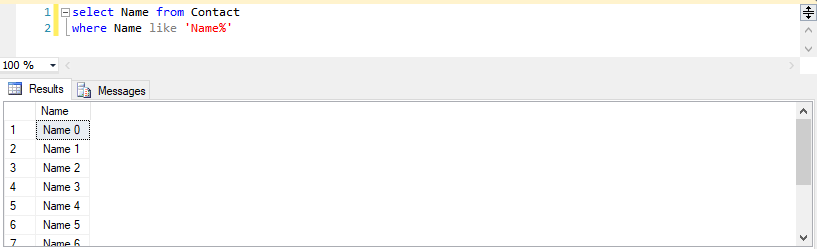
View the execution outcome of the aforementioned code in the Contacts Creatio section or by executing the database request.

Write C# code for Creatio in the cloud
1. Create a class library project
Create a standard class library project in Visual Studio. For example, name the project "CreatioCustomServerLogic.Cloud."
To use the Creatio core’s server-side classes, set up the dependencies from the necessary Creatio class libraries in the created project. For example, add a dependency from the Terrasoft.Core.dll library.
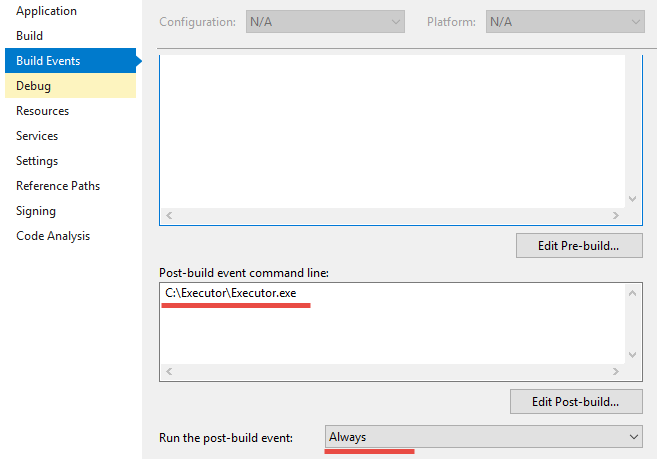
Specify the full path to the configured Executor utility ("C:\Executor\Executor.exe") and select the condition to launch the library build event (Always) in the Post-build event command line property on the BuildEvents tab of the created class library project’s properties window.
2. Develop the functionality
Add the class that implements the Terrasoft.Core.IExecutor interface to the created class library project.
3. Set up the Executor utility
Open the directory that contains the installed Executor utility (C:\Executor). Then, set the values of the following setup elements in the configuration file:
- Specify the URL of the Creatio application loader in the Loader element. Usually, this is the Creatio website URL, for example, "https://mycloudapp.creatio.com."
- Specify the Creatio application URL in the WebApp element. Usually, this is the path to the default Creatio configuration, for example, "https://mycloudapp.creatio.com/0."
- Specify the name of the Creatio user in the Login element, for example, "Supervisor."
- Specify the password of the Creatio user in the Password element.
- Specify the path to the original class library copy in the LibraryOriginalPath element. Usually, this is a path to where the Visual Studio creates a class library after the compilation, for example, "C:\Projects\CreatioCustomServerLogic\CreatioCustomServerLogic.Cloud\bin\Debug\
CreatioCustomServerLogic.Cloud.dll ." - Specify the path to create a class library copy that interacts with the remote server in the LibraryCopyPath element. You can specify any temporary directory or a directory that contains the Executor utility, for example, "C:\Executor\CreatioCustomServerLogic.Cloud.dll."
- Specify the full name of the class to implement the developed software logic, including the names of all namespaces, in the LibraryType element, for example, "CreatioCustomServerLogic.Cloud.MyContactReader."
- Enter the name of the class library in the LibraryName element, for example, "CreatioCustomServerLogic.Cloud.dll."
4. Execute the developed code
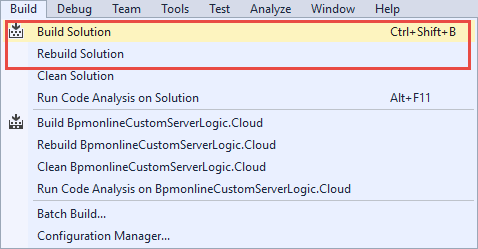
To launch the building process, use the Build Solution and Rebuild Solution menu commands.
View the execution outcome of the developed code in the Output window of Visual Studio after each successful build of the class library.

To improve the developer experience, Creatio lets you manage the files of client module schemas in an external IDE, for example, WebStorm, Visual Studio Code, Sublime Text, etc. To do this, download the schema source code from the database. Creatio downloads the source code of client module schema as *.js files and client module styles as *.less files. Since database access is required to write client code, this instruction is relevant only for Creatio on-site.
To write the source code of client module schemas in the file system:
- Enable the file system development mode.
- Set up the package in the SVN repository.
- Create a client module schema in Creatio IDE.
- Download the package to the file system.
- Write the source code of the client module schema in an external IDE.
- Debug the source code (optional).
- Disable the file system development mode (optional).
1. Enable the file system development mode
To enable the file system development mode, follow the instruction in a separate article: External IDEs.
2. Set up the package in the SVN repository
To set up the package in the SVN repository, take one of the following steps:
-
Create a package in the SVN repository.
Creatio lets you create a package in the following ways:
- Using SVN. To do this, follow the instruction in a separate article: Create a custom package.
- Without using SVN. To do this, follow the instruction in a separate article: Create a package in the file system development mode.
- Install a package from the SVN repository. To do this, follow the instruction in a separate article: Install an SVN package in the file system development mode.
- Update a package from the SVN repository. To do this, follow the instruction in a separate article: Update and commit changes to the SVN from the file system.
The steps below use the sdkPackageInFileSystem package installed from the SVN repository as an example.
3. Create a client module schema in Creatio IDE
To create a client module schema in Creatio IDE, follow the instruction in a separate article: Client module.
For example, create a schema of the ContactPageV2 replacing view model and schema of the ContactPageV2CSS view model in the sdkPackageInFileSystem package.
4. Download the package to the file system
To download the package that contains the client module schema to the file system, select Download packages to the file system in the File system development mode action group on the toolbar.
/scr_download_to_fs.png)
For example, after you download the sdkPackageInFileSystem to the file system, the ..Terrasoft.WebApp\Terrasoft.Configuration\Pkg\sdkPackageInFileSystem\Schemas subdirectories will contain the ContactPageV2.js (source code of the client module schema) and ContactPageV2CSS.less (client module styles) files.

5. Write the source code of the client module schema in an external IDE
For example, to hide the Full job title field from the contact page:
-
Open the ContactPageV2.js file in an external IDE and add the source code displayed below.
- Save the ContactPageV2.js file.
As a result, Creatio will hide the Full job title field from the contact page.
Note that the changes will be displayed automatically.
6. Debug the source code (optional)
Debug the source code if it was written with errors. To do this, follow the instruction in a separate article: Front-end debugging.
7. Disable the file system development mode (optional)
If you do not need to use the file system for further development, disable the file system development mode.
To disable the file system development mode:
-
Select Update packages from file system in the File system development mode action group on the toolbar.
/scr_updating.png)
- Set the enabled attribute of the fileDesignMode element in the Web.config file in Creatio root directory to false.