The Configuration section is designed for managing configuration elements that implement Creatio configuration functions.
Use the Configuration section tools to perform the following actions:
- Manage packages that comprise system functions, as well as manage the package contents.
- Expand and modify Creatio functions.
- Organize the integration with subversion control systems.
- Manage the development processes and transfer changes between the working environments.
Opening the Configuration section
In Creatio, you can open the Configuration section as follows:
- Open the System Designer by clicking
 . In the Admin area, click Advanced settings.
 - You can also click the [Creatio application address]/0/ClientApp/#/WorkspaceExplorer link. For example, http://my.Creatio.com/0/ClientApp/#/WorkspaceExplorer.
- Use the /we alias. For example, http://my.creatio.com/0/we.
- Use the /conf alias. For example, http://my.creatio.com/0/conf.
- Use the /dev alias. For example, http://my.creatio.com/0/dev.
The Configuration section will open in a new tab.
Managing the Configuration section permissions
By default, only system administrators have access to the key system operations. However, you can set up access for specific users or user groups. To enable the Configuration section permissions:
- Click to open the System Designer. In the Users and administration block, click Operation permissions.
- Select the Access to "Configuration" section (CanManageSolution) system operation.
- Click
 and specify the necessary user/role on the Operation permission detail. The record with the Yes value will appear in the Access level column on the detail. The users who belong to the specified role will have permission to the Access to "Configuration" section system operation.
Interface of the Configuration section
The interface of the Configuration section includes several functional areas.
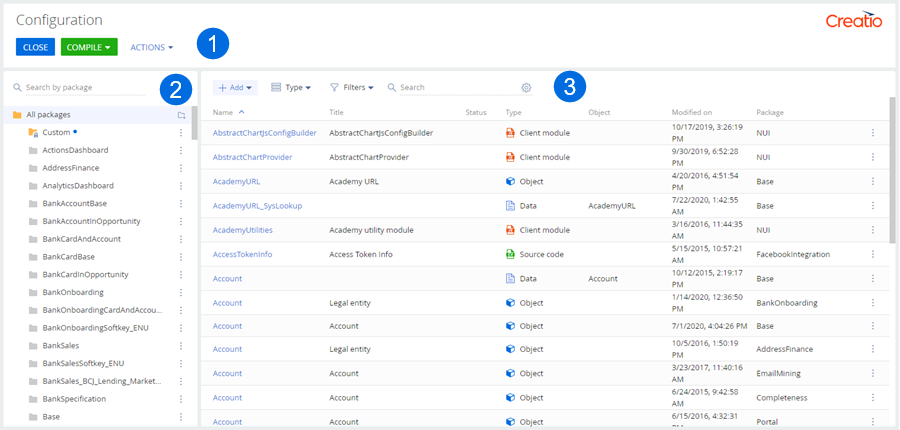
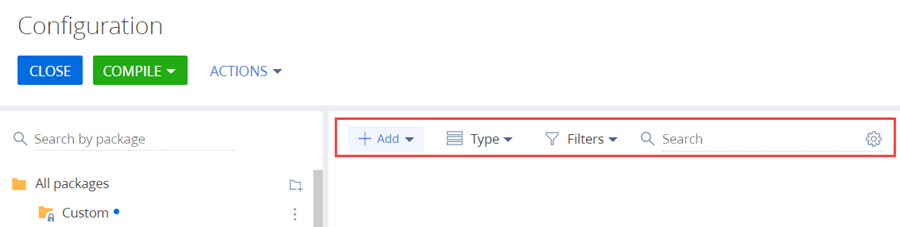
Toolbar
The toolbar has the following elements:
- The Close button – closing the tab with the Configuration section.
- The Compile button – running compilation of the configuration. If you click the button, the compilation of changes in the configuration starts. If you select Compile all in the Compile button menu, Creatio will run a compilation of the configuration for all configuration elements. As a result, all executable files will be updated, and the static content will be uploaded to the ...\Terrasoft.WebApp\conf catalog. After the compilation is complete, the user will receive a corresponding notification, and the changes will take effect for users working in the current configuration.
- The Actions drop-down list – contains the list of actions in the Configuration section. The actions are divided into several groups.
The actions in the Configuration section include the following groups:
- File system development mode – actions connected to the development mode in the file system.
- SVN repositories – actions to work with repositories of the version control system.
- Actualize items – actions to actualize the configuration elements.
- Source code – actions to work with the source code.
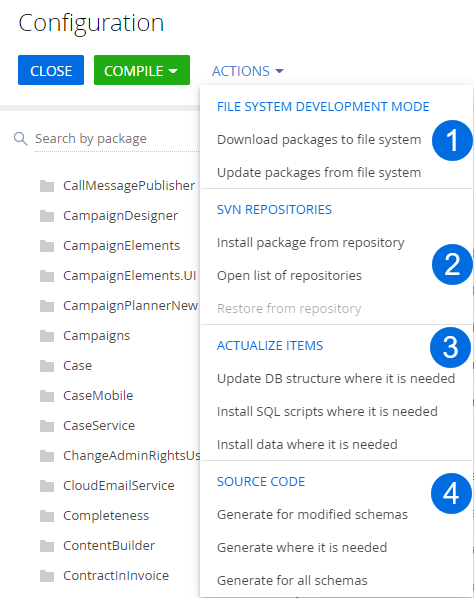
The File system development mode (1) action group contains the following items:
- Download packages to file system – exports the packages from the application database to the ...\Terrasoft.WebApp\Terrasoft.Configuration\Pkg directory.
- Update packages from file system – imports the packages from the ...\Terrasoft.WebApp\Terrasoft.Configuration\Pkg catalog to the database.
The SVN repositories (2) action group contains the following options:
-
Open list of repositories – opens the List of repositories window used for creating, configuring, and deleting links to subversion control repository.
The Actualize items (3) action group contains the following options:
- Update DB structure where it is needed – updates the database structure for configuration elements that require updating. After the DB structure is updated, the user receives a corresponding notification in the dialog window.
- Install SQL scripts where it is needed – install the SQL scenarios that require installation. After the SQL scenarios are installed, the user receives a corresponding notification in the dialog window.
- Install data where it is needed – install the data that require installation. After the data is installed, the user receives a corresponding notification in the dialog window.
The Source code (4) action group contains the following options:
-
Generate for modified schemas – generates source code only for schemas that have been modified in the current configuration.
-
Generate where it is needed – generates source code for all schemas that require source code generation.
-
Generate for all schemas – generates source code for all schemas in the current configuration. This operation may take some time (longer than 10 minutes).
Area of working with packages
The area of working with packages contains the following elements:
- The Search by package string – performs the search of a report by name.
- The
 button – creates a new package. When you click the button, a window for creating a new package appears. In the window, you can set the package name and description, as well as add dependencies.
 - The All packages group – contains a list of all application packages in alphabetical order. When you select the All packages group, the configuration elements of all the application packages display in the Configuration section working area in alphabetical order. When you select one of the packages from the All packages group, you will see the configuration elements of the current package displayed in alphabetical order.
 — pre-installed packages (cannot be modified).
 — custom packages cannot be modified if created by other users.
 — custom packages created by the current user, can be modified.
 symbol next to the package name and are located at the top of the
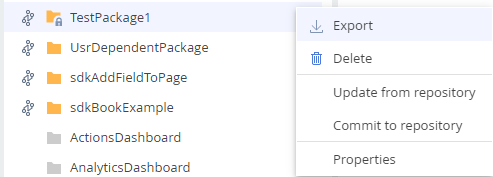
 When you click  in the string with the package name, a menu with the following options pops up:
- Export – export the package to a zip-archive.
- Delete – removes the selected package. Inactive for the pre-installed packages.
- Update from repository – updating the package from a connected version control system repository.
- Commit to repository – saving the package in the connected version control system repository.
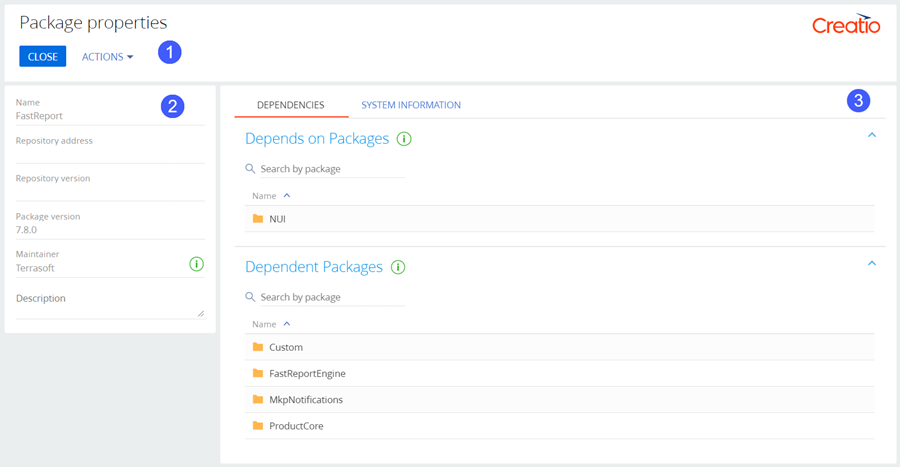
- Properties – open the Package properties page. The page opens in a new tab. Use this page to set up the current package dependencies, view system information (the author of creating and editing the package, the dates of creating and editing the package, the unique identifier, the package primary key in the database table). You can also open the package properties by double-clicking the package name.
The Package properties page interface contains several functional areas.
Working area
You work with the configuration elements in the working area of the section. The working area contains the following elements:
- Toolbar – enables adding and setting up the displaying of configuration elements in the section list and performing the search.
- The section list contains the list of configuration elements.
Toolbar
Toolbar – enables adding and setting up the displaying of configuration elements in the section list and performing the search.
The toolbar has the following elements:
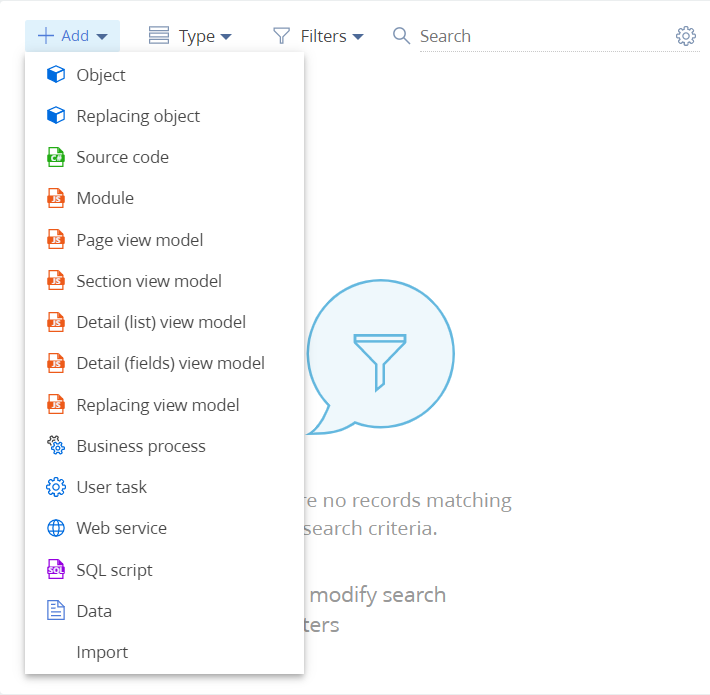
- The Add drop-down list – selecting a configuration element to add.
Configuration elements for adding
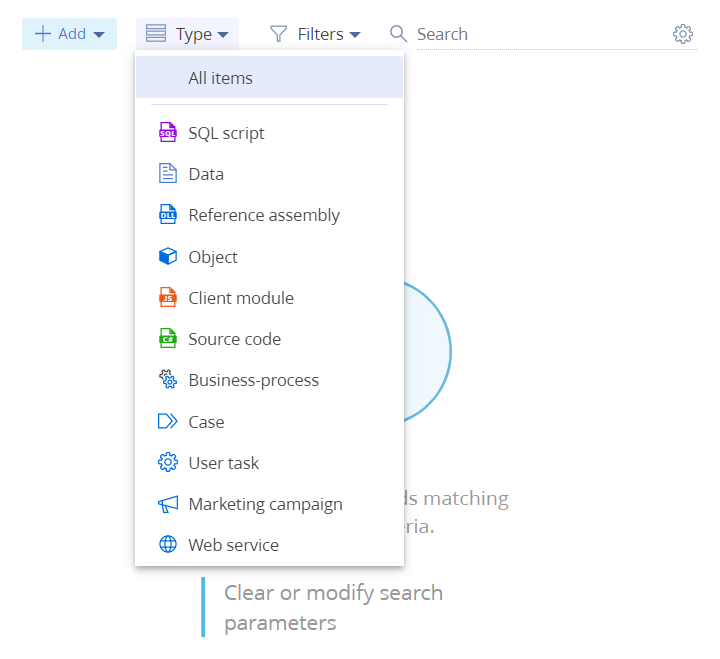
- The Type drop-down list – enables selecting the type of configuration elements to display in the section list.
Types of configuration elements to display
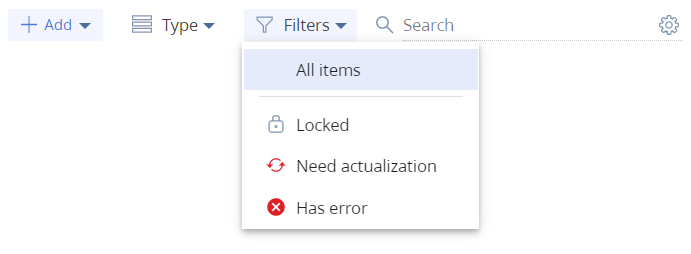
- The Filters drop-down list – enables selecting the status of configuration elements to display in the section list.
Statuses of configuration elements to display
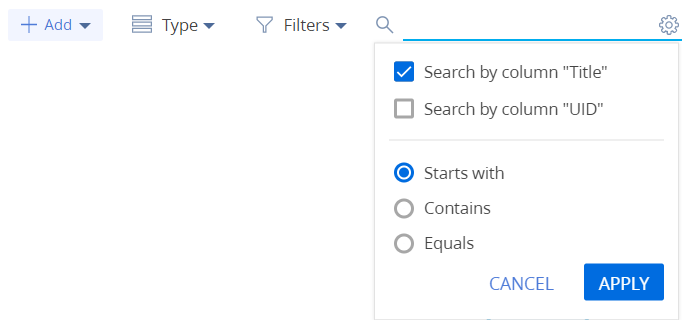
- The Search string – perform the search of a configuration element by name. You can set additional search parameters by clicking
 .
.
Section list
The section list contains the list of configuration elements. The data is represented as a table consisting of the following columns:
- Name – the name of the configuration element set at its creation. All configuration elements are sorted in alphabetical order.
- Title – the configuration element title.
- Status – the status of the configuration element. Contains data from the Filtersdrop-down list.
- Type – the type of the configuration element selected in the Add drop-down list when creating the element.
- Object – the object that package bound data are connected to. The column is only populated for the Data configuration element.
- Modified on – the date of modifying the current configuration element.
- Package – the name of the package containing the current configuration element.
When you click , the configuration element string will display a menu that depends on the Type column value.
The menu of the SQL script and Data configuration elements contains the following options:
- Delete – delete a configuration element. Inactive for configuration elements of the pre-installed packages.
- Install – install a configuration element (for the SQL script element, the installation will be performed in the database, while for the Data element, the data installation will be performed for the Object column).
- Discard changes – cancel the changes.
- Properties – open the window of the configuration element properties.
The menu of the Reference assembly configuration element contains the following options:
- Delete – delete a configuration element. Inactive for configuration elements of the pre-installed packages.
- Discard changes – cancel the changes.
- Properties – open the window of the configuration element properties.
The menu of the Object configuration element contains the following options:
- Edit process – open the object for editing. If third persons created the object, the corresponding notification will display.
- Export – download the object. The object will be downloaded in the *.md format.
- Delete – delete a configuration element. Inactive for configuration elements of the pre-installed packages.
- Update database structure – update the database structure for the current object.
- Generate source code – generate the source code of the current configuration element. You can run this option if the process contains compilable elements.
- Discard changes – cancel the changes.
- Properties – open the window of the configuration element properties.
The menu of the Client module, Source code, Case, and Marketing campaign configuration elements contains the following options:
- Export – download the configuration element. The configuration element will be downloaded in the *.md format.
- Delete – delete a configuration element. Inactive for configuration elements of the pre-installed packages.
- Discard changes – cancel the changes.
- Properties – open the window of the configuration element properties.
The menu of the Business-process and User task configuration elements contains the following options:
- Export – download the configuration element. The configuration element will be downloaded in the *.md format.
- Delete – delete a configuration element. Inactive for configuration elements of the pre-installed packages.
- Generate source code – generate the source code of the current configuration element.
- Discard changes – cancel the changes.
- Properties – open the window of the configuration element properties.
You can delete a configuration element by clicking  . This button appears when you hover your cursor over a record in the Configuration section for configuration elements only.
Client Modules are separate functional blocks, downloaded and run on-demand by the AMD technology. System functions are implemented via client modules. All client modules in Creatio share description structures that correspond with the AMD module description format. Custom module types are described in the "Module types and their specificities” article.
The following client module types are available in Creatio:
- non-visual modules (module schema)
- visual modules (view module schema)
- expanding modules and replacing client modules (Replacing schema of the custom model).
The procedure for creating a custom schema differs for various types of schemas.
Creating a new schema of the non-visual module
Non-visual modules represent system functionality that is not associated with data binding or data display in the UI. Examples of non-visual modules in the system are business rule modules (BuisnessRuleModule) and utility modules that implement utility functions.
To create a non-visual module schema:
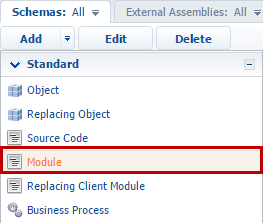
1. Go to the Configuration section and select custom package to add a new schema.
2. On the Schemas tab, select Add — Module.
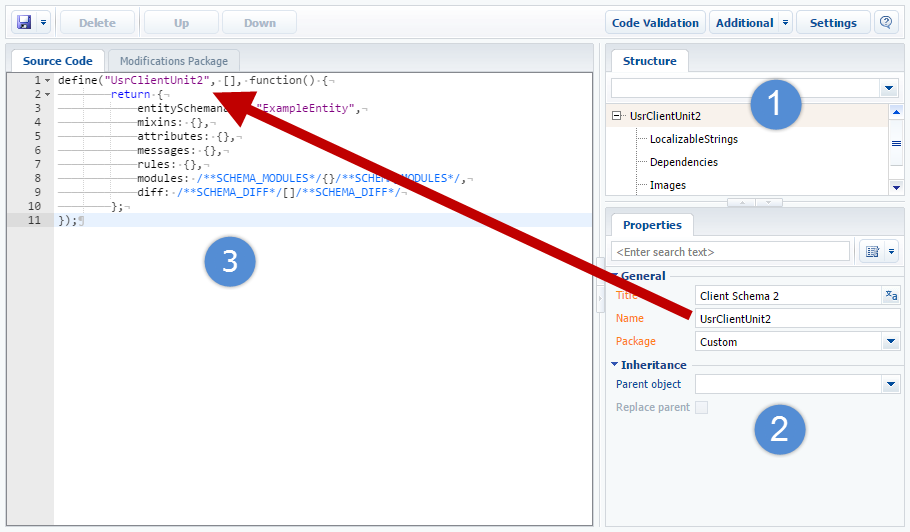
3. Select the root element of the structure in the custom module designer (1) and fill out the properties of the generated schema module (2):
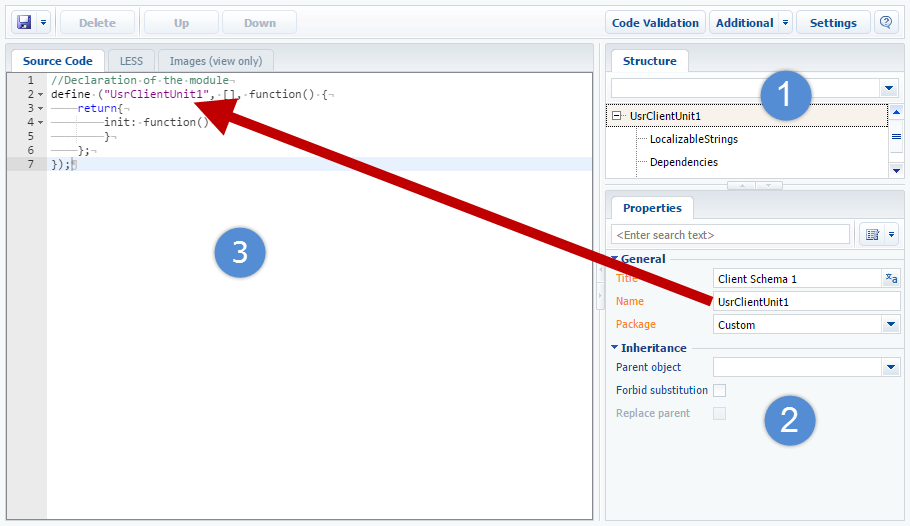
The main properties of the module schema are:
- [Name] – schema name. It may contain only Latin characters and numbers. Contains the prefix specified in the [Object name prefix] system setting (SchemaNamePrefix).
- [Title] – schema title. It can be localized.
- [Package] – custom package where the schema is generated.
4. Add the module source code to the Source code tab (3). You need to make sure that the module name in the define() function is the same as the module schema name.
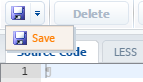
5. Save the module schema after making all the changes:
Creating a new view model schema.
Custom view model schema is a visual module schema. It is a configuration object for generating views and view models by the ViewGenerator and ViewModelGenerator generators. For more information about the schema structure, please see the “Client view model schemas” article.
To create a schema of the visual module:
1. Go to the Configuration section and select custom package to add a new schema.
2. Select one of the commands to add the schema from the “Additional” commands menu on the Schemas tab:
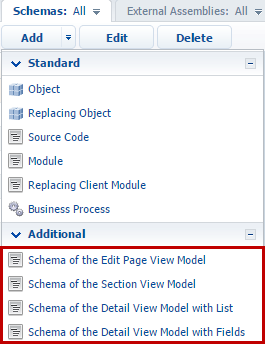
You can add the following types of visual module schemas:
- [Schema of the Edit Page View Model] – a schema of the edit page of section record.
- [Schema of the Section View Model] – a schema of the section page with the list and dashboards.
- [Schema of the Detail View Model with List] – a schema of the edit page of detail with a list.
- [Schema of the Detail View Model with Fields] – a schema of the edit page of detail with fields.
3. Select the root element of the structure in the designer of custom schema model (1) and fill the properties of the generated schema (2):
The view model schema's main properties match with the main properties of the non-visual module schema mentioned above.
4. Add the model schema source code to the Source code tab (3). You need to make sure that the visual module name in the define() function is the same as the view model schema name.
Save the module schema after making all the changes.
Creating a replacing schema
Replacing schemas are used to extend the functions of the already existing schemas. The existing schemas also maybe replacing and belong to different packages.
To create the replacing schema of the non-visual or visual modules:
1. Go to the Configuration section and select custom package to add a new module schema.
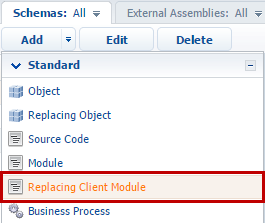
2. On the Schemas tab, select Add — Replacing client module.
3. Select the root element of the structure in the custom module designer (1).
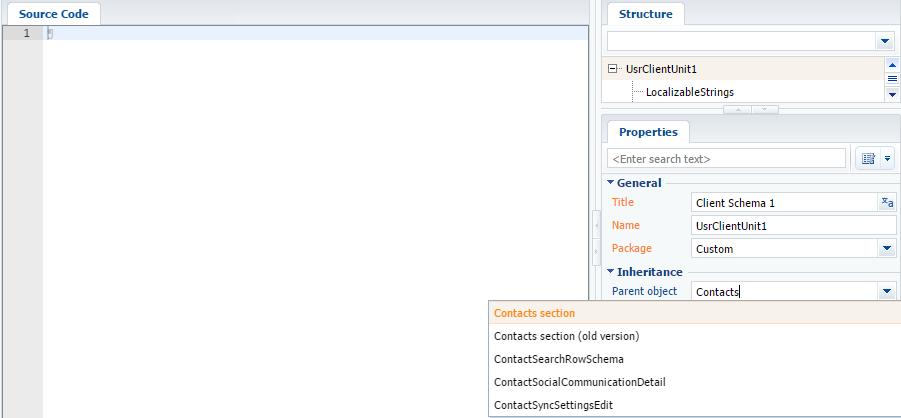
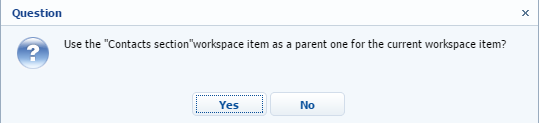
4. To make the replacing module for a specific section or page, specify the title of the base view model schema that you want to replace in the Parent object field of the schema properties. For example, to create a replacing schema for the Contacts section, you need to specify the ContactSectionV2 as a parent object. Start typing the “Contact Section” schema title in the Parent object field of the replacing schema properties and select the corresponding value from the drop-down list.
After confirmation of the selected parent object, the other property fields are filled out automatically.
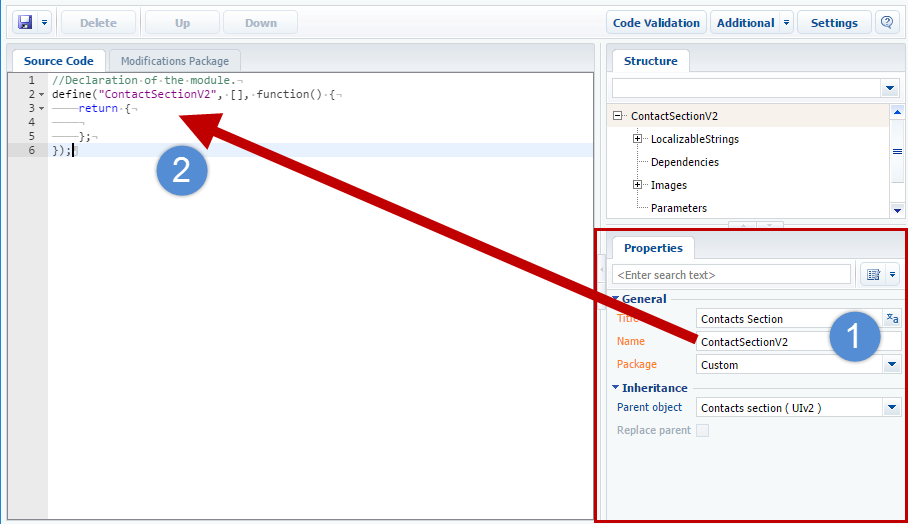
5. Add the model schema source code to the Source code tab. You need to make sure that the replacing module name in the define() function is the same as the view model schema name.
6. Save the module schema after making all the changes.
The ORM (Object-relational mapping) objects in Creatio are based on Creatio objects — entities. An entity is a business model that allows you to declare a new class of ORM model on the server core level. At the base level, creating an entity means creating a table with the same name and with the same columns as the created object. In most cases, each entity is a system representation of a table in the database.
Creatio configuration is based around schemas. Every type of the configuration item is represented by a schema of the appropriate type. From the implementation view point, any type of schema is a kernel class that is inherited from the base Schema class.
An entity as a configuration element is presented by entity schema that is implemented by the EntitySchema class. The composition of the columns indexes and methods is described in entity schemas.
There are base and custom entity schemas.
Base entity schemas are not available for editing and are located in the pre-installed packages.
Custom entity schemas can be created as part of configuration and placed in custom packages. Base schemas can be replaced by custom schemas.
Creating a custom object schema
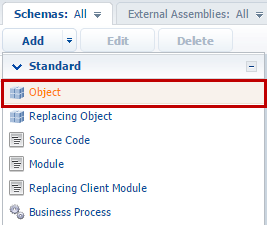
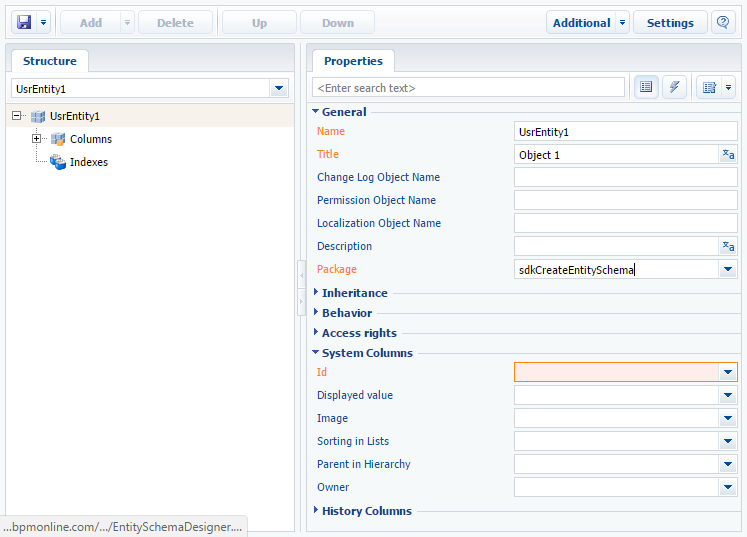
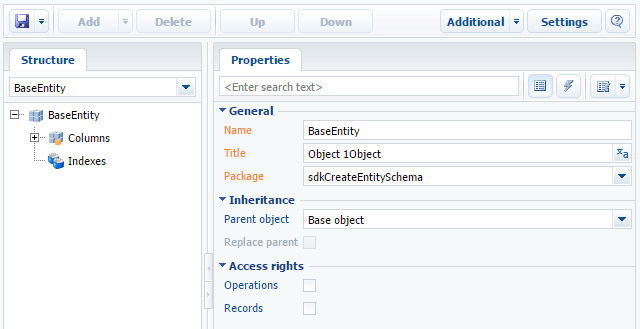
To create a custom schema, open the Configuration section, select a custom package, go to the Schemas tab and select Add — Object command. As a result, the Object designer window will open, where you can configure the created entity.
You need to assign values to the following required properties for the created entity schema:
- [Title] – localized schema title. The default value is set by object designer and can be modified.
- [Name] – schema name. The default value is set by object designer and can be modified. Contains the prefix specified in the [Prefix for object name] system setting (SchemaNamePrefix). By default the prefix is “Usr”.
- [Package] – a package where the entity schema will be placed after the publication. By default, it contains a package name that was selected before the schema creation. Select one of the available packages from the drop-down list.
- [Id] – a system column used as a primary key in the database table. It is displayed in the extended view of the "Object Designer”.
The entity is the representation of the table record in the database and it must have the id column used as a table primary key. If you try to save an object schema without an Id, a warning will pop up.
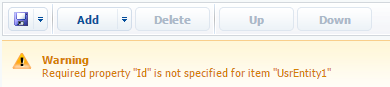
You can set the Id property value by selecting the column of specific type from the drop-down list or by specifying one of base system object as a parent object.
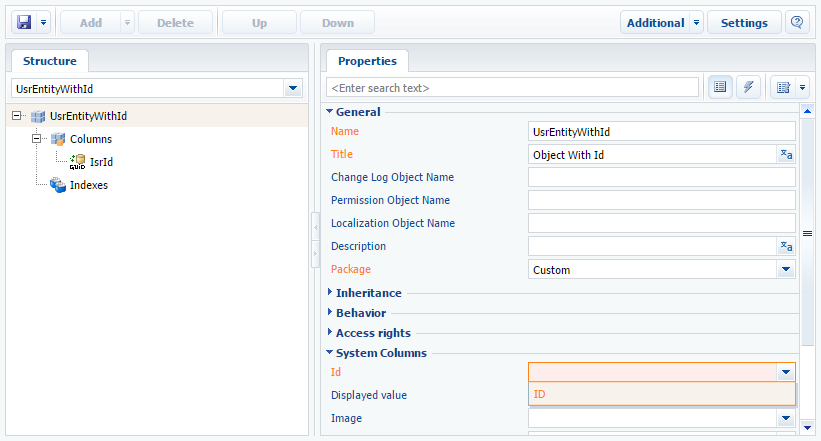
Specifying the parent object
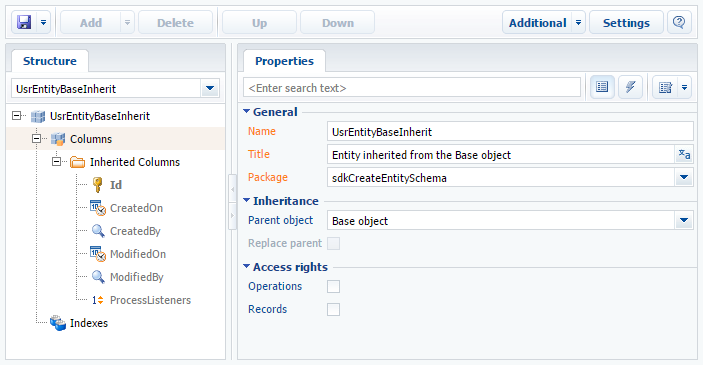
The inheritance mechanism is implemented for Creatio objects. It is used when the created entity schema must have the functionality already implemented in one of the existing entities. The Base object and the Base lookup system objects are used as parent objects in most cases.
To implement the inheritance of a new entity schema from an existing entity schema you need to select the root element of the data structure in the entity schema. In the Parent object field of the schema properties, select the base entity schema whose functionality you need to inherit. To inherit the functionality of the Base object schema, start typing the schema title in the Parent object field and select the schema from the drop-down list.
After confirming the selected parent object, the columns inherited from that object will be added to the entity structure.

Save the object schema to preserve the metadata changes. Publish the schema to create the corresponding table in the database and make the changes available to Creatio users.
Adding a custom column to an entity
This section covers adding an Id column to an entity schema.
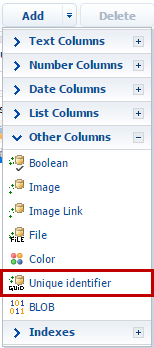
Use Add button or Add command from the context menu of the Columns node in the entity structure to add a custom column. Select the column type from the drop-down list and specify column properties. To add an Id column, execute Add — Unique identifier command.
Specify the properties of the Id column:
- [Title] – column localized title. The default value is set by the object designer and can be modified.
- [Name] – column name. The default value is set by the object designer and can be modified.
- [Data type] – the type of the data in the column. The default value is set by object designer depending on the selected command and can be changed.
- [Required] – specify that the column is required. Since the Id column cannot be empty, select “Application Level” for this property.
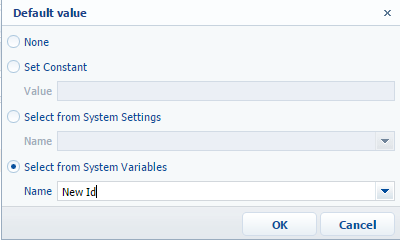
- [Default value] – set the column’s default value. Choose “Select from System Variables” from the default value dialog box (Fig. 10). Then select the name of the system variable in the [Name] field. Select the “New Id” variable, which generates unique Ids.
- [Usage mode] – select the “Advanced” mode.
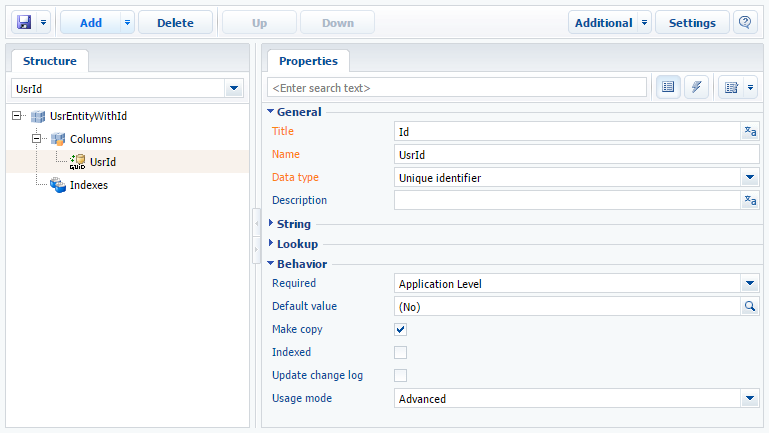
Save the schema after setting values for all required attributes.
Adding indexes to the object
Indexes also can be added to the object. They will be automatically created in the database table when the object is published.
To create an index by one column, select the Indexed checkbox in the Behavior property block. All reference columns are indexed by default.
You can create a composite index in a following way:
- Select [Add] > [Index] in the context menu of the [Indexes] element. You can specify a custom name for the index or select the [Generate Name Automatically] option. After that, the unique index name will be generated by the system.
- To implement an integrity constraint for the columns of the index, i.e. to exclude the possibility of inserting duplicate combinations of values, select the [Unique] checkbox for the index.
- Then add the necessary columns to the index. Select [Add] > [Indexed column] in the context menu of the [Indexes] element. Select the object column and specify the sorting direction for the added indexed column.
Creating the replacing object schema
Replacing object schemas are used to extend the functions of the already existing schemas. The existing schemas also may be replacing and belong to the different packages.
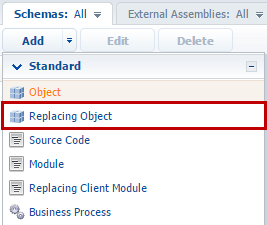
To create a replacing object schema, go to Configuration section and select custom package to add new module schema. On the Schemas tab, select Add > Replacing Object.
To implement the replacement of the new entity schema, select the root element of the data structure in the entity schema. In the Parent object field of the schema properties, select the base entity schema whose functionality you need to replace. To replace the functionality of Base object schema, start typing the schema title in the Parent object field and select the corresponding value from the drop-down list.
After confirmation of the selected parent object (Figure 6), the other property fields are filled in automatically.
After implementing the changes, publish the replacing object schema.
Saving and publishing objects
All structure changes of a business object are stored in RAM.
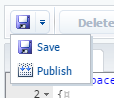
Save the schema to preserve the changes at the metadata level. To do this, select the Save command in the object designer.
To implement changes at the database level, the object must be published. The created (or modified) physical objects in the database (tables, columns, indexes) are the result of successful publication of an object in the Configuration section.
Perform the following actions to create a Back-end (C#) schema.
1. Go to the Configuration section and select the custom package to add a new schema.
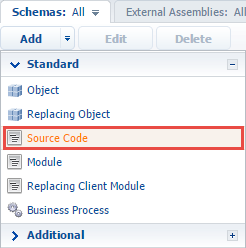
2. On the Schemas tab, run the Add > Source Code command.
3. Select the root element of the structure (1) and fill in the created schema properties (2) in the schema designer.
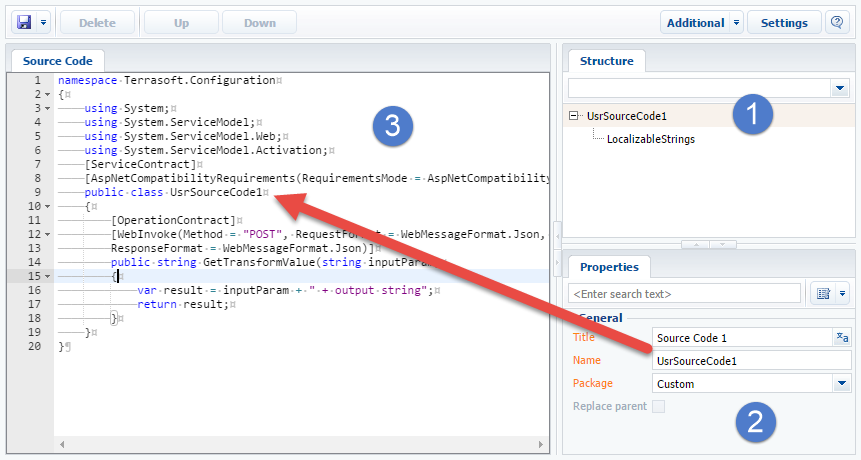
Main Source code schema properties:
- [Name] – schema name. May contain only Latin characters and numbers. Includes the [Prefix for object name] system setting prefix (SchemaNamePrefix).
- [Title] – schema title. May be localized.
- [Package] – a custom package used to create a schema.
4. Use the Source Code tab of the schema designer to add the source code (3). Make sure that the source code declares a class with a name that matches the schema name.
5. Publish the schema: