 button that appears. Press and hold the left mouse button to move the transition arrow to one of the four spots on the frame of the item you want to connect to.
How to create an outbound campaign
Let's consider an example of creating an outbound marketing campaign. For example, we need to create the campaign workflow focused on the audience acquisition from the event using the single-shot bulk email to a particular segment.
Contents
•Goal
In the corresponding sections of the system, create the bulk emails and events to be included in the campaign: For example:
1.In the [Email] section, create two mailings: an invitation to the event and a thank you letter for participation in the event.
Note
How to add bulk email is described in a separate article.
2.Create the required event in the Events section. For example, a seminar on the system for marketing automation.
Attention
Do not add the audience manually to bulk emails and events, because the audience of each item will be automatically defined.
Create a new campaign in the Campaigns section and specify its title. For example, "Capturing audience for the seminar".
Specify the goal of the campaign on the campaign page and specify the expected percentage of the audience needed to reach the campaign goal. For example, 15% of the participants should click the link in a thank-you letter.
Create a campaign workflow using a visual process designer. Add items, define their properties and set up the transitions between the items.
Adding items
1.Select the "Audience" as a start item.
2.Add the rest of the items and place them in the following order: "Bulk email" (invitation letter) – "Event" – "Bulk email" (thank-you letter).
3.Place the final items on the workflow.
Define the properties of the items
In the items properties area:
1.Connect the first "Bulk email" item to the bulk email containing the invitation for the event.
2.Connect the "Event" item to the seminar.
3.Connect the second "Bulk email" item to the bulk email containing a thank-you letter for the participation in the event.
Adding transitions between items.
Add the following transitions to connect the workflow items in the following order: "Audience" – "Bulk email" (invitation letter) – "Event" – "Bulk email" (thank-you letter). Connect the last email in the communication chain to the "Reached the target" and "Exited the campaign" final items.
To add a transition, select the required item and click the button that appears. Press and hold the left mouse button to move the transition arrow to one of the four spots on the frame of the item you want to connect to.
Defining transition properties
In the transition properties area:
1.Specify the "Clicked the link" response to connect the first email to an event.
2.Specify the "Participated" response to connect an event to the second email.
3.Select the instant transition type and specify the "Email opened" and "Email clicked" responses to connect the second email to the "Reached the target" item.
4.Select the transfer type with postponement in days and specify the required number of days to move from the second email to the "Exited the campaign" item.
As a result, the campaign workflow will be as shown in Fig. 131.
Fig. 131 "Capturing the audience for a seminar"
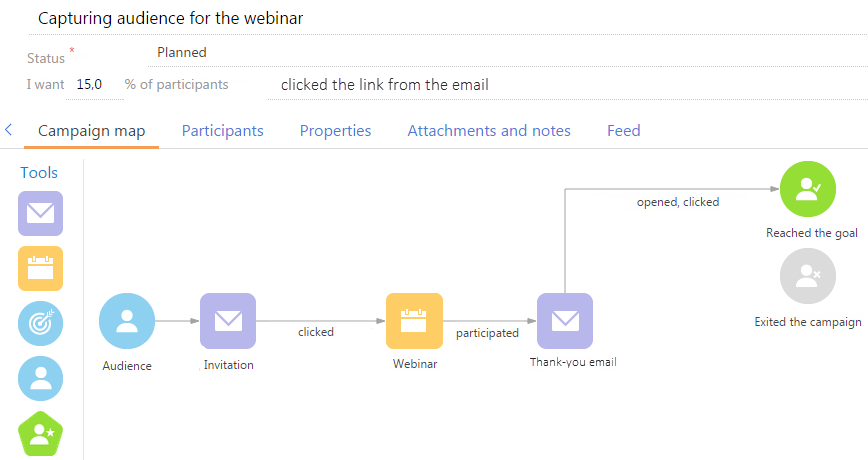
Open the [Participants] tab to build a target audience for your campaign. You can add participants one by one or select the folder that was previously set in the [Contacts] section. As the campaign progresses, you can track the current and the next step for each campaign participant in the [Participant] tab.
Note
You can add the audience manually only for campaigns with workflows that start with the "Audience" start element.
See also
•Items used in the campaign workflow
•How to create and start a campaign