User dialog process element
Have a user select from multiple preset options with the User dialog process element. The selected option determines the element execution result and further process branching.
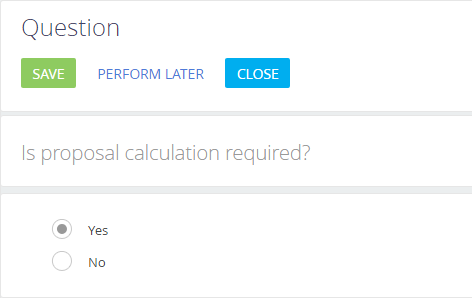
The element setup area contains the dialog text and options a user can select (Fig. 1).
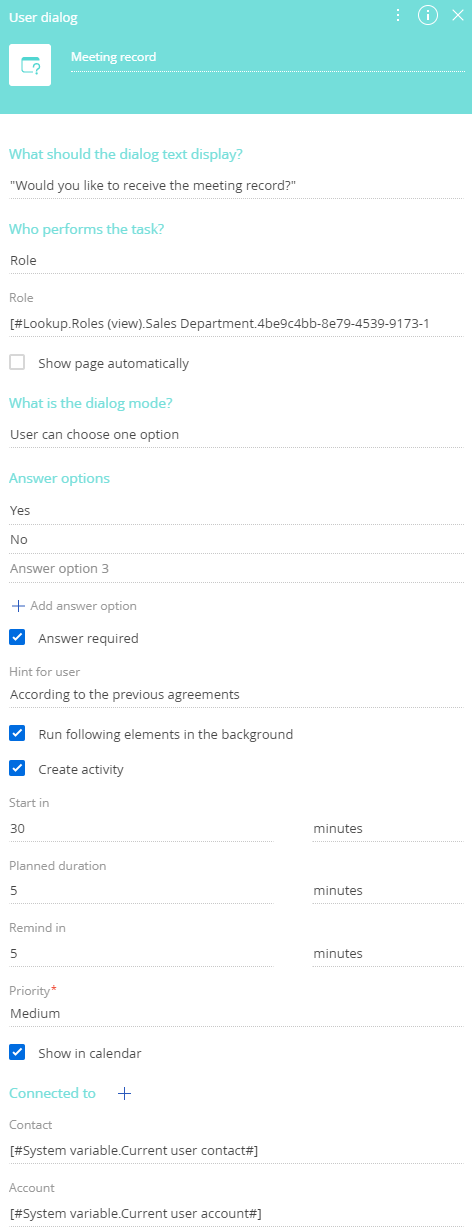
Specify the dialog parameters in the element setup area (Fig. 2).
Fill out the fields using the parameter value menu:
-
Enter the element title at the top of the element setup area. Creatio will display the title on the process diagram.
-
What should the dialog text display? – enter the text to display on the dialog page. Enter the dialog text in the parameter value box. The dialog text is a single line string, therefore it does not support line breaks regardless of syntax. To display the text in the assignee's language, make sure the "Create business process tasks in the owner's language" ("UsePerformerCultureInUserTask" code) system setting is enabled and the Translation section includes the translation. Learn more: Localize UI via the Translation section.
noteIf the assignee a group whose members use different Creatio languages, the dialog will use the default culture.
-
Who performs the task? – select one of the options and fill out the field that opens:
-
"User" – specify the user who will see the dialog page in the Contact field.
-
"Employee's manager" – specify the user whose manager will see the dialog page in the Contact field.
-
"Role" – specify the role the users with which will see the dialog page in the Role field.
You can specify a dynamic parameter value or select a constant value in the parameter value box.
-
-
Show page automatically – select the checkbox to display the dialog page automatically to the current user as soon as the process initiates the action. Creatio does not display the page automatically if the process runs for other users or in the background mode.
-
What is the dialog mode? – select one of the following:
-
User can choose one option – the user will be able to select only a single option. For example, create a new customer or select an existing customer from the list. If you select the User can choose one option option, branch the process using the Exclusive gateway (OR) element (Fig. 3).
Fig. 3 The User dialog element in single selection mode 
-
User can choose multiple options – the user will be able to select multiple options. For example, select with whom to align the contract: customer, manager, lawyer, etc.
If you select the User can choose multiple options option, add a Inclusive gateway (OR) element with an outgoing flow for each option to the process (Fig. 4).
Fig. 4 The User dialog element in multiple option mode 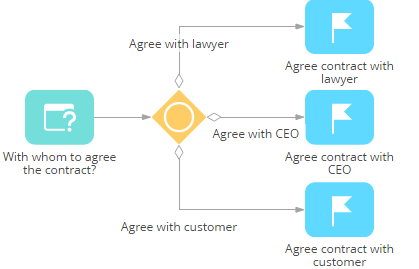
In this case, the process will activate only those conditional flows that correspond to the options the user selected.
-
Answer options – enter the list of available options in this field group. The order of the options in the list corresponds to the order of the options in the dialog box. Change the order using the Move up and Move down list menu options (Fig. 5).
Fig. 5 Change the order of the answer options 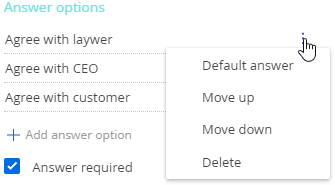 note
noteBy default, there are three answer option fields in the element setup area. If you enter only two options, there will be only two fields in the User dialog element setup area the next time you open it.
Select Default answer in the list menu to specify the preselected dialog option. Regardless of the dialog mode, you can set only one option as default.
Click Add reply option to add a new answer option.
-
Answer required – select the checkbox to make selecting an option required. If the checkbox is cleared, the process will continue even if the user does not select an option.
-
Hint for user – enter additional information about the task. Click the
 button on the dialog page to view the hint.
-
-
Run following elements in the background – select the checkbox to run the elements connected to the outgoing flows in the background.
-
Create activity – select the checkbox to create a corresponding activity as part of this process step. If you select the checkbox, the following fields will become available:
-
Start in – specify the period after which the activity must start, in minutes, hours, days, weeks, or months. The countdown starts as soon as the activity is created. Creatio uses this parameter to populate the Start field of the activity page.
noteThe value of the activity page's Start field is the sum of the current user time and the Start in field value. For example, if you specify "30 minutes" in the Start in field, and the task was created at 12:00 PM, the value of the task's Start field will be "12:30 PM."
-
Planned duration – enter the activity duration, in minutes, hours, days, weeks, or months. Creatio uses this parameter to populate the Due field of the activity page.
noteThe value of the activity page's Due field is the sum of the Start and Planned duration field values.
-
Remind in – specify the period that ends before the activity starts. After this period, Creatio will add a notification for the owner or the role automatically.
-
Show in calendar – select the checkbox to display the task in the Calendar view of the Activities section.
-
Connected to – connect the task to other Creatio entities. For example, an account. Creatio will display the task on the Activities detail of the corresponding record. By default, the element setup area displays account and contact connections. Click the
 button to connect the task to other Creatio entities.
-
If you specify a parameter, Creatio will populate the corresponding field on the activity page when creating a process task. If you do not specify a parameter, the corresponding field on the activity page will remain empty. You will be able to fill it out manually.
See also
Open edit page process element
Auto-generated page process element