Set up and manage segments
Use the Segments section to create reusable groups of contacts, keep them up to date, and make them available to your marketing campaigns and filters. This article covers how to create a segment, define who enters and leaves it, activate it, and manage its lifecycle. Learn more about how segments work: Segments.
Working with a segment usually follows this path: create the segment, configure its entry and exit rules, activate it to populate the audience, then pause, resume, or repopulate it as your data and campaigns change.
To open the Segments section, click the Segmentation app in the Application Hub, then click Run app. An administrator can also add the section to a workplace so that it is available in the navigation. Learn more: Add the Segments section to a workplace.
Create a segment
-
Open the Segments section.
-
Click New. This opens a mini page.
-
Enter the Name of the segment.
The name is required and must be unique across the Segments section. If the name is already in use, Creatio prompts you to choose a different one.
-
Enter a Description (optional).
-
Click Save (Fig. 1). This creates the record.
Fig. 1 New segment mini page 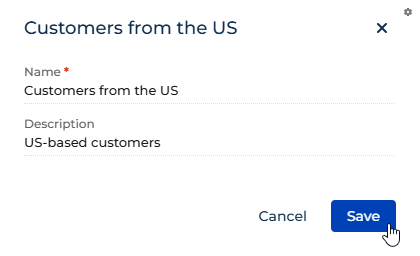
As a result, a new segment is created in the "Draft" status. You can now configure its entry and exit rules.
Configure entry rules
Entry rules define who enters the segment.
-
Open the segment.
-
Open the Entry rules tab.
-
Set up the filter conditions that a contact must match to enter the segment.
The Matching contacts metric shows an approximate, predicted count of contacts that match the current conditions and updates as you edit the filter.
Fig. 2 Entry rules tab 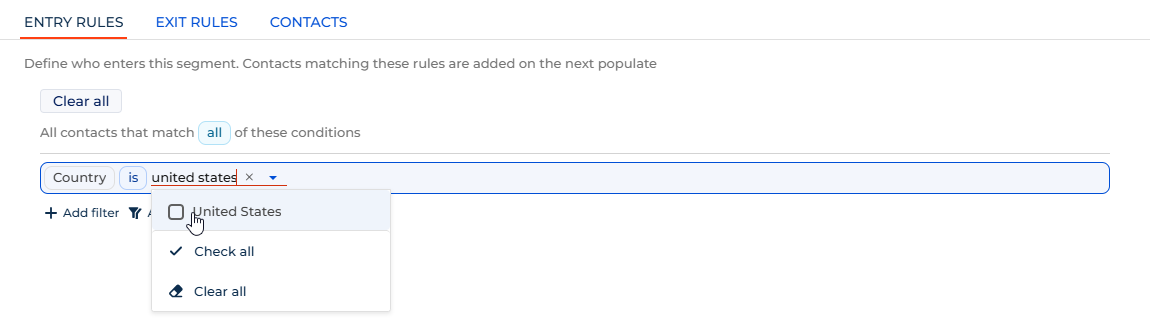
-
Click Save.
As a result, the entry rules are saved and the segment is ready to activate.
Entry conditions use the same builder as any advanced filter in Creatio. Learn more: Set up filters.
Configure exit rules
Exit rules control who leaves the segment. A new segment uses the "On specific conditions" strategy by default.
-
Open the segment.
-
Open the Exit rules tab.
-
Select an exit strategy: "On specific conditions," "No longer matches entry," or "Never exits."
-
Set up the exit filter conditions. This step applies only to the "On specific conditions" strategy.
-
Click Save.
As a result, the exit rules are saved. Learn more about each exit strategy: Segments.
Activate a segment
Activating a segment populates it for the first time and makes it available in campaigns. You can edit a segment's rules only while it is in the "Draft" or "Paused" status, because activating makes the segment read-only.
-
Open the segment.
-
Click Activate segment.
If entry rules are not configured, Creatio prompts you to add entry criteria first. Add the entry rules, then activate the segment again.
-
In the confirmation dialog, review what happens next, then click Activate & populate.
-
Wait for the population to complete.
A banner shows that the segment is being populated. You can leave the page, and Creatio notifies you when the segment is ready.
As a result, the segment moves to the "Active" status and is populated according to its entry and exit rules. The Pause segment and Repopulate now buttons become available, and the segment can be selected in campaigns. To change the rules of an active segment, pause it first.
Pause a segment
Pause a segment to stop its lifecycle or to edit its rules.
- Open an active segment.
- Click Pause segment.
- In the confirmation dialog, click Pause segment.
As a result, the segment moves to the "Paused" status. Its rules stay intact, it stops refreshing, and it cannot be selected in campaigns until you resume it. You can now edit its entry and exit rules.
Resume a paused segment
Resuming brings a paused segment back to life and re-runs its population.
-
Open a paused segment.
-
Click Resume segment.
If entry rules are missing, Creatio prompts you to configure them first.
-
Select a Segment resume mode in the dialog.
- "Replace — start fresh" clears the current contacts and repopulates the segment from scratch. Use it for a clean new send.
- "Add new — top up" keeps everyone already in the segment and adds newly matching contacts.
-
Click Resume & repopulate.
As a result, population runs and the segment returns to the "Active" status when it completes successfully. If the population does not complete, the segment status stays unchanged and the segment form shows the reason, so you can try again.
Repopulate a segment manually
An active segment can be re-run at any time without changing its rules.
- Open an active segment.
- Click Repopulate now.
As a result, Creatio starts the population in the background and confirms that the update has started. The "Last time refreshed" value in the Lifecycle panel updates when the run completes.
Add the Segments section to a workplace
This is an administrator task. The Segments section must be added to a workplace before it appears in the navigation. You can add it to any workplace, for example, "Marketing," "CRM," or "Sales."
-
Open the System Designer.
-
Open the Workplace setup section.
-
Select the workplace to extend and click Open.
-
In the Sections group, click the + button.
-
In the Select: Section by UI type dialog, find the Segments row.
The UI type of the row must be "Freedom UI."
-
Select the Segments row and click Select.
-
Save the workplace.
As a result, the Segments section becomes available to all users assigned to that workplace. Reload the app to see it in the navigation.
Troubleshoot segment errors
The following situations can stop a segment from activating, resuming, or populating.
Situation | What to do |
|---|---|
The segment has no entry rules. | Open the Entry rules tab and define at least one filter condition before you activate or resume the segment. |
A filter references a column you cannot read. | The entry or exit filter references a column you do not have permission to read. Remove that condition, or ask your administrator to adjust your column permissions. |
The name is already in use. | Enter a unique segment name before saving. |
The calculation failed. | Use Try again in the segment calculation error dialog. If the error persists, contact your administrator. |
The population did not complete in time. | The contact database did not respond in time, so no contacts were added, but your rules were saved. Repopulate the segment to try again. If the error persists, ask your administrator to increase the value of the "Segment candidate tables maintenance database command timeout (seconds)" ( |