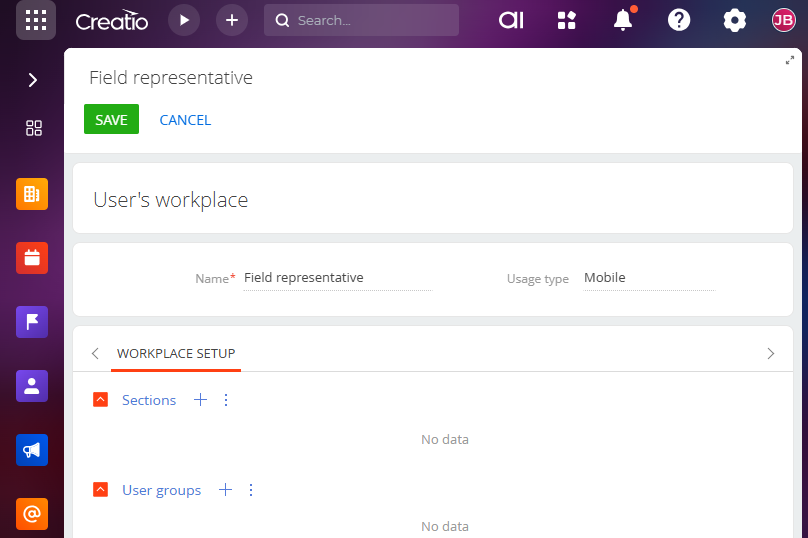
Set up workplaces
The sets of sections displayed on the Creatio navigation panel for different user groups (roles) are called workplaces. You can set up any workplace by creating a list of sections that are necessary for the users in their everyday work. The sections that are not included in it will be hidden from the main Creatio menu.
The list of available workplaces can vary depending on the user group. For example, a Communications workplace can include Activities, Calls and Feed sections available for all system users, and a Supervisor workplace can include administration sections for users and roles that are available for the system administrators group only.
Access to the workplaces does not affect the access to Creatio objects.
The full set of Creatio sections the user can access in every workplace is aggregated in the All apps workplace. If you have both Classic UI and Freedom UI sections for a specific object, the All apps workplace displays only the Freedom UI section. Manage permissions to view this workplace in the "Can view all apps workplace" (CanViewAllAppsWorkplace code) system operation. Creatio does not display the All apps workplace if the user has access to only a single workplace, for example, if they have Limited internal license.
To access the workplace setup:
- Click
 to open System Designer.
 - Go to Set up view → Workplace setup. This opens a page.
You can take the following steps on the page that opens:
- Set up the list of available workplaces. Read more >>>
- Add workplaces. Read more >>>
- Edit existing workplaces. Read more >>>
- Set up sections in the workplace. Read more >>>
- Provide access permissions to the workplace for different functional and organizational user roles. Read more >>>
Set up the list of available workplaces
To set up a sequence of workplaces:
- Select the required record.
- Click
 or
or  to move the record up or down (Fig. 2).
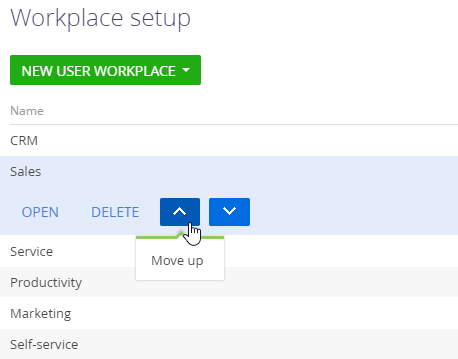
As a result, Creatio will apply the new workplace order for the workplace menu in the navigation panel. The All apps workplace is always displayed first.
Add a workplace
To add a new workplace:
-
Click New user workplace and select the workplace type (Fig. 3):
- General if you want to set up the list of sections for company employees. Workplaces of this type can be used both in the main Creatio application and in the mobile app, depending on the Usage type you select.
- Portal if you want to set up the list of sections for external users.
- Self-service if you want to set up the list of sections for users that have Self-service license. Learn more: Creatio licenses overview. If you add multiple sections of this type, users that have the corresponding license will only see the first workplace as per the sorting order.
- Limited internal if you want to set up the list of sections for internal users that have Limited internal license. Learn more: Creatio licenses overview. If you add multiple sections of this type, users that have the corresponding license will only see the first workplace as per the sorting order.
Fig. 3 Add a workplace 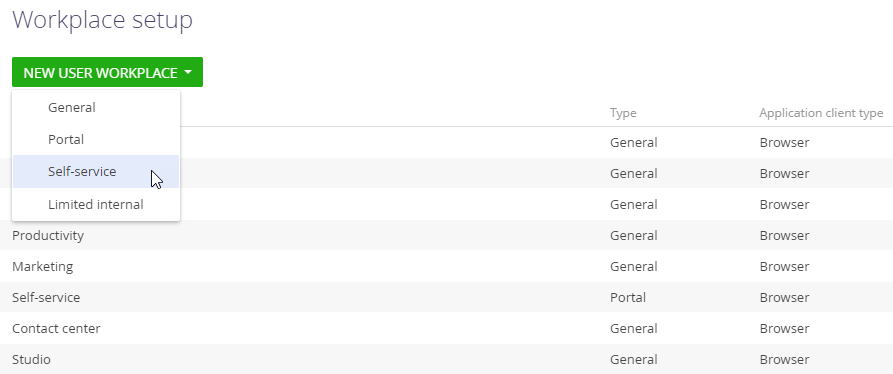
-
Enter the workplace name in the Name field.
-
Select the Usage type for workplaces of the General type:
- Web — the workplace appears in the main Creatio application.
- Mobile — the workplace appears in the Creatio mobile app. Available in Creatio 8.3.3 and later. Learn more: Set up mobile app workplaces.
-
Select the homepage in the Home page field or click
 to create one from scratch. Available only for workplaces of the General type. Learn more: Set up a homepage.
 -
Select the Use only in shell checkbox to display the workplace in Freedom UI. If the checkbox is cleared, Creatio displays the workplace both in Freedom UI and Classic UI.
-
Save the changes.
Edit a workplace
To edit an existing workplace, select a workplace in the workplace list → Open (Fig. 4).
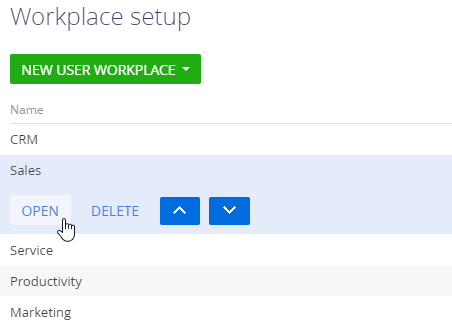
This opens the workplace setup page (Fig. 5).
You can edit the workplace parameters by following steps 2–6 in the previous section.
Set up sections in the workplace
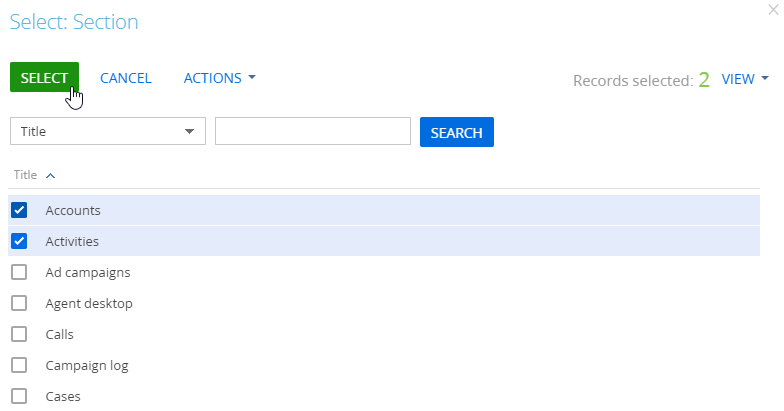
You can set up a list of sections for the workplace using the toolbar on the Sections detail. The setup is the same for web and mobile workplaces. To do that:
- Click the button on the detail toolbar. This opens a window (Fig. 6).
-
Select the required sections → Select.
-
Save the changes.
If you have a Freedom UI and Classic UI section of the same name, Creatio displays both of them in the selection window.
You can select from any section in the Self-service and Limited internal workplace types, but users that have the corresponding license type will only be able to see the sections permitted by their license. For example, if you add Cases, Knowledge base, and Accounts sections to a workplace of Self-service type, users that have the corresponding license will be able to view only Cases and Knowledge base sections. Learn more: Creatio licenses overview.
You can only select from sections available for external users in the Portal workplace type.
To remove a section from a workplace:
-
Select the required record in the block.
-
Click
 → Delete.
 -
Save the changes.
The sequence of the records in the Sections detail is the sequence in which the sections will be displayed in the Creatio navigation panel. To move the required detail record up or down:
-
Select the record.
-
Click the
or buttons. -
Save the changes.
Configure sections in the Application Designer. Learn more: Manage app elements in the Application Designer.
Creatio always displays sections in the All apps workplace in alphabetical order.
Set up user roles that need to access the workplace
View organizational and functional user roles that can access the workplace on the User groups detail. The roles you can add can differ based on the workplace type. For example, you can only add internal users to Limited internal workplace. For Mobile workplaces, you can assign user groups or individual users — the setup mirrors the web workflow.
To set up access to the workplace:
-
Go to the User groups detail toolbar and click the
button. This opens a window (Fig. 7).Fig. 7 Set up access to the workplace for user groups 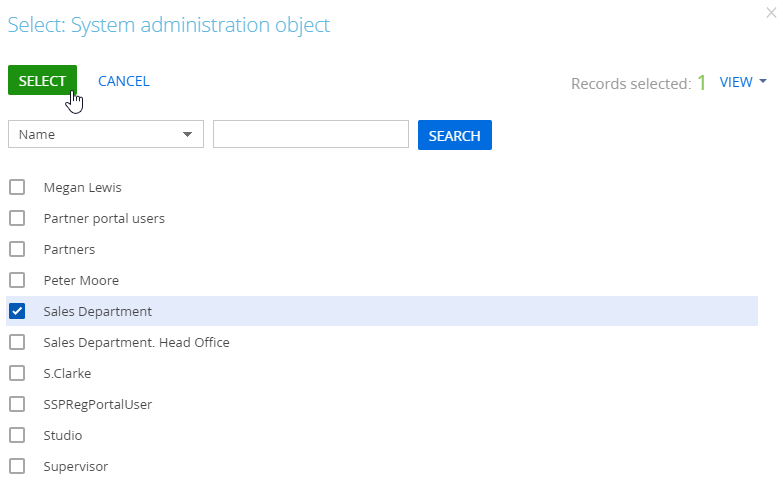 note
noteYou can configure a list of functional and organizational roles, as well as a list of users, in the "Users and administration" block of the System Designer. Learn more: Users and permissions.
-
Select the roles you need → Select. Selected roles will be added to the User groups detail of the workplace.
-
Save the changes.
As a result, all users of the selected roles will have access to the workplace.
The changes will be applied after the user logs in the next time.