Deploy the Identity Service
Identity Service implements OAuth 2.0 in Creatio.
If you use Creatio in the cloud, the Identity Service is deployed out of the box. Proceed with generating OAuth 2.0 client credentials. Instructions: Set up client credentials grant, Set up authorization code grant.
Install the Identity Service
This is a one-time procedure. Before you install the Identity Service, deploy the database and Creatio application servers.
This functionality is available for Creatio deployed on either .NET Framework or .NET 8 in Creatio 8.3.2 and later. In Creatio 8.3.1 and earlier the functionality is available for Creatio deployed on .NET Framework only.
You can install the Identity Service in multiple ways:
- Using IIS. Read more >>>
- Using Docker. Read more >>>
To sign access and refresh OAuth tokens, the Identity Service utilizes OpenSSL certificates. You can use a certificate issued by a trusted certificate authority or alternatively, a manually generated certificate. Learn more: Generate PFX certificate using OpenSSL.
To maintain robust security standards, we recommend using unique certificates for each individual instance of the Identity Service.
Install the Identity Service using IIS
Install the Identity Service into the Creatio application server. Each Creatio instance needs an individual Identity Service.
To install the Identity Service using IIS:
-
Install additional components.
- .NET 8 Runtime. Download the install file
- .NET 8 Hosting Bundle. Download the install file
-
Restart the IIS.
-
Extract the IdentityService.zip archive to an arbitrary directory in the root Creatio directory. For example, "IdentityService."
-
Add the Identity Service application pool to the IIS. Use dedicated application pool for every Creatio instance.
-
Open the Application Pools section in the Connections area of the IIS.
-
Select Add Application Pool... in the Actions area (Fig. 1). This opens the Add Application Pool window.
Fig. 1 Add the pool to the IIS 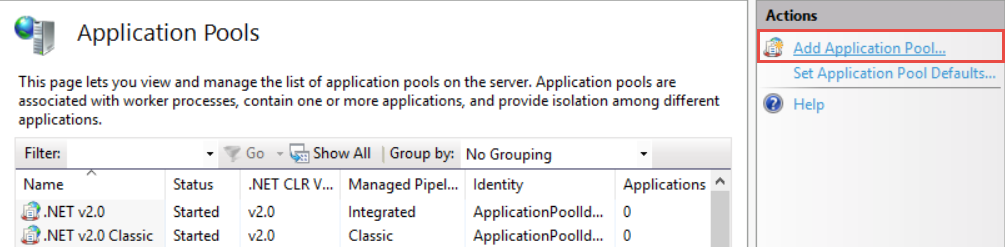
-
Fill out the settings.
Setting
Setting value
Name
Must be unique. For example, "IDServicePool."
.NET CLR Version
No Managed Code
Managed pipeline mode
Integrated
-
Save the changes.
As a result, the "IDServicePool" pool will be added (Fig. 2).
Fig. 2 Identity Service pool 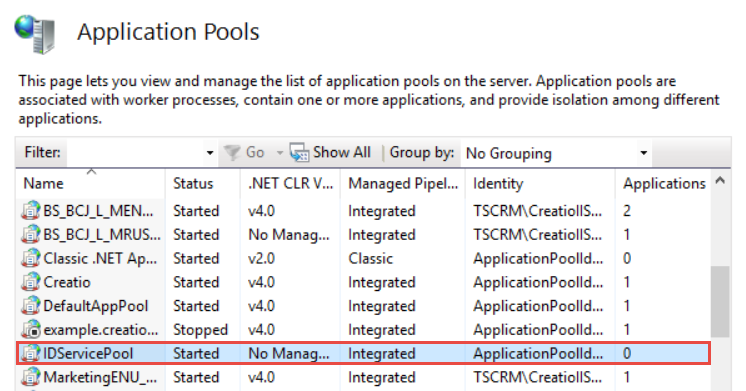
-
-
Set up access to the application pool (optional for development environment). By default, the Windows user accesses the application pool.
-
Select "IDServicePool" in the Application Pools area.
-
Select Advanced Settings... in the Actions area (Fig. 3). This opens the Advanced Settings window.
Fig. 3 Set up access 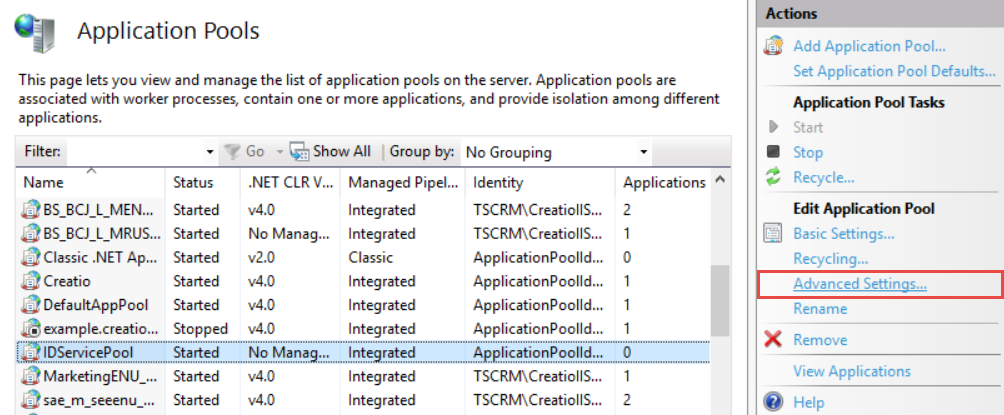
-
Set Load User Profile setting to "True."
-
Click
 in the Identity setting of the Advanced Settings window. This opens the Application Pool Identity window.
 -
Select the Custom account checkbox and click Set... (Fig. 4). This opens the Set Credentials window.
Fig. 4 Add a new user 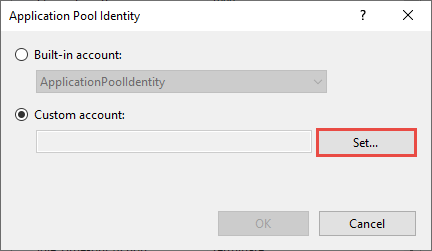
-
Fill out the User name, Password, Confirm password user settings.
-
Save the changes.
-
-
Create the Identity Service website in the IIS.
-
Click Sites → Add Website in the Connections area of the IIS. This opens the Add Website window.
-
Fill out the website settings.
Setting
Setting value
Site name
An arbitrary website name. For example, "IDServiceWebsite."
Application pool
Click Select... and select the "IDServicePool" in the Application pool setting.
Physical path
The path to the root Identity Service directory.
Port
The port for the Identity Service. Must be unique. For example, "8090."
-
Save the changes.
As a result, the website for Identity Service will be created (Fig. 5).
Fig. 5 Website for Identity Service 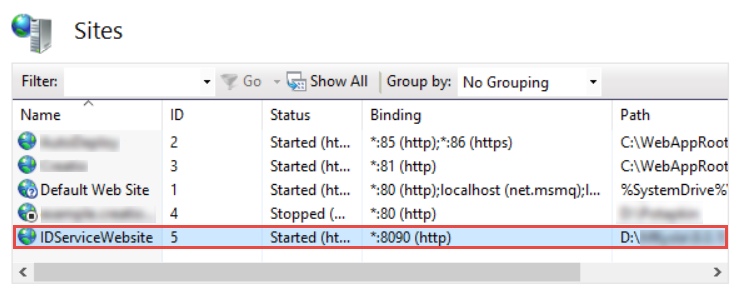
-
-
Connect the website to your Creatio DBMS.
-
Open the appsettings.json file in the root Identity Service directory.
-
Modify the file parameters.
Parameter
Parameter value
DbProvider
"MsSqlServer" or "Postgres"
DatabaseConnectionString
Use the same connection string you specified in the
connectionStringattribute of the ConnectionStrings.config file. Use escaped characters.The user that connects to the database must have permissions to create and update the tables.
-
Save the changes.
-
-
Set up the Identity Service system client.
-
Open the appsettings.json file in the root Identity Service directory.
-
Modify the file parameters. The Identity Service uses these values to interact with Creatio. All parameters support uppercase and lowercase letters, numbers, and special characters, for example, brackets or punctuation marks.
Parameter
Parameter value
Requirements for parameter value
ClientId
An arbitrary client ID. For example, "IdServiceUser."
16 characters
ClientName
An arbitrary client name. For example, "MyIdentityServiceApp."
Any number of characters
Secrets
An arbitrary client secret. For example, "ItIsMyPasswordForIdentityService."
32 characters
appsettings.json file"Clients": "[{\"ClientId\":\"SOME_CLIENT_ID\",\"ClientName\":\"SOME_CLIENT_NAME\",\"Secrets\":[\"SOME_CLIENT_SECRET\"],\"AllowedGrantTypes\":[\"implicit\",\"client_credentials\"],\"RedirectUris\":[\"http://localhost:8090\",\"http://localhost:8090/lib\",\"http://localhost:8090/lib/\"],\"PostLogoutRedirectUris\":[\"http://localhost:8090\"],\"IdentityTokenLifetime\": 300,\"AccessTokenLifetime\": 3600,\"Properties\": {\"AllowedQueryParameters\": \"[\\\"invitationHash\\\",\\\"targetSubject\\\"]\"},\"AllowedScopes\": [\"register_own_resource\", \"get_resource_list\", \"get_client_info\", \"find_clients\", \"remove_client\", \"update_client\", \"add_registrar_client\", \"IdentityServerApi\"]}]", -
Save the changes.
-
-
Generate openssl.pfx certificate by a trusted certificate authority or manually. Instructions: Generate PFX certificate using OpenSSL.
OAuth and OpenID authorization functionality support certificates encrypted with RSA, or ECDSA using the following combinations: P-256 with SHA-256, P-384 with SHA-384, or P-521 with SHA-512. When using certificates from a certificate authority, ensure they are signed with a supported encryption type to guarantee compatibility.
-
Set up the access to openssl.pfx certificate.
- Open the appsettings.json file in the root Identity Service directory.
- Specify the full path to openssl.pfx certificate from the root Identity Service directory in the
X509CertificatePathparameter. Use escaped characters. - Save the changes.
-
Switch the Identity Service to HTTPS (optional for development environment). The setup process is similar to switching Creatio to HTTPS. Instructions: Switch a Creatio website from HTTP to HTTPS.
-
Set up the Identity Service logging. Enable logging to verify that the Identity Service operates as expected. For optimal performance, enable logging only while testing and debugging.
-
Open the web.config file in the root Identity Service directory.
-
Set the
stdoutLogEnabledparameter to "true." -
Specify the directory to store the Identity Service logs in the
stdoutLogFileparameter. You can leave default parameter value. The directory will be created automatically when you first launch the IdentityService.dll library. -
Save the changes.
-
Open the appsettings.json file in the root Identity Service directory.
-
Configure the log level.
appsettings.json file"Logging": {"LogLevel": {"Default": "Debug"}}Specify the log level based on your business goals. Learn more: Define the log rules (developer documentation).
-
Save the changes.
-
As a result:
- The application pool and website for Identity Service will be created.
- The Identity Service will be launched.
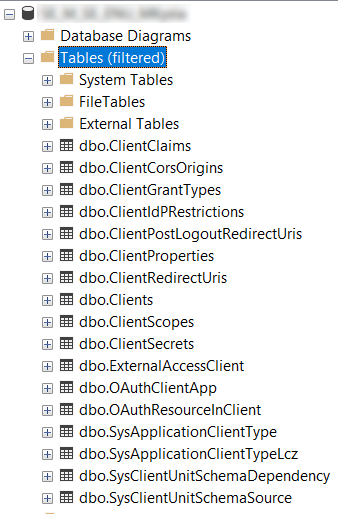
- The Identity Service will create a set of database tables (Fig. 6).
- The client settings from the appsettings.json file will be added to the "Clients" database table.
If you need to change the client settings:
- Delete the record from "Clients," "ClientScopes," "ClientSecrets," "ClientClaims" Identity Service database tables.
- Relaunch the IdentityService.dll library.
- Restart the Identity Service application pool.
- Test the Identity Service.
Install the Identity Service using Docker
-
Extract the IdentityService.zip archive to an arbitrary directory in the root Creatio directory. For example, "IdentityService."
-
Connect the website to your Creatio DBMS in one of the multiple ways:
- Modify the appsettings.json file in the Identity Service root directory before building.
- Modify the Dockerfile-OAuth file and add environment variables using the ENV directive. For example, specify "Postgres" in the
ENV DbProviderparameter. The parameter value will be set when the container starts. - Specify the environment variables when running the container. For example, use the
docker run --env=DbProvider=Postgrescommand.
Regardless of the chosen method, configure the following parameters:
Parameter
Parameter value
DbProvider
"MsSqlServer" or "Postgres"
MsSqlConnection or PostgresConnection
Use the same connection string you specified in the
connectionStringattribute of the ConnectionStrings.config file.The user that connects to the database must have permissions to create and update the tables.
-
Generate openssl.pfx certificate by a trusted certificate authority or manually. Instructions: Generate PFX certificate using OpenSSL.
OAuth and OpenID authorization functionality support certificates encrypted with RSA, or ECDSA using the following combinations: P-256 with SHA-256, P-384 with SHA-384, or P-521 with SHA-512. When using certificates from a certificate authority, ensure they are signed with a supported encryption type to guarantee compatibility.
-
Set up the Identity Service system client. To do this, modify the file parameters. The Identity Service uses these values to interact with Creatio. All parameters support uppercase and lowercase letters, numbers, and special characters, for example, brackets or punctuation marks.
Parameter
Parameter value
Requirements for parameter value
ClientId
An arbitrary client ID. For example, "IdServiceUser."
16 characters
ClientName
An arbitrary client name. For example, "MyIdentityServiceApp."
Any number of characters
Secrets
An arbitrary client secret. For example, "ItIsMyPasswordForIdentityService."
32 characters
Example that sets up the Identity Service system client"Clients": "[{\"ClientId\":\"SOME_CLIENT_ID\",\"ClientName\":\"SOME_CLIENT_NAME\",\"Secrets\":[\"SOME_CLIENT_SECRET\"],\"AllowedGrantTypes\":[\"implicit\",\"client_credentials\"],\"RedirectUris\":[\"http://localhost:8090\",\"http://localhost:8090/lib\",\"http://localhost:8090/lib/\"],\"PostLogoutRedirectUris\":[\"http://localhost:8090\"],\"IdentityTokenLifetime\": 300,\"AccessTokenLifetime\": 3600,\"Properties\": {\"AllowedQueryParameters\": \"[\\\"invitationHash\\\",\\\"targetSubject\\\"]\"},\"AllowedScopes\": [\"register_own_resource\", \"get_resource_list\", \"get_client_info\", \"find_clients\", \"remove_client\", \"update_client\", \"add_registrar_client\", \"IdentityServerApi\"]}]", -
Build the Docker image. To do this, run the
docker build -t creatio-identity-service -f ./Dockerfile-OAuth .command. -
Run the container using the following command:
docker run --env=PATH=/usr/local/sbin:/usr/local/bin:/usr/sbin:/usr/bin:/sbin:/bin--env=ASPNETCORE_URLS=http://+:80 --env=DOTNET_RUNNING_IN_CONTAINER=true--env=DOTNET_VERSION=8.0.10 --env=ASPNET_VERSION=8.0.10 --workdir=/app-p 80:80 -d creatio-identity-service:latest -
Switch the Identity Service to HTTPS.
-
Obtain a digital certificate from the certification center. Instructions: Windows using Linux containers (official vendor documentation).
-
Run the following command:
docker run --env=PATH=/usr/local/sbin:/usr/local/bin:/usr/sbin:/usr/bin:/sbin:/bin-e ASPNETCORE_URLS="https://+;http://+" -e ASPNETCORE_HTTPS_PORT=443-e DOTNET_RUNNING_IN_CONTAINER=true -e DOTNET_VERSION=8.0.10-e ASPNET_VERSION=8.0.10 -e ASPNETCORE_Kestrel__Certificates__Default__Password=SOME_CERTIFICATE_PASSWORD-e ASPNETCORE_Kestrel__Certificates__Default__Path=/https/aspnetapp.pfx-v %USERPROFILE%\.aspnet\https:/https/ --workdir=/app -p SOME_HTTP_PORT:80 -p SOME_HTTPS_PORT:443-d creatio-identity-service:latestParameter
Parameter value
Parameter description
-e ASPNETCORE_URLS
https://+;http://+
Environment variable that switches the Identity Service to HTTPS
-e ASPNETCORE_HTTPS_PORT
443
Environment variable that sets the port number for HTTPS
-e DOTNET_RUNNING_IN_CONTAINER
true
Variables for working via .NET
-e DOTNET_VERSION
6.0.15
-e ASPNET_VERSION
6.0.15
-e ASPNETCORE_Kestrel__Certificates__Default__Password
SOME_CERTIFICATE_PASSWORD
Password for the openssl.pfx certificate
-e ASPNETCORE_Kestrel__Certificates__Default__Path
SOME_CERTIFICATE_PATH. For example, "/https/aspnetapp.pfx."
Path to the openssl.pfx certificate
-v %USERPROFILE%.aspnet\https:/https/
–
Path to the certificate storage
--workdir
/app
Working directory
-p SOME_HTTP_PORT:80
–
Port numbers that map the container to Docker environment. Docker serves the HTTP version of Identity Service via this port.
-p SOME_HTTPS_PORT:443
–
Port numbers that map the container to Docker environment. Docker serves the HTTPS version of Identity Service via this port.
-d
–
A container startup format. Does not depend on the process that runs the container.
creatio-identity-service:latest
–
The name of the Docker image to run.
-
-
Set up the Identity Service logging. Enable logging to verify that the Identity Service operates as expected. For optimal performance, enable logging only while testing and debugging.
-
Open the appsettings.json file in the root Identity Service directory.
-
Configure the log level.
appsettings.json file"Logging": {"LogLevel": {"Default": "Debug"}}Specify the log level based on your business goals. Learn more: Define the log rules (developer documentation).
-
Save the changes.
-
As a result:
- The application pool and website for Identity Service will be created.
- The Identity Service will be launched.
- The Identity Service will create a set of database tables (Fig. 6).
- The client settings from the appsettings.json file will be added to the "Clients" database table.
If you need to change the client settings:
- Delete the record from "Clients," "ClientScopes," "ClientSecrets," "ClientClaims" Identity Service database tables.
- Relaunch the IdentityService.dll library.
- Restart the Identity Service application pool.
- Test the Identity Service.
Test the Identity Service (optional)
To test the Identity Service, access the [Identity Service URL]/.well-known/openid-configuration URL from the browser.
As a result, the list of Identity Service settings will be displayed.
You can set up automated monitoring systems based on OAuth health monitoring. Instructions: OAuth health monitoring. If needed, use Postman to test the Identity Service and check the health of OAuth functionality. The Postman request collection that tests requests is available in Creatio API documentation.
Now you can connect the Identity Service to Creatio. Instructions: Connect the Identity Service to Creatio.
See also
Connect the Identity Service to Creatio
Set up client credentials grant
Set up authorization code grant
OAuth 2.0 authorization (developer documentation)
NLog (developer documentation)
E-learning courses
Tech Hour - Integrate like a boss with Creatio, part 2 (Odata)