Switch a Creatio website from HTTP to HTTPS
The HTTPS protocol ensures secure connection between a client and a web service. Switching from HTTP to HTTPS is recommended to increase system security and enable additional services, such as WebRTC support in Webitel. Please note that this article refers only to on-site applications. To switch to HTTPS, you need to change several options of the website in IIS and edit the Web.config file. Creatio cloud uses secure connection by default.
You will not be able to use the advantages of HTTPS if Creatio application is deployed on Windows Server 2008.
IIS setup
Before configuring HTTPS, do the following:
-
Obtain a digital certificate from the certification center in PFX format;
noteIf you are using a self-signed certificate, Creatio mobile application will not be able to connect to the Creatio site due to the security policies of mobile applications.
-
Set up websockets for the correct operation of all system components;
-
Additionally, check the list of installed IIS components to avoid errors during Creatio setup and operation.
The received digital certificate must be loaded into the server certificate storage:
-
Open Internet Information Services (IIS) Manager.
-
In the main IIS window, double-click the Server Certificates detail (Fig. 1).
Fig. 1 Selecting the Server Certificates detail 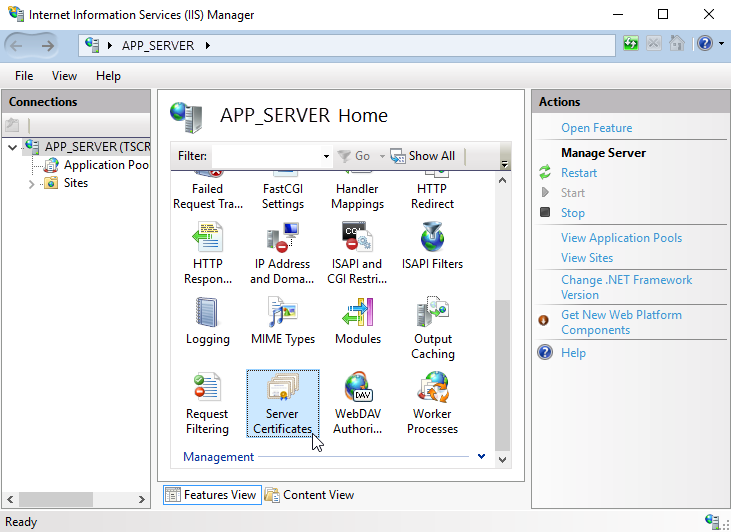
-
In the Server Certificates window, click the import link in the action menu to the right (Fig. 2).
Fig. 2 Opening the Import window 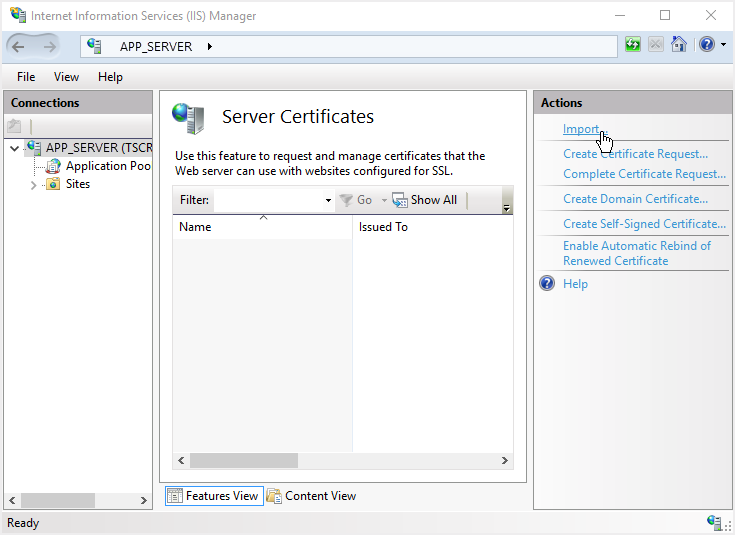
-
In the import dialog box, specify:
-
Path to the import file hosted on the server
-
Password (if required)
-
Certificate storage (Fig. 3)
Fig. 3 Certificate import window 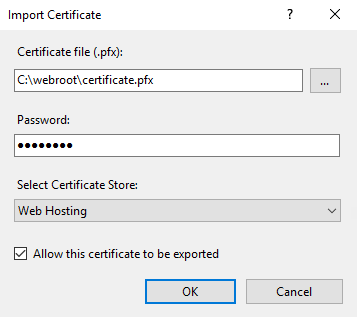
-
-
Click OK to import the certificate.
Next, connect the imported certificate to the Creatio application:
-
In the IIS window, go to the application website by clicking its name in the left Connections menu (Fig. 4).
Fig. 4 Selecting the Creatio website in the IIS window 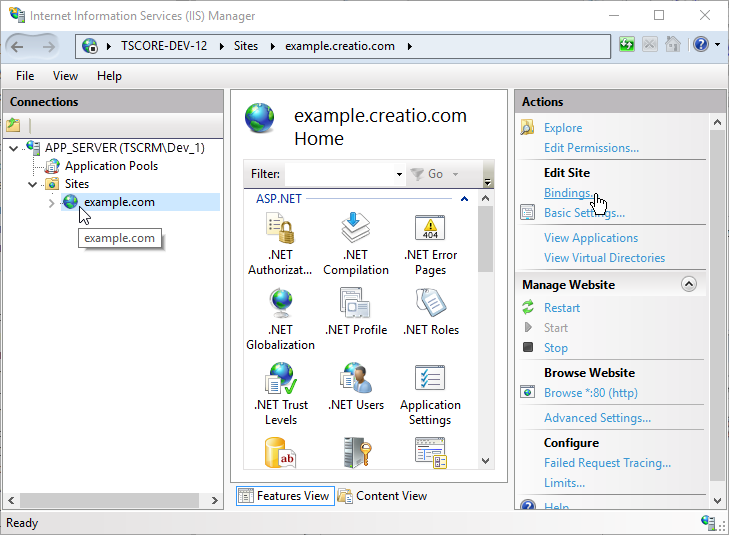
-
Click the Bindings link in the action menu (Fig. 5).
Fig. 5 Selecting website bindings 
-
In the website bindings menu, click Add and add a new binding. In the Add Site Binding window, specify:
-
Type "https"
-
Website address
-
SSL certificate (Fig. 6).
Fig. 6 Binding a certificate to the Creatio website 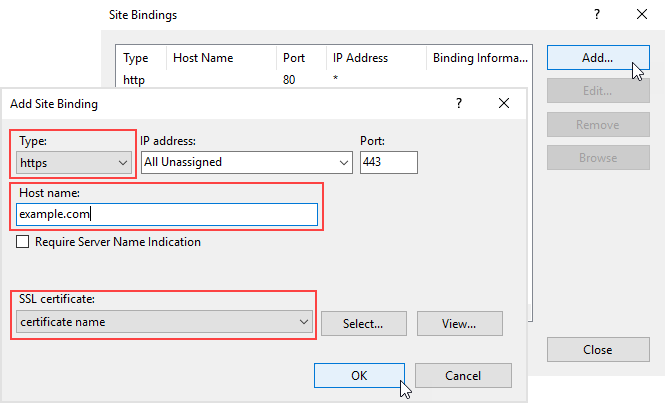
-
-
Click OK to confirm the settings.
Now the certificate is successfully bound to the web application.
Web.config setup
After adding the certificate, you need to make changes to the Web.config configuration file, located in the root directory of the Creatio website.
-
At the end of the file, find:
<behaviors configSource="Terrasoft.WebApp\ServiceModel\http\behaviors.config" /><bindings configSource="Terrasoft.WebApp\ServiceModel\http\bindings.config" /> -
Change paths from "http" to "https":
<behaviors configSource="Terrasoft.WebApp\ServiceModel\https\behaviors.config" /><bindings configSource="Terrasoft.WebApp\ServiceModel\https\bindings.config" />
Edit the Web.config file located in the Path to the root website directory\Terrasoft.WebApp directory.
-
Set the variable value to encrypted="true". The configuration differs depending on the operating system of the server with Creatio application.
For Windows Server 2022 and higher, the configuration string should look as follows:
<wsServicetype="Terrasoft.Messaging.MicrosoftWSService.MicrosoftWSService,Terrasoft.Messaging.MicrosoftWSService" encrypted="true"portForClientConnection="443" maxConnectionNumber="100"clearIdleSession="false" clearIdleSessionInterval="120" /> -
At the end of the file, find:
<services configSource="ServiceModel\http\services.config" /> -
Change the path from "http" to "https":
<services configSource="ServiceModel\https\services.config" />
Save the configuration files.
Restart the application in the IIS and then go to your Creatio website. If all is done right, then in the address bar you will see "https://" before the web address of the application.