Form product conditions
In Creatio, a set of product details comprises the complete profile of a product. These details consist of:
- Customer parameters – requirements that the customer must meet to be able to purchase the product. Customer parameters include age limitations, working experience, etc.
- Product features – static parameters that characterize the product. Product features include product currency, early repayment, etc.
- Sales conditions – product details that change depending on each particular sale. For example, the interest rate for a 12-month loan will be different from that of an 18 months loan.
- Documents package – the list of documents that the customer must provide to purchase the product. For example, if a customer needs to provide an internal passport, an extract from a salary account, or other documents to purchase a banking product.
- Condition change criteria – additional conditions that can affect the product details. For example, condition change criteria include a positive credit history, which can justify decreasing the interest rate.
Each record on the Product details detail is a separate set of conditions. A product can have multiple sets of conditions with different terms.
Set up customer parameters
This article covers the setup procedure for the customer’s parameters. For example, the customer has the following parameters:
- Age: 21 to 65 years.
- Residency status: resident.
- Employment status: has been employed for no less than 12 months with the current employer.
- Has been a resident for no less than 6 months.
To specify the customer parameters:
-
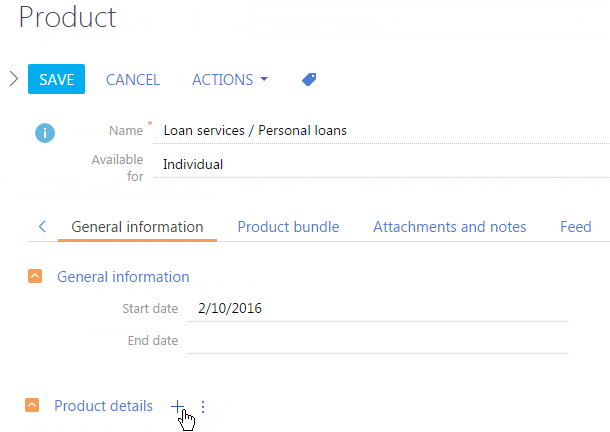
Go to the Products section, create a new product, or open the needed product page.
-
Click the
 button on the Product details detail (Fig. 1).
Fig. 1 Adding a product condition 
-
On the Product details page (Fig. 2) enter the start and end dates for the product conditions.
Fig. 2 Product condition page 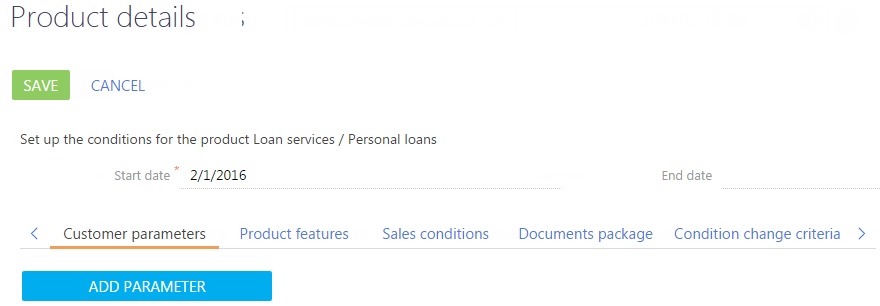
-
Click the Add parameter button on the Customer characteristics tab.
-
Select "Male age, years", for example, in the empty field (Fig 3.).
Fig. 3 Selecting characteristics 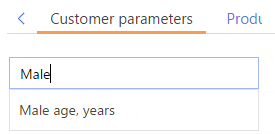
As a result, the Male age, years field will appear on the Customer parameters tab.
-
Change the view of the value entry field to enter values:
- Place the cursor over the selected value.
- Click
 .
. - Select Value range (minimum/maximum) (Fig. 4).
Fig. 4 Changing the field view 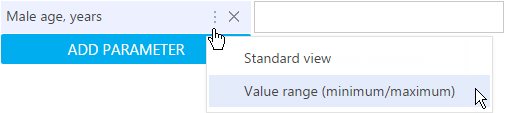
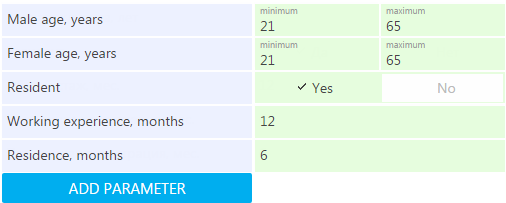
- Enter the required range of values (Fig. 5).
Fig. 5 Specifying a value range 
-
Click the Add parameter button. Select the Resident parameter, for example, and set the value to "Yes" (Fig. 6).

- Click the Add parameter button. Select the "Total work record" and specify "12" in the field that appears to the right, for example (Fig 7).

- Add and fill in the parameters for residence in the same manner.
- Click Save.
As a result, the specified customer parameters (Fig. 8) will apply when matching products to applications.
Set up product features
Use the Product features tab to set up the static characteristics of a product (Fig. 9).
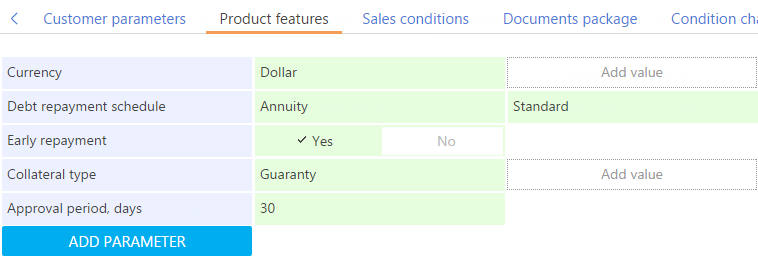
For example, product features may include repayment conditions, currency, repayment schedule, etc.
Creating a list of product features is identical to creating a list of the customer’s parameters as described above.
Set up product opportunity conditions
The Sales condition page is designed for setting up those product characteristics that change depending on the specifics of a sale, for example, the correlation between the interest rate and the term of the loan, special conditions for different customer categories, etc.
Here we will set up an example of sales conditions for a loan product in which the interest rate depends on the customer segment, loan term, and amount.
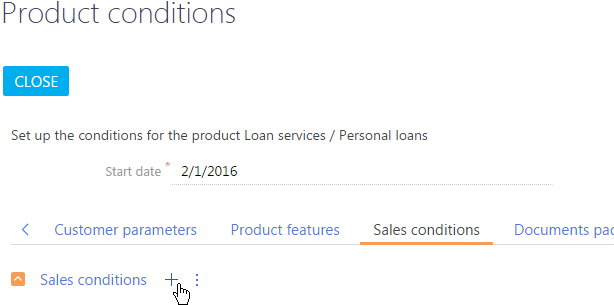
- Go to the Products section and open the needed product page.
- Click the button on the Product details detail (Fig. 10).
- Go to the Sales conditions tab.
- Click the button on the Sales conditions tab (Fig. 11).
-
On the opened page:
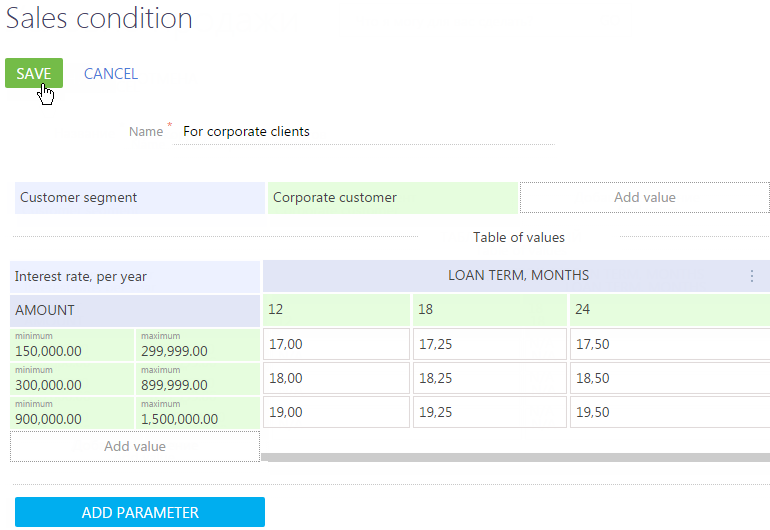
- Enter the sales condition name, for example, "For corporate customers".
- Click the New parameter button (Fig. 12).
Fig. 12 Creating opportunity conditions 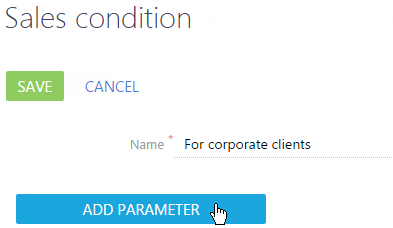
-
In the appeared field select the "Customer segment" and specify the "Corporate customer" value for it (Fig. 13).

-
Click the Add parameter button and select "Interest rate, yearly".
-
Change the view of the value entry field to enter values:
- Place the cursor over the selected value.
- Click
 .
. - Select Table view (Fig. 14).
Fig. 14 Selecting table view to create opportunity conditions 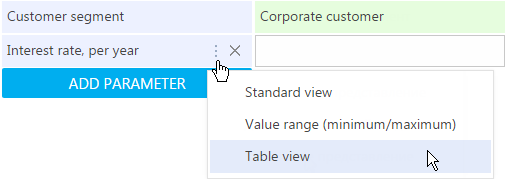
As a result, the Interest rate, yearly parameter will switch to the table view (Fig. 15).
Fig. 15 Table view 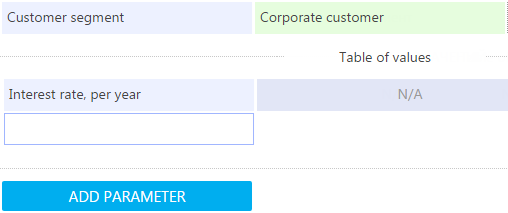
-
Select Loan term, months in the right part of the table (Fig. 16).
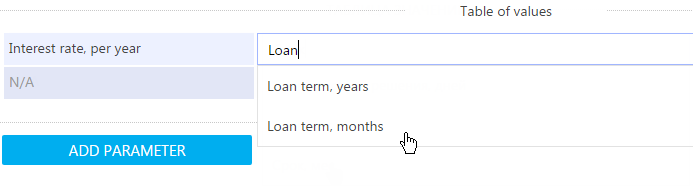
- Specify the terms in months for which the loan can be granted in months (Fig. 17).

- In the left part of the table, select the "Amount" value, and specify available ranges for the credit amount (Fig. 18).
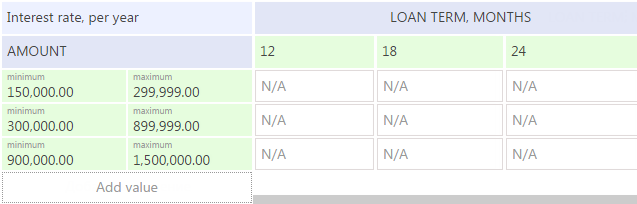
- Specify the interest rates for each intersection of the loan term and the amount (Fig. 19).
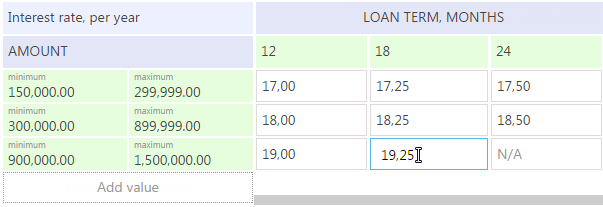
- Click the Save button to save the generated table of the opportunity conditions.
As a result, opportunity conditions will be formed for the corporate customers of your bank (Fig. 20). For example, if a corporate customer applies for a loan of 300 000 USD for 12 months, the interest rate will be automatically set to 18%.
Set up the document package
Use the Documents package tab to set up the list of documents required for the product.
The document package can be created automatically or manually. The automatic formulation of the document package is used if a standard document package is required for a product. You can set up the standard document package in the Product categories and types lookup.
The document package is manually created if a customer must provide additional documents.
How to set the standard document package
To enable automatic adding of standard documents to the Product details page, set up the Product categories and types lookup first. After this, select the Generate package item in the menu of the Documents package tab to add documents from the standard package to the product.
To set up a document package:
- Choose the relevant condition from theProduct details detail and click the link in the name to go to its respective page.
- Choose the Document package in the opened Product details page.
- Click the button and select the Generate package command (Fig. 21).
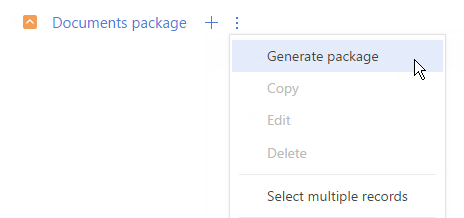
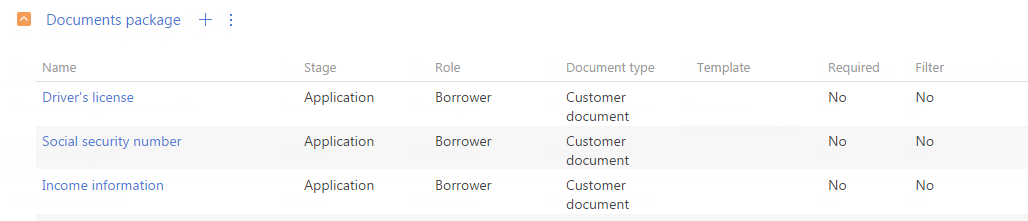
As a result, the list of the documents that were set up in the Product categories and types lookup for this product will be added to the Documents package tab (Fig. 22).
Add documents manually
Additional documents are added to the standard package manually. For example. a document certifying military obligation may be required for men below 27 years of age. Let's consider an example of adding an extract from salary accounts for clients who are employees of the bank. To do this:
- On the product page, open the current product condition by clicking the link in the title. Click the button on the Document package tab of the Product details page (Fig. 23).

- On the Document in the package (Fig. 24) page, enter the name of the document, for example, "Statement from the salary account".
![Fig. 24 – The [Document in package] page](https://academy.creatio.com/docs/sites/en/files/2020-11/scr_section_products_document_in_package.png)
- Select the belonging group of the document, for example, "Income confirmation". The group list is set up in the Document groups lookup.
- Select a product sale stage, at which the document must be submitted.
- Select the role ("Borrower", "Debtor", "Warrantor", etc.) who must submit the document.
- Type of the document, e.g., "Customer document" or "Regulation".
- Select the document template if the document is a Creatio printable.
- If the document is required and must be submitted during contracting, select the Required checkbox.
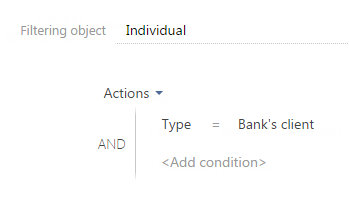
- Configure the conditions in the filtering block. Create a filter by contact type. (Fig. 25). To do this, specify the "Contact" object and the "Type" column in the filter column selection window.
- Click Save.
As a result, the document will be added to the Documents package detail. The document will be available only for individuals of the "Bank's client" type.
Set up condition change criteria
The Condition change criteria tab of the Product details page contains additional criteria that can affect the sales conditions of the product. For example, the interest rate of a loan may be lowered if the customer has an exceptionally high credit score.
Use the Product categories and types lookup to set up the list of available criteria.
To add condition change criteria to a product:
-
Go to the Products section and open the needed product page.
-
Click the
button on the Product details tab. -
Go to the Condition change criteria tab.
-
Click the
button on the Condition change criteria detail of the Product details page. -
Fill out the fields on the opened Condition change criteria in the product conditions page (Fig. 26).
Fig. 26 Example of the condition change criteria in a product 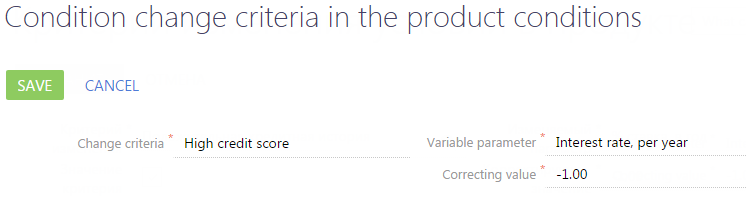
- Select a value from the lookup in the Change criteria field.
- Enter the value for the criteria. For example, select the checkbox for Boolean criteria.
- In the Variable parameter field, select the product feature that is affected by the criteria. For example, select "Interest rate, per year." The values are selected from the Default feature lookup.
- In the Correcting value field, enter the value by which the variable parameter value must be adjusted.
To decrease the variable parameter value, enter the correcting value a preceding "-" character. Otherwise, the variable parameter value will be increased by the correcting value.
-
Click Save.