Record permissions
Configure object permissions on several levels:
- Operation permissions. Learn more in a separate article: Object operation permissions.
- Column permissions. Learn more in a separate article: Column permissions.
- Record permissions. This article explains how to configure permissions to read, edit, and delete individual records of a particular object.
The system administrator can manage permissions to read, edit, or delete individual records, as well as the ability to delegate these permissions.
To enable the record permissions, toggle on the "Use record permissions" switch in the Object permissions section of the System Designer. The permission mechanism is based on the record authorship. If the record author is a member of the role specified in the "Record author" column, Creatio will grant permissions to the receiving role specified in the "User or role who obtains permissions" column. If the receiving role is subordinate, its management role will inherit the granted permissions.
By default, Creatio grants maximum access permissions to the following users:
- The system administrators with permissions to the "Add any data," "View any data," "Edit any data," and "Delete any data" system operations. These settings have a higher priority than the settings specified in the Object permissions section.
- The record author and the management role of the author, including the ability to delegate permissions to other users.
- The record owner and the management role of the owner, including the ability to delegate permissions to other users.
Learn more in a separate article: Share records.
If object record permissions are disabled, the records will be available to all users that have sufficient object operation permissions.
If record permissions are enabled, but there are no permission rules set up, the records will be available only to the author, the author’s management role, the record owner, the owner’s management role, as well as the system administrators.
Configure access permissions to the Opportunities section.
If a sales associate creates a record, all employees with this organizational role must have permission to view the record with the ability to delegate this permission, as well as edit the record, but not delete it.
If a supervisor creates the record, the associates must have permission to view and edit the record without the ability to delegate these permissions. The other supervisors must have full access to the record, including the ability to delegate permissions.
In this example, the record authors and the users who receive permissions are the members of the "Sales associates" and "Sales associates. Managers group" organizational roles.
If you use a load balancer to ensure fault tolerance of your Creatio application, perform the setup on one Creatio instance, then transfer settings to other instances. The setup process applies to Marketplace apps, user-made packages, and other settings that require compilation. Learn more in a separate article: Compile an app on a web farm.
-
Click the
 button to go to the System Designer, then open the "Object permissions" section.
 -
Select the "Sections" filter and choose the "Opportunity" object to configure access permissions to the Opportunities section. Click the object name or title to open the permission setup page of the Opportunity object (Fig. 1).
Learn more in the e-learning course: Object permissions.
Fig. 1 Selecting the section object and opening the permission setup page 
-
Toggle on the "Use record permissions" switch to enable record permissions (Fig. 2).
Fig. 2 Toggle on the record permissions 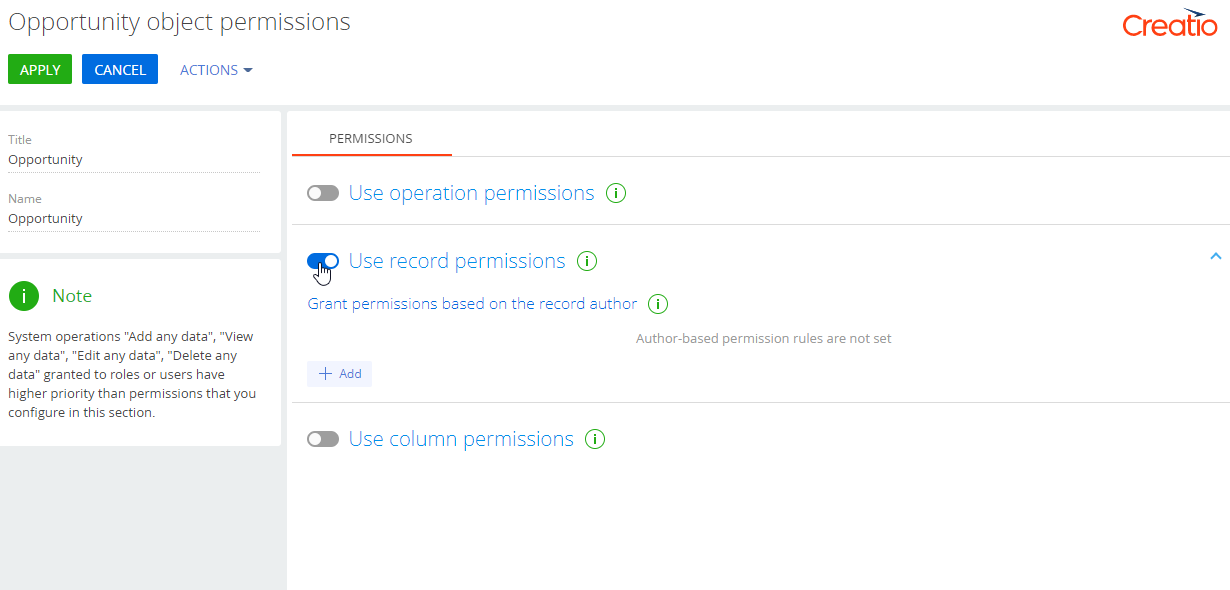
-
Click the Add button. In the box that opens, specify the record author user or role and the user or role that will receive permissions for the record. Use the search bar to quickly find the needed role or user. In this example, you need to add three records (Fig. 3).
Fig. 3 Adding the record permission roles 
-
Click the
 button and select "Granted"
  or "Granted with right to delegate"
  options in the column that corresponds to specific permissions (read, edit or delete) for each user to determine access levels. By default, access permissions are not specified. In this example, grant the following permissions (Fig. 4):
Fig. 4 Configure the record permissions 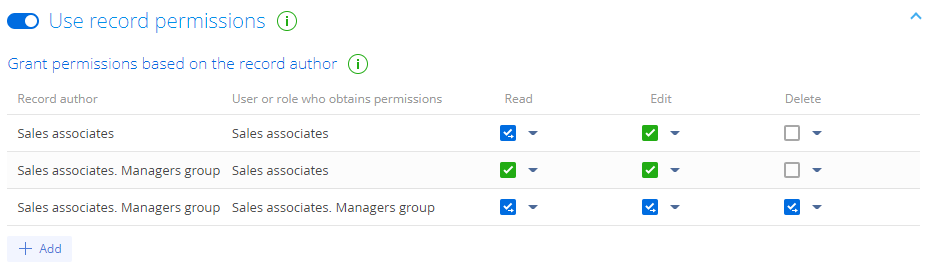
-
Select the "Granted with right to delegate"
 checkbox for the "Sales associates" role in the Read column, and the "Granted"
  checkbox in the Edit column to enable sales associates to view records created by their colleagues and delegate this permission to other users, as well as edit the records, but not delete them.
 -
Select the "Granted"
 checkbox in the Edit and Read columns for the "Sales associates" role to enable sales associates to view and edit records created by their managers, but not delete them.
 -
Select the "Granted with right to delegate"
 checkbox for the "Sales associates. Managers group" role in the Read, Edit, and Delete columns of the records created by the "Sales associates. Managers group" role to allow managers to view, edit and, delete records created by their colleagues, as well as delegate these permissions.note
Unlike object operation permissions, the order of the record permissions does not affect their priority.
-
-
Click Apply.
ImportantIf you configure access permissions for a section with existing records, you will need to run a permission update. Otherwise, the new permissions will apply only to newly created section records.
Permission update is a resource-intensive procedure. Depending on the number of section records, as well as the number of affected users and roles, the update may take 3 minutes or more and affect Creatio performance. We recommend updating record permissions when the load on Creatio is the lowest to avoid this.
Open the access permissions setup page and select "Update record permissions" in the Actions menu to apply new access permissions to existing section records (Fig. 5).
Fig. 5 Start the update of object record permissions 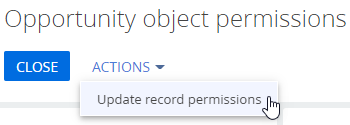
As a result of the update, Creatio will delete the default permissions and add new permissions. During the update, Creatio will not delete permissions you added manually to the record permission page or those configured as part of a business process.
One role can have several record permissions. For example, these may be permissions you added by running the Update record permission action and obtained as part of a business process, as well as permissions you added manually and obtained as part of a business process.