Manage access permissions with business processes
During a business process execution, various actions are performed with Creatio records. These actions can be fully automatic (system actions) or they can be performed with some form of input from users (user actions).
When executing user actions as part of a business process, the access permissions of the corresponding user still apply. For instance, a business process is supposed to open a record page for a user that has no permission to view and edit the corresponding record. In this case, the user will not be able to complete this process action and consequently – advance or even complete the business process.
This must be taken into account when designing business processes. Usually, a user task requires 2 changes in access permissions:
- Before executing the user action, corresponding access permissions must be granted to the corresponding user.
- After the user action is complete, the changes in access permissions must be reverted to restore the permissions that the user had initially.
Use the Change access rights element to grant or deny access permissions automatically, as part of business process flow. The element sets specified permissions for specific records for the specified users.
Whenever an account owner changes, the new owner employee must be granted access to view and edit the account record, while other employees must have only permission to view this account.
-
Add the Change access rights on the process diagram ([Fig. 1)
Fig. 1 Business process for changing access permissions for a new account owner 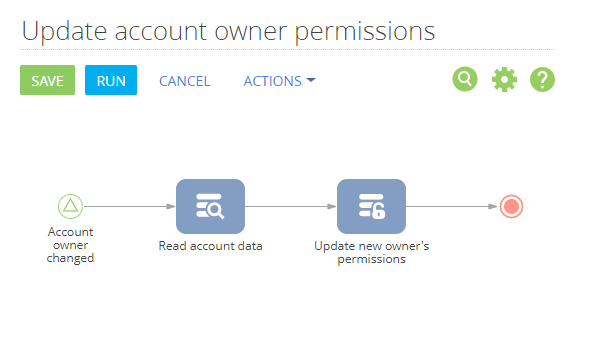
-
Set up the properties of the element (Fig. 2).
Fig. 2 The Change access rights element setup area -
In the Which object to read data from? field, select "Account."
-
In the Apply access rights to all records that match conditions area, set up a filter to select the needed records. For instance, to select the account that triggered the object signal that initiates the process, set up a filter by the Id column: "Id = Account owner modified.Unique identifier of record." To do this:
- In the filter area, click
<Add condition>and select the Id column. - In the opened context menu, select Compare with parameter.
- In the opened parameter value window, select the Account owner modified element and its parameter Unique identifier of record.
- In the filter area, click
-
In the Which access rights to remove? area, click + and add users and roles whose access rights to the selected records must be removed. For instance, to limit access rights to all other users, except for the record owner:
- Select For all roles and users in the menu.
- Select checkboxes for permissions that must be revoked. To leave only permission to view the records, select
 (edit) and
  (delete) checkboxes.
-
In the Which access rights to add? area, click + and specify who should be granted the new permissions. For instance, to grant full access to the record for its new owner:
-
Select For an employee from the menu.
-
In the field that appears afterwards, specify the employee contact who will be granted the permissions. You can select an employee contact from the Contacts lookup, or map this field to a process or element parameter that already contains the needed contact record.
You can obtain the employee who was set as the new owner of an account record by reading the data in the Owner column of the corresponding account record. To do this, click the
 button in the Employee field and select Process parameter from the menu.
 -
In the opened parameter value window, on the Process elements tab, select the Read account data element and its Owner parameter. Click "Select" to save the entered value.
-
Select operations to grant permissions for. To permit a user to view and edit the records, select the
 (read) and
  (edit) checkboxes.
-
-
If necessary, click
 and select Permit with right to delegate from the menu, so that the user could grant same permissions for the record to other users (Fig. 3).
Fig. 3 Granting permission with right to delegate 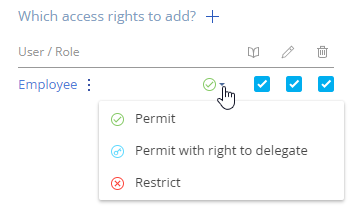 note
noteTo use parameters of other elements, make sure that you properly add and set up them in your business process. Learn more about mapping parameters in the "Process parameters" article.
As a result, the process will run whenever an owner of an account record is changed. All users, except for the owner, will be denied permission to edit and delete the record, while the owner user will be granted permissions to view and edit the record.