Customize record pages
Record page is a UI element that stores the information about Creatio business objects organized as fields, tabs, details, and dashboards. The name of the record page corresponds to the name of the Creatio object. For example, account page, contact page, etc. The purpose of the record page is management of section list records. Each Creatio section includes one or more record pages.
Each record page is represented by a client module schema. For example, the ContactPageV2 schema of the Uiv2 package configures the contact page. The BasePageV2 schema of the NUI package implements the functionality of a base record page. Record page schemas must inherit the BasePageV2 schema.
The record page types are as follows:
- The page that adds records. Creates a section list record.
- The page that edits records. Modifies an existing section list record.
Record page containers
Creatio stores the UI elements related to the record page in the corresponding containers. Configure the containers in the base schema of the record page or the schema of the replacing record page. The record page type does not affect the containers.
Creatio uses the meta names of HTML containers. The actual IDs of the corresponding HTML elements on the page are generated based on the meta names.
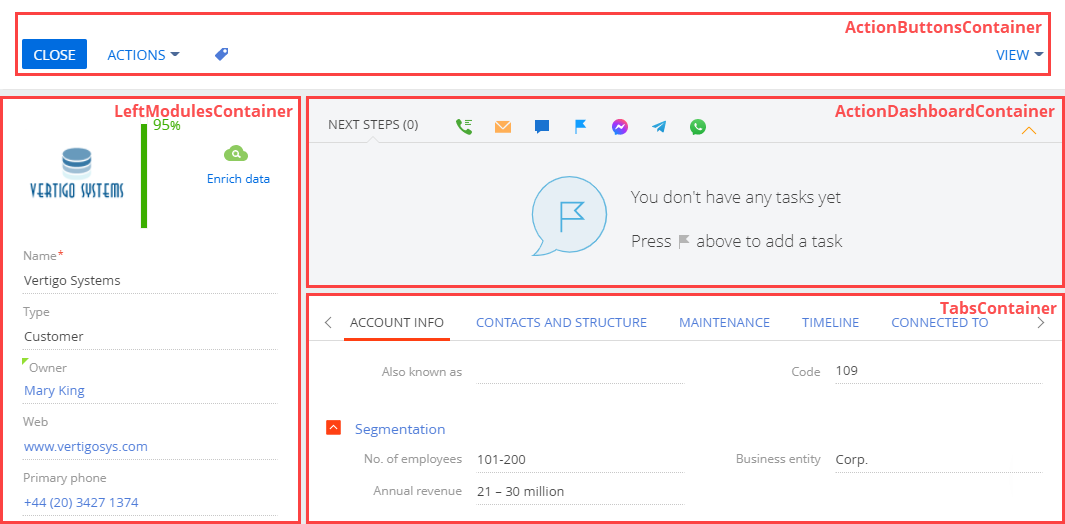
View the main record page containers in the figure below.

ActionButtonsContainerstores the action buttons of the record page.LeftModulesContainerstores the main data input and edit fields.ActionDashboardContainerstores the action panel and workflow bar.TabsContainerstores the tabs that group input and edit fields by a category. For example, current employment.
Create a record page
-
Go to the Configuration section and select a user-made package to add the schema.
-
Click Add on the section list toolbar and select the type of the view model schema.
-
Fill out the following schema properties.
-
Code* is the schema name. The code must contain a prefix specified in the Prefix for object name (the SchemaNamePrefix code) system setting. The default prefix is
Usr. -
Title* is the localizable schema title.
-
Parent object is the record page schema whose functionality to inherit.
- Select "BasePageV2" to create a new record page.
- Select the schema of the needed record page to replace an existing record page. For example, select the
AccountPageV2schema of theUiv2package to display a custom account page in Creatio.
-
-
Implement the record page logic.
-
Click Save on the Module Designer’s toolbar.
Set up the record page
Use controls to set up the record page.
Creatio lets you set up the record page in the following ways:
- Add standard page controls.
- Edit standard page controls.
- Add custom page controls.
The main page controls are as follows:
- Action dashboard. Learn more about setting up the action dashboard in a separate article: Action dashboard.
- Field. Learn more about setting up page fields in a separate article: Field.
- Button. Learn more about setting up buttons in a separate article: Button.
Add a custom action to a record page
Creatio lets you add a custom action to the Actions drop-down menu of the record page. The BasePageV2 schema of the base record page implements the menu.
To add a custom action to the record page:
- Create a record page or replacing record page. To do this, take steps 1-3 in the instruction to create a record page.
- Override the protected
getActions()virtual method that returns the page action list. The page action list is an instance of theTerrasoft.BaseViewModelCollectionclass. Each action is a view model. - Pass the
getButtonMenuItem()method to theaddItem()method as a parameter. TheaddItem()method adds a custom action to the collection. - Pass the configuration object to the
getButtonMenuItem()callback method as a parameter. ThegetButtonMenuItem()method creates an instance of the action view model. - Implement the action configuration object that lets you set the properties of the action view model explicitly or use the base binding mechanism.
If you replace the base record page, call the this.callParent(arguments) method in the getActions() method of the replacing view model schema. this.callParent(arguments) returns the action collection of the parent record page.
View the template to add a custom action to a record page below.
/**
* Return the action collection of the record page.
* @protected
* @virtual
* @return {Terrasoft.BaseViewModelCollection} Return the action collection of the record page.
*/
getActions: function() {
    /* The action list is an instance of Terrasoft.BaseViewModelCollection. */
    var actionMenuItems = this.Ext.create("Terrasoft.BaseViewModelCollection");
    /* Add the action to the collection. Pass the method that instantiates the action model instance by the passed configuration object. Pass it as a callback method. */
    actionMenuItems.addItem(this.getButtonMenuItem({
        /* The configuration object that sets up the action. */
        ...
    }));
    /* Return the new action collection. */
    return actionMenuItems;
}
See also
E-learning courses
Tech Hour - HOW TO USE BUTTONS AND ACTIONS TO EMPOWER CREATIO PAGES

/scr_add_replacing_module.png)