You can integrate Creatio with Azure Active Directory (Azure AD) to manage single sign-on for all Creatio users that work in the corporate network. The further instructions are relevant for .NET Framework users.
To set up integration, configure a number of settings both in Azure AD and Creatio.
- Settings in Azure AD:
- Register SAML of the SSO application.
- Define the endpoints.
- Settings in Creatio:
- Set up the configuration files.
- Check the integration.
- Set up Just-In-Time User Provisioning (optional).
Configure settings in Azure AD
To configure the settings below, register Creatio in the administrator account of the enterprise identity service of Azure Active Directory (Azure AD). Learn more in the Microsoft documentation.
- Add a new SSO application (Trusted Relaying Party) to Azure AD:
- Open the Enterprise applications section → All Applications.
- Click New application.
- Select “Creatio” in the Add from the gallery section and add the application. Learn more in the Microsoft documentation: Add Creatio from the gallery.
- Open the Single sign-on section and specify the following parameters:
- Select “SAML” in the Single Sign-on Mode field.
- Specify the full site name, for example, “https://ts1-dtcc1-crm-26909-2.creatio.com/,” in the Identifier field.
- Specify the full site name and “svc/SsoLogin” address, for example, “https://ts1-dtcc1-crm-26909-2.creatio.com/ServiceModel/AuthServiceModel/AuthService.service.svc/SsoLogin,” in the Reply URL field.
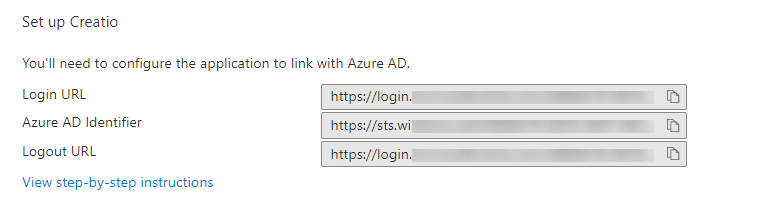
- Save the following data to configure settings in Creatio (Fig. 1):
- Azure AD Identifier
- Login URL
- Logout URL
Configure settings in Creatio
If you use Creatio cloud, contact Creatio support to apply the settings to the website.
The single sign-on setup instructions below are intended for Creatio on-site customers. We strongly recommend granting Creatio support temporary access to Creatio configuration or performing setup under the guidance of a Creatio support specialist.
To configure settings in Creatio, fill out the parameters of the SAML provider by specifying the identification data in saml.config:
- Specify your website’s FQDN in the “Name” parameter.
- Specify the IdP settings in the “Partner Identity Provider” section.
- Set “Name” to the name of the Identity provider. For Azure AD, the parameter usually looks like this: https://sts.windows.net/<Azure account id>/.
- Set the “WantAssertionSigned” flag to “true” if you are going to use an encryption certificate for SAML Assertion
- Set “SingleSignOnServiceUrl” to the URL of the identity provider’s single sign-on. For Azure AD, this is usually https://login.microsoftonline.com/<Azure account id>/saml2. Find out the settings of the added connector in the Azure account.
- Set “SingleLogoutServiceUrl” to the URL of the identity provider’s single sign-off. For Azure AD, this is usually https://logout.microsoftonline.com/<Azure account id>/saml2. Find out the settings of the added connector in the Azure account.
- Set “PartnerCertificateFile” to the path to the *.cer security certificate in the server file system relative to the Creatio application root. Specify this parameter if WantAssertionSigned="true".
- Set the “OverridePendingAuthnRequest” to “true” if you are not going to validate whether the IdP response matches the Auth Request created earlier.
Example of the saml.config code snippet for Azure AD:
- Configure settings in the website root directories. Enable the SAML SSO in Creatio after specifying the SAML provider settings. Enter the needed settings in the web.config file in Creatio root directory to enable SSO Auth providers on login to Creatio:
- Specify “SsoAuthProvider” for the main application.
- Specify “SSPSsoAuthProvider” for the customer portal. You can specify one or both providers.
-
Specify the SAML Attribute where to search for the account name of the user that logs in with SSO. The username is specified in the NameID SAML Assertion attribute. To ensure the backwards compatibility of settings, Creatio uses the SAMLNameFieldName value if it is specified, for example:
-
-
Specify the SAML Attribute where to search for roles of the user account that logs in with SSO (required for Just-in-Time User Provisioning):
-
Specify which IdP of those specified in saml.config to use. Set the “PartnerIdP” parameter of the web.config App Loader to the value from the Issuer URL string of saml.config, for example, https://sts.windows.net/a2cf6876-ff98-4480-8792-dc1903e649c7/.”
-
Set SSO as the default option upon login. To do this, specify the NuiLogin.aspx?use_sso=true default resource in the web.config App Loader.
-
Set up the redirect to Azure AD login page when loading the Creatio website.
-
Set up the redirect to Azure AD login page when loading a specific record page.
- Configure settings in web.config App (in the Terrasoft.WebApp directory):
- Enable Single Log Out.
- Enable SSO if the user does not have an active session and loads a URL that matches the following pattern: https://<site FQDN>/0/Nui/ViewModule.aspx#CardModuleV2/ContactPageV2/edit/f2e9c5a0-7b6f-4320-bba1-30e78bfce75c:
- Enable Single Log Out.
- Enable Just-in-Time User Provisioning.
- Enable Just-in-Time User Provisioning web.config Loader.
- Match SAML Assertion fields to Creatio columns using the “SAML field name converters to contact field name” lookup.
- Enable Just-in-Time User Provisioning web.config Loader.