You can integrate your Active Directory Federation Services (ADFS) instance to help manage seamless single sign-on for your members. For this, you need to configure a number of settings both in ADFS and Creatio.
Settings in ADFS
-
Add a new Relying Party Trust to ADFS (Fig. 1).
Fig. 1 The Relying Party Trust menu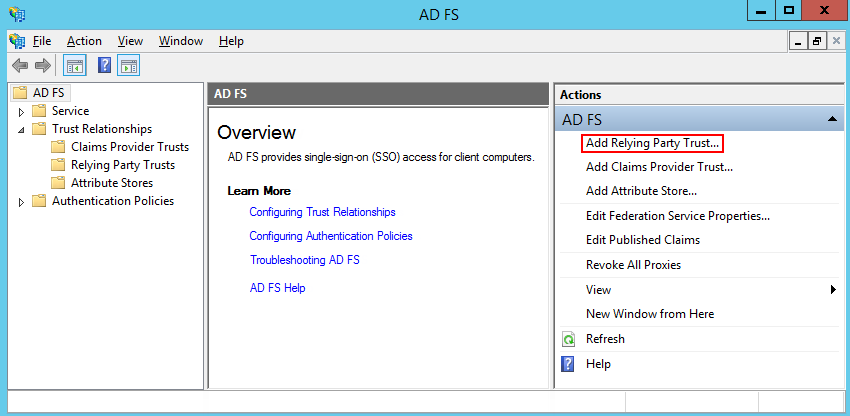
-
Select the “Enter data about the relying party manually” option, as shown on the Fig. 2.
Fig. 2 The “Enter data about the relying party manually” option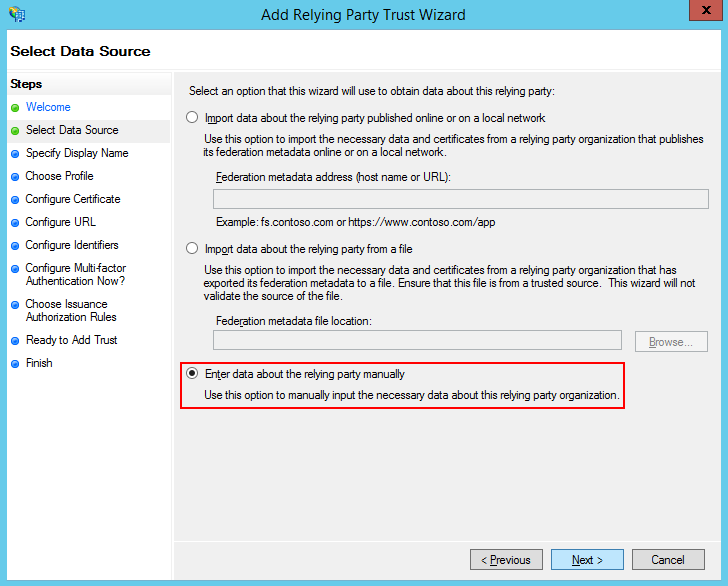
-
Enter the name of the Relying Party in the Display name field. This name is needed to make it easier to navigate the list of trusted applications in ADFS and does not affect the actual setup.
-
Keep the default ADFS profile. Click the Next button.
-
Click Next on the “Configure Certificate” step.
-
Enable SAML 2.0 protocol support. Specify the site address and add “/ServiceModel/AuthService.svc/SsoLogin” to it (Fig. 3).
Fig. 3 The SAML 2.0 protocol support option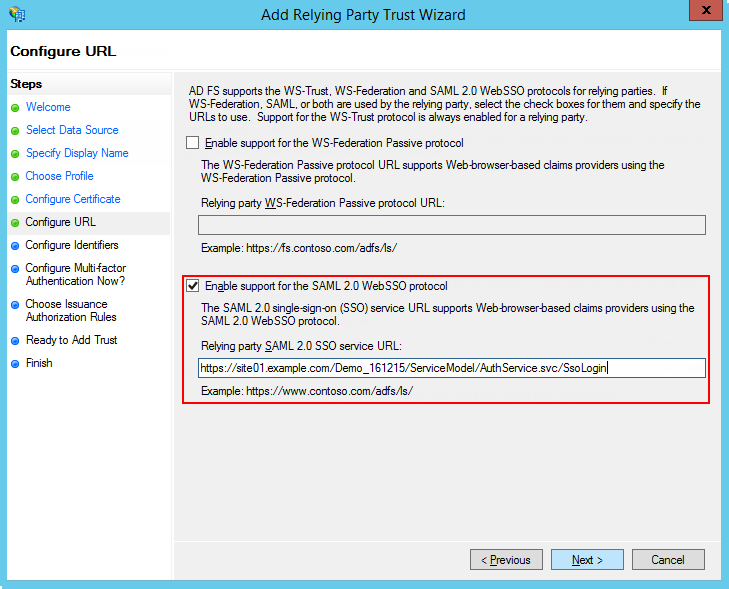
-
Specify the full site address in the identifier settings and click the Add button, as shown on the Fig. 4.
Fig. 4 The identifier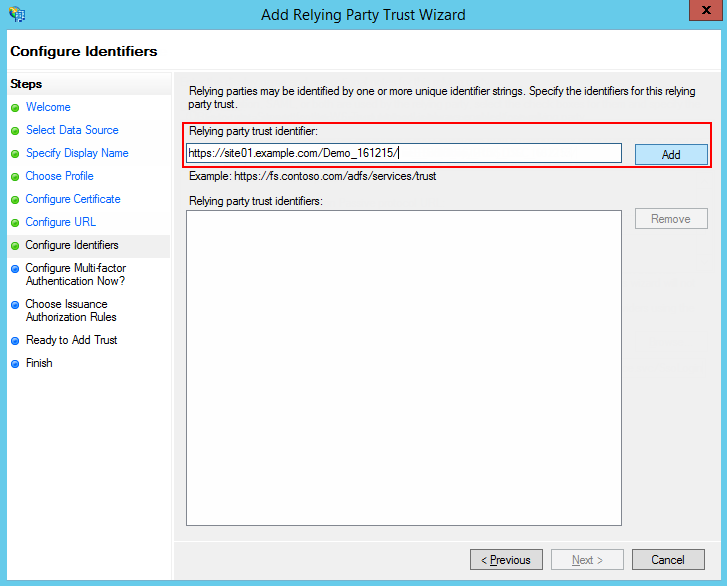
-
Set up the rest of the parameters according to your security requirements. You can leave default values for test purposes.
-
Click Finish. Click Add Rule and add a new SAML Assertion to SAML Response rule (Fig. 5) in the newly-opened window.
Fig. 5 The “Add rule” button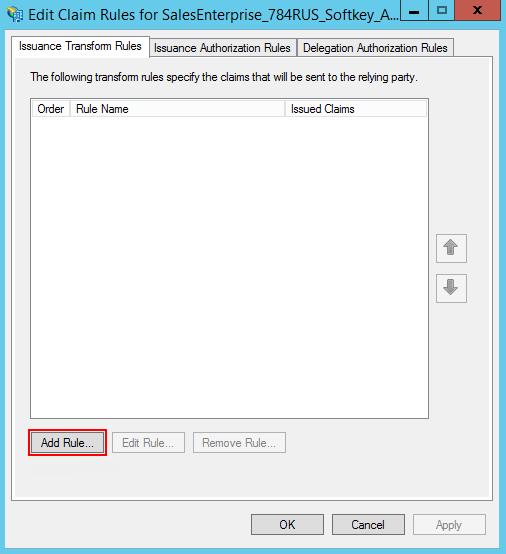
-
Keep the default settings and click Next on the first step of the Rule Wizard. Set up a set of parameters that will be received from the user’s data (Fig. 6). In this example, the user’s name and a list of domain groups will be passed via SAML Assertion.
Fig. 6 The rule parameters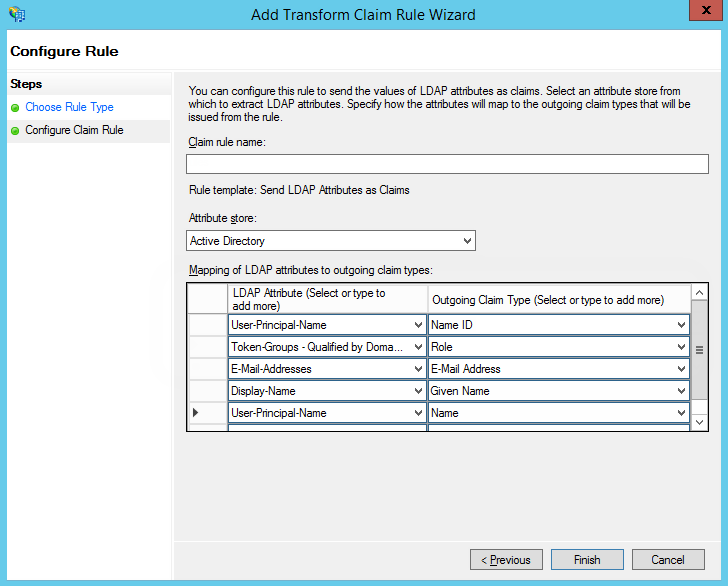
-
Click the Save button.
-
Open the Trusted Relay settings, go to the Advanced tab, and specify SHA-1 encryption according to the website certificate algorithm.
-
Add the public certificate key on the Encryption tab to set up the SAML encryption (Fig. 7).
Fig. 7 The Encryption tab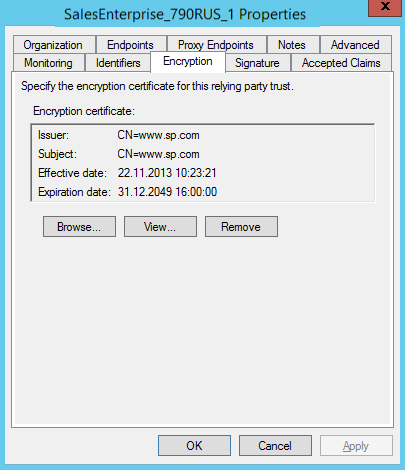
-
Add the logout endpoint and set the following parameters (Fig. 8) on the Endpoints tab:
-
Endpoint type: SAML Logout.
-
Binding: Redirect.
-
Trusted URL: https://site01.creatio.com/Demo_161215/ServiceModel/AuthService.svc/SsoLogout
Fig. 8 The Endpoint parameters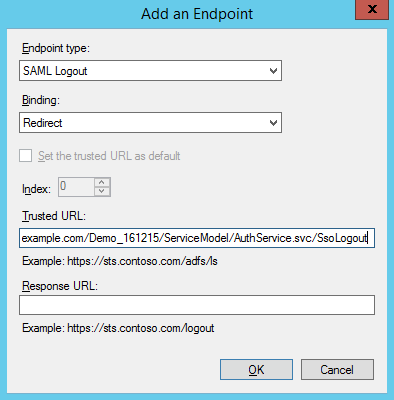
-
-
Add the Logout Request certificate on the Signature tab, as specified on the Fig. 9.
Fig. 9 The Logout Request certificate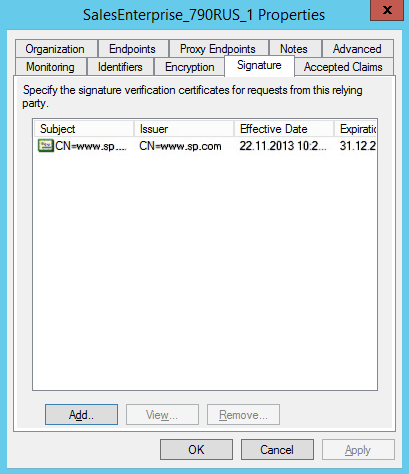
Settings in Creatio
If you use Creatio cloud, prepare the setup information according to the instructions below and contact Creatio support to apply the settings.
The single sign-on setup instructions below are intended for Creatio on-site customers. We strongly recommend granting Creatio support temporary access to Creatio configuration or performing setup under the guidance of a Creatio support specialist.
Follow these steps to set up single sign-on in Creatio:
- Enter the SAML provider settings.
- Set up the SSO authentication parameters.
- Test the basic SSO scenarios.
- Set up Just-In-Time User Provisioning (JIT).
- Set SSO as the default option.
Certain settings are different for Creatio .NET Framework and Creatio .NET Core. This guide provides instructions for both platforms.
.NET Framework
- Fill out the SAML provider settings by specifying the data of the SAML identification provider in the saml.config file.
-
Specify your website’s FQDN in the Name parameter.
- Specify the IdP settings in the Partner Identity Provider section. You can view these settings in the metadata file.
- WantAssertionSigned="false": if no encryption certificate will be used for SAML Assertion.
- SingleSignOnServiceUrl: URL of the identity provider’s single sign-on. For ADFS, this is usually https://adfs01.mysite.com/adfs/ls.
- SingleLogoutServiceUrl: URL of the identity provider’s single sign-off. For ADFS, this is usually https://adfs01.mysite.com/adfs/ls.
- PartnerCertificateFile: path to the *.cer security certificate in the server file system relative to the Creatio application root. Specify this parameter if WantAssertionSigned="true."
- SignLogoutRequest="true": specify for ADFS, since the LogoutRequest must be signed. If set to “true,” specify the certificate for signature generation in the LocalCertificateFile parameter.
- SignLogoutResponse="true": specify for ADFS, since the LogoutResponse must be signed. If set to “true,” specify the certificate for signature generation in the LocalCertificateFile parameter.
- OverridePendingAuthnRequest="true": if enabled, Creatio does not check whether the IdP response matches the earlier Auth Request.
Example of the saml.config file for ADFS:
If you enable the SignLogoutRequest or SignLogoutResponse flags, add the *.pfx private encryption certificate key to the same file system as your Creatio application. Specify the file path and the password in the saml.config configuration files and make sure that the user who runs the application has permission to read the file. Make sure that the certificate file is available in the Terrasoft.WebApp directory and the website root directory.
Fig. 10 The SAML packet encryption settings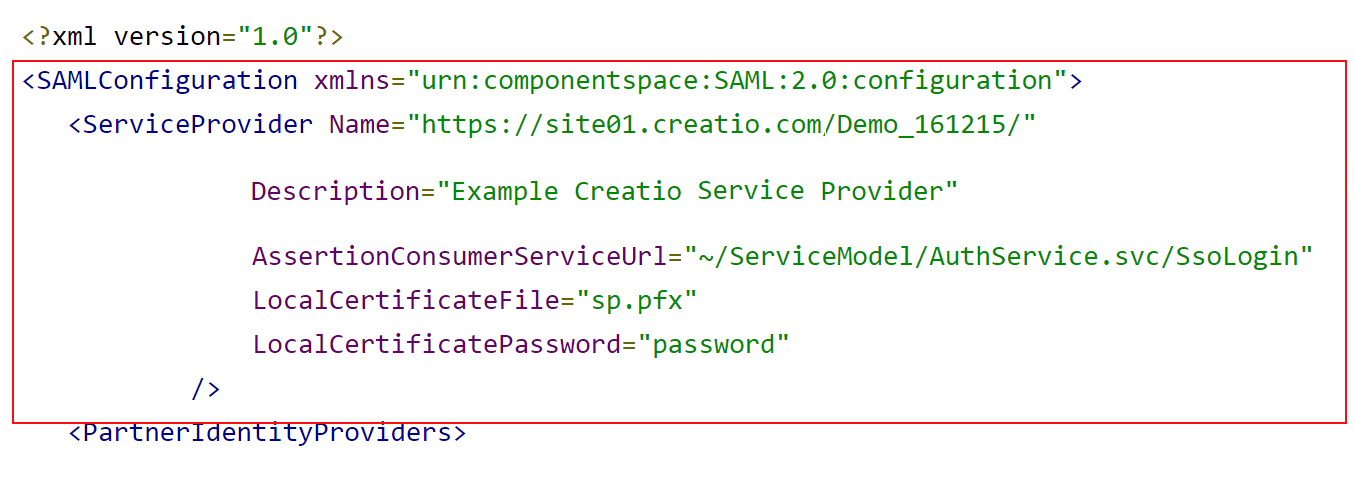
-
- Enable the SSO provider in Creatio. Enable the SAML SSO in Creatio after specifying the SAML provider settings. Modify the web.config file in the website root directory:
- Enable using the SSO Auth providers on login:
- SsoAuthProvider for the main application.
- SSPSsoAuthProvider for the customer portal.
You can enable one or both of the providers.
-
Specify which identification provider from the saml.config file to use in Service Provider initiated SSO scenarios by default. In the web.config App Loader, specify the PartnerIdP parameter value from the Issuer URL string in the saml.config file, such as:
- Enable using the SSO Auth providers on login:
-
Test the Identity Provider (IdP) initiated SSO basic scenario to make sure the settings are correct:
-
Go to the trusted IdP applications page. The default link is https://sts.contoso.com/adfs/ls/idpinitiatedsignon.aspx.
-
Authorize.
-
Go to Creatio with the IdP authorization results.
Test the settings in the IdP initiated scenario before setting SSO as the default option in Creatio. Make sure Creatio has an active user account whose login matches the NameId passed by the Identity Provider before starting the test. If such account does not exist, the SSO setup process will not finish since it will be impossible to match the domain user to a Creatio user. After you successfully log in via SSO, proceed to further setup.
-
- Set up Just-In-Time User Provisioning (JIT). The Just-In-Time User Provisioning functionality complements the single sign-on technology. It enables not only creating a user on the first login to Creatio, but also updating the contact page data with the data received from the identification provider on every login. Learn more in a separate article: Just-In-Time User Provisioning.
- Add the JIT settings to the web.config file in the Creatio root directory.
The user type is defined by the page that they use to log in. If the “Identity initiated” scenario is used to log in, specify the DefUserType value:
-
General for general users.
-
SSP for portal users.
-
- Map the SAML Assertion fields to Creatio columns using the SAML field name converter to contact field name lookup. You need this to ensure Creatio populates the contact fields correctly when creating new users via Just-In-Time User Provisioning. If the field is empty or disabled in the identity provider data, you can fill it out with the value specified in the Default value field of the lookup. Upon the next login, Creatio will populate the contact fields specified in the lookup with either the values received from the provider or with the current default values.
- Add the JIT settings to the web.config file in the Creatio root directory.
-
Set SSO as the default option upon login. We recommend following this step only after you finished the previous steps successfully and made sure the SSO works correctly. This step enables the Service Provider (SP) initiated SSO.
The standard Service Provider (SP) initiated scenario is as follows:
- The user goes to Creatio, they have no active sessions on the site.
- They are redirected to the IdP where they authorize.
- They are redirected back to Creatio with the IdP authorization results.
To set the SSO provider as the default option:
- Specify the NuiLogin.aspx?use_sso=true default resource in the root web.config file.
- Enable redirection to the identity provider when going to the website root in the root web.config file:
- Enable Single Log Out in the web.config file in the Terrasoft.WebApp directory:
- Specify where to redirect the user when the active session expires in the web.config file in the Terrasoft.WebApp directory
- Select the Default value checkbox in the “Use SSO in the mobile app” (“MobileUseSSO” code) system setting to use the Single Sign-On in the mobile application.
.Net Core
- Fill out the SAML provider settings by specifying the data of the SAML identification provider in the saml.json file.
-
Specify your website’s FQDN in the Name parameter.
- Specify the IdP settings in the Partner Identity Provider section. You can view these settings in the metadata file.
- WantAssertionSigned: specify “false” if no encryption certificate will be used for SAML Assertion.
- SingleSignOnServiceUrl: URL of the identity provider’s single sign-on. For ADFS, this is usually https://adfs01.mysite.com/adfs/ls.
- SingleLogoutServiceUrl: URL of the identity provider’s single sign-off. For ADFS, this is usually https://adfs01.mysite.com/adfs/ls.
- PartnerCertificateFile: path to the *.cer security certificate in the server file system relative to the Creatio application root. Specify this parameter if WantAssertionSigned="true."
- SignLogoutRequest: specify “true” for ADFS since the LogoutRequest must be signed. If set to “true,” specify the certificate for signature generation in the LocalCertificateFile parameter.
- SignLogoutResponse: specify “true” for ADFS since the LogoutResponse must be signed. If set to “true,” specify the certificate for signature generation in the LocalCertificateFile parameter.
- WantAssertionSigned: specify “false” if no encryption certificate will be used for SAML Assertion.
-
- If you enable the SignLogoutRequest or SignLogoutResponse flags, add the *.pfx private encryption certificate key to the same file system as your Creatio application. Specify the file path and the password in the saml.json configuration file and make sure that the user who runs the application has permission to read the file. Make sure that the certificate file is available in the Terrasoft.WebApp directory and the website root directory.
- Enable the SSO provider in Creatio. Enable the SAML SSO in Creatio after specifying the SAML provider settings. To do this, edit the Terrasoft.WebHost.dll.config file in the website root directory:
- Enable using the SSO Auth providers on login:
- SsoAuthProvider for the main application.
- SSPSsoAuthProvider for the customer portal.
You can enable one or both of the providers.
-
Specify which identification provider from the saml.json file to use in Service Provider initiated SSO scenarios by default. In Terrasoft.WebHost.dll.config, specify the PartnerIdP parameter value from the Issuer URL string in the saml.json file, such as:
- Enable using the SSO Auth providers on login:
-
Test the Identity Provider (IdP) initiated SSO basic scenario to make sure the settings are correct:
-
Go to the trusted IdP applications page. The default link is https://sts.contoso.com/adfs/ls/idpinitiatedsignon.aspx.
-
Authorize.
-
Go to Creatio with the IdP authorization results.
Test the settings in the IdP initiated scenario before setting SSO as the default option in Creatio. Make sure Creatio has an active user account whose login matches the NameId passed by the Identity Provider before starting the test. If such account does not exist, the SSO setup process will not finish since it will be impossible to match the domain user to a Creatio user. After you successfully log in via SSO, proceed to further setup.
-
- Set up Just-In-Time User Provisioning (JIT). The Just-In-Time User Provisioning functionality complements the single sign-on technology. It enables not only creating a user on the first login to Creatio, but also updating the contact page data with the data received from the identification provider on every login. Learn more in a separate article: Just-In-Time User Provisioning.
- Add the JIT settings to the Terrasoft.WebHost.dll.config file in the Creatio root directory. Enable JIT for general users in the SsoAuthProvider settings and for portal users in the SSPSsoAuthProvider settings:
The user type is defined by the page they use to log in. If the “Identity initiated” scenario is used to log in, specify the DefUserType value:
-
General for general users.
-
SSP for portal users.
-
- Map the SAML Assertion fields to Creatio columns using the SAML field name converter to contact field name lookup. You need this to ensure Creatio populates the contact fields correctly when creating new users via Just-In-Time User Provisioning. If the field is empty or disabled in the identity provider data, you can fill it out with the value specified in the Default value field of the lookup. Upon the next login, Creatio will populate the contact fields specified in the lookup with either the values received from the provider or with the current default values.
- Add the JIT settings to the Terrasoft.WebHost.dll.config file in the Creatio root directory. Enable JIT for general users in the SsoAuthProvider settings and for portal users in the SSPSsoAuthProvider settings:
-
Set SSO as the default option upon login. We recommend following this step only after you finished the previous steps successfully and made sure the SSO works correctly. This step will enable the Service Provider (SP) initiated SSO.
The standard Service Provider (SP) initiated scenario is as follows:
- The user goes to Creatio, they have no active sessions on the site.
- They are redirected to the IdP where they authorize.
- They are redirected back to Creatio with the IdP authorization results.
To set the SSO provider as the default option:
- Specify UseSsoByDefault": "true" in the saml.json file.
- Enable redirection to the identity provider when going to the website root in the Terrasoft.WebHost.dll.config file:
- Enable Single Log Out in Terrasoft.WebHost.dll.config:
- Specify where to redirect the user the active session expires in the Terrasoft.WebHost.dll.config file:
- Select the Default value checkbox in the “Use SSO in the mobile app” (“MobileUseSSO” code) system setting to use the Single Sign-On in the mobile application.