The Email Listener (formerly Exchange Listener) service synchronizes Creatio with Microsoft Exchange and IMAP/SMTP mail services using a subscription mechanism. Email Listener lets you use horizontal scaling that enables the active use of email synchronization block and controlled use of resources.
The synchronization service is required to manage emails in Creatio .NET Framework and .NET Core since version 7.17.2. This article covers the deployment of Exchange Listener synchronization service for Creatio on-site.
The service consists of the following components:
- Email Listener (EL API). Initiates an outgoing connection to EWS API or IMAP. Creates a subscription to “new message” events using the mailbox credentials. The open subscription remains in the component memory to ensure fast response time when new emails arrive. The email is downloaded upon receiving the corresponding event. An in-memory repository is sufficient to deploy the service. A required service component.
- NoSQL Redis DBMS. Creates a scalable and fault tolerant system of handler nodes. The Redis repository holds information about the mailboxes that are served. This enables any container to handle Creatio requests to add a new subscription or check the status of a specific subscription regardless of the subscription node. Redis requires a separate database for the Exchange Listener service operation. A required service component.
- Email Worker (EL Worker). Maintains the scalability and fault tolerance of the primary Email Listener module. The additional module downloads emails from the mail server and delivers them to Creatio. This enables high-load services to handle emails smoother during peaks in the email flow. The EL Worker reduces the load on the EL API components that no longer need to download emails. Instead, the components can manage the subscription and send outgoing emails.
- RabbitMQ. Maintains the scalability and fault tolerance of the service. The queue broker distributes tasks between components in high-load environments.
Determine the configuration of the Email Listener service
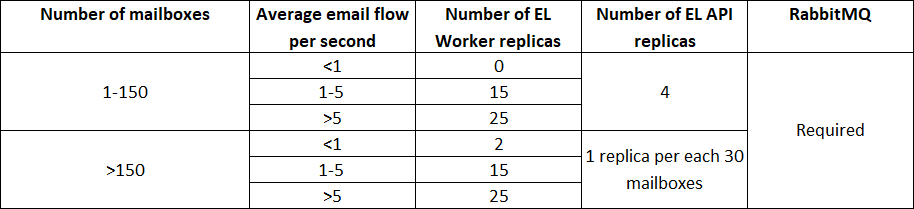
Determine the configuration of the Email Listener service for your Creatio instance based on the average flow of emails (both incoming and outgoing) that the company mailboxes handle per second.
For example, if your company uses a single support mailbox whose email flow is 4, the recommended configuration includes 15 EL Worker replicas, 4 EL API replicas, and RabbitMQ service.
Component replica system requirements
| Component | vCPU | RAM |
|---|---|---|
| EL Worker | 0.1 | 1.1 GB |
| EL API | 0.150 | 850 MB |
| Redis | 0.5 | 3 GB |
| Rabbit MQ | 0.5 | 4 GB |
Email Listener deployment methods
We recommend using the Kubernetes orchestrator and Helm package manager to deploy the service. Read more >>>
You can also use Docker to speed up the deployment in the development environment. Read more >>>
Deploy the synchronization service via Kubernetes
Deploy the synchronization service using the RabbitMQ programmable message broker.
Take the following steps to deploy the service:
- Set up the target environment:
- Kubernetes cluster. Learn more about setting up and managing the cluster in the Kubernetes documentation.
- Helm package manager. Learn more about installing the package manager in the Helm documentation.
- Install Redis. Learn more about installing Redis using Helm on the GitHub website.
Where:
default is the namespace to install Redis.
redis is an arbitrary name for the Redis instance.
- Install the RabbitMQ queue broker. Use the standard bitnami/rabbitmq helm package in the Exchange Listener namespace with the recommended RabbitMQ parameters. Learn more: bitnami/rabbitmq (GitHub).
Create a virtual host and Email Listener user in the installed RabbitMQ instance:
- Connect to RabbitMQ and run the following command:
- Create a virtual host:
- Create a user and specify the password. For example, “creatio:”
- Set up the user permissions to the virtual host:
- Install the Email Listener module. To install the module, download the helm package. View the available parameters of the helm package in the table below.
Where:
<redis_host> is the Redis server address.
<kubernetes_url> is the Kubernetes URL or IP address.
ReplicaCount is the number of EL API replicas based on the number of mailboxes and average email flow for your company. View the calculation table above.
WorkerReplicaCount is the number of EL Worker replicas based on the number of mailboxes and average email flow for your company. View the calculation table above.
To set up an HTTPS connection, deploy the service with Ingress and a valid SSL certificate, as well as specify HTTPS in the <kubernetes_url> Email Listener service address.
To check the availability, execute the query as specified in the Fig. 1.
Fig. 1 An Email Listener service response
Available parameters of the Email Listener helm package
Parameter
Parameter description
Default value
replicaCount
Number of StatefulSet handlers.
2
service.type
Service type. Learn more about the Kubernetes service types in the Kubernetes documentation.
ClusterIP
service.nodePort
If the service.type parameter equals NodePort, specify the external service port in this parameter.
Learn more about the NodePort type in the Kubernetes documentation.
env.host
Host address for Redis.
env.port
Host port for Redis.
6379
env.base
Database number for Redis.
0.
ingress.enabled
Use address overriding via ingress.
false
ApiUrl
Service address if ingress.enabled=true
ingress.path
Relative service path.
log4Net.level
Default logging level.
Info
- Connect to RabbitMQ and run the following command:
Use the system requirements calculator to check the server requirements.
Deploy the synchronization service in Docker
To set up the service, use a server (computer or virtual machine) that has Linux or Windows OS installed.
Take the following steps to deploy the service:
-
Set up the Docker container platform first.
To install Docker Desktop on Windows Server, follow special instructions on Microsoft website.
To install Docker on Linux, follow the guide in the Docker documentation. To check the installed Docker version, run the following command:
You can install Docker components using the Docker-Compose instruction file. Learn more about installing Docker-Compose in the Docker documentation.
- Install and run Email Listener:
- Open the directory to deploy Email Listener on the server dedicated for the service.
- Download and unpack the archive that contains the setup files to the directory. Download the archive.
- Open the / Creatio Email Listener component directory and run the following command:
The command might take up to several minutes to complete.
- Make sure the logs contain no errors by running the following command: docker logs ListenerAPI.
- Check whether the deployment is complete by opening the http://localhost:10000/ URL, where localhost is the URL of the Email Listener server.
Set up the Email Listener service in Creatio
-
Make sure the ExchangeListenerService anonymous service is available at Creatio application address/0/ServiceModel/ExchangeListenerService.svc (Fig. 2).
Fig. 2 An ExchangeListenerService response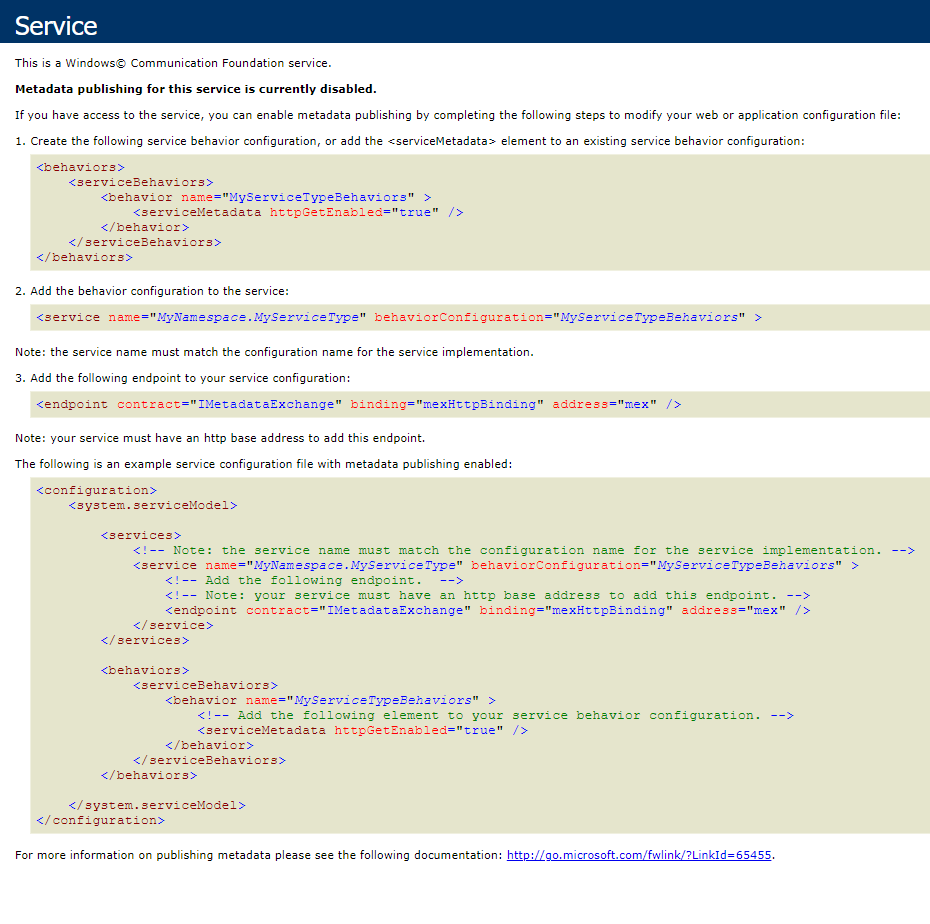
-
Set the needed system setting values. To do this:
-
Open the System Designer, e. g., by clicking
 .
. -
Click “System settings” in the “System setup” block.
-
Set the system setting values as follows:
“ExchangeListenerServiceUri” (the “ExchangeListenerServiceUri” code). The format of the system setting: the service address used at installation/api/listeners.
“Creatio exchange events endpoint URL” (the “BpmonlineExchangeEventsEndpointUrl” code). The format of the system setting value: the anonymous ExchangeListenerService address/NewEmail. For example, https://mycreatio.com/0/ServiceModel/ExchangeListenerService.svc/NewEmail.
-
Email Listener service diagnostics
The Email Listener service diagnostics page provides tools for troubleshooting the service.
Use the service page:
- to check if the features essential for Exchange Listener are enabled
- to verify the service availability
- to receive subscription information
- to validate the “ExchangeListenerServiceUri” system setting
- to check the health of a mailbox
To open the Email Listener Service Diagnostics page, add the “/0/ClientApp/#/IntegrationDiagnostics/” string to the URL of your Creatio website in the browser address bar and press Enter. For example:
The diagnostics page contains several readout blocks and diagnostics controls (Fig. 3). By default, most of the readout blocks do not display diagnostics data unless you click Run diagnostics in that block.
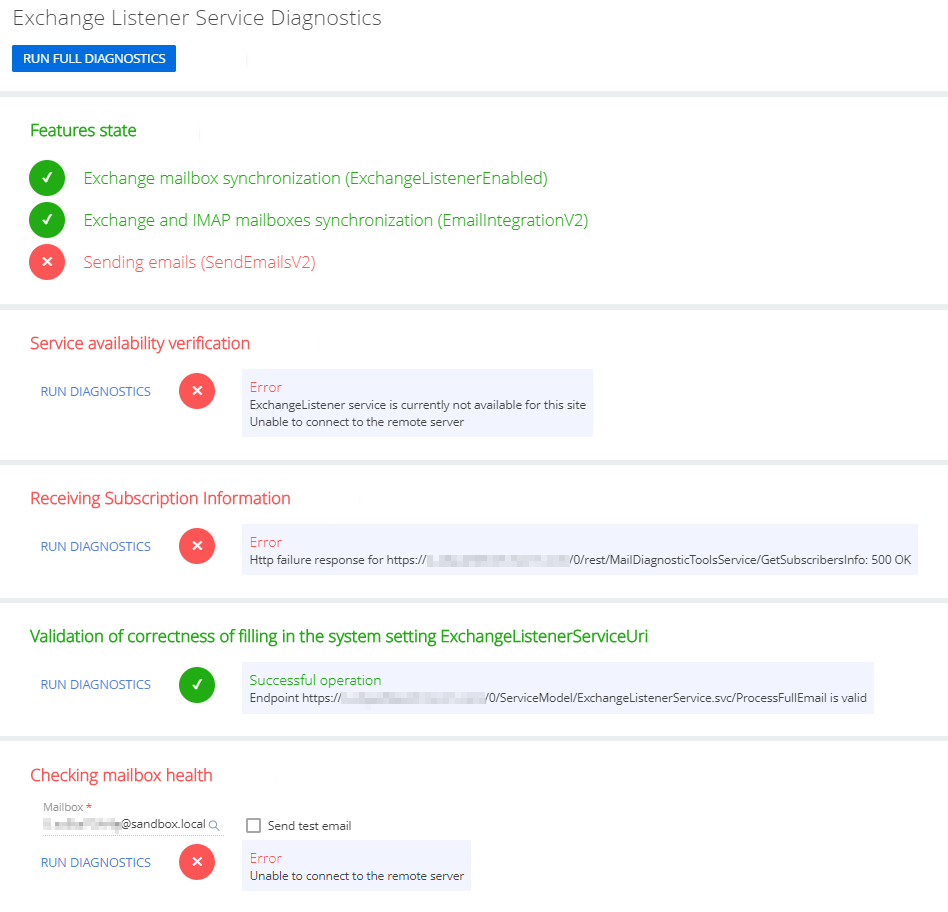
|
Feature state |
This readout block runs diagnostics automatically on page load. Checks if required Email Listener features are enabled in your Creatio application:
Learn more about enabling features in the developer documentation: Feature Toggle mechanism. |
|
Service availability verification |
Checks if the Email Listener service is accessible from your Creatio application. |
|
Receiving subscription information |
Checks the connection to the remote server. |
|
Validation of the “ExchangeListenerServiceUri” system setting |
Checks if the Exchange Listener service endpoint specified in the “ExchangeListenerServiceUri” system setting is valid. |
|
Checking mailbox health |
Checks the operation of Microsoft Exchange mailboxes. Select the Send test email checkbox to send a test email to the specified address when clicking the Run diagnostics link. |