This article covers the setup of business data access permissions. Access to business data involves CRUD data operations: create, read, update, and delete. To grant access to business data, configure access permissions to corresponding Creatio objects.
If you are just getting started with Creatio, we recommend familiarizing yourself with the principles of Creatio object permissions in the e-learning course: User and role management, Access permissions.
Configure object permissions on several levels:
- Operation permissions. This article covers the setup of data operation permissions for different Creatio objects: section and detail.
- Record permissions. Learn more in a separate article: Record permissions.
- Column permissions. Learn more in a separate article: Column permissions.
Access to functions can be granted through system operations. Object operations are different from system operations. Set up system operation permissions in the Operation permissions section of the System Designer. Learn more in a separate article: System operation permissions.
Creatio includes the following object permissions out-of-the-box:
- All employees organizational role has permissions to create, read, update and delete any record in any object. Creatio also grants these permissions to All employees role for objects with "Use operation permissions" switch disabled.
- All portal users organizational role has no operation permissions for Creatio records. To enable the users with this role to see their records and their organization's data in the portal, set up operation permissions for each section available in the portal.
- System administrators organizational role has system operation permissions to add, view, edit and delete any data. These permissions have higher priority than object operation permissions.
Configure access to operations in section objects
-
Go to the system designer (
 button) and open the Object permissions section.
 -
Select the necessary object in the list or use the search box. For example, to configure access permissions to the Opportunities section, select the “Sections” filter and choose the “Opportunity” object. Click the name (or title) of the object to open the object permission settings window (Fig. 1).
Fig. 1 Choosing the section object and opening the permissions settings window
-
Enable the “Use operation permissions” switch (Fig. 2).
Fig. 2 Enable the “Use operation permissions” switch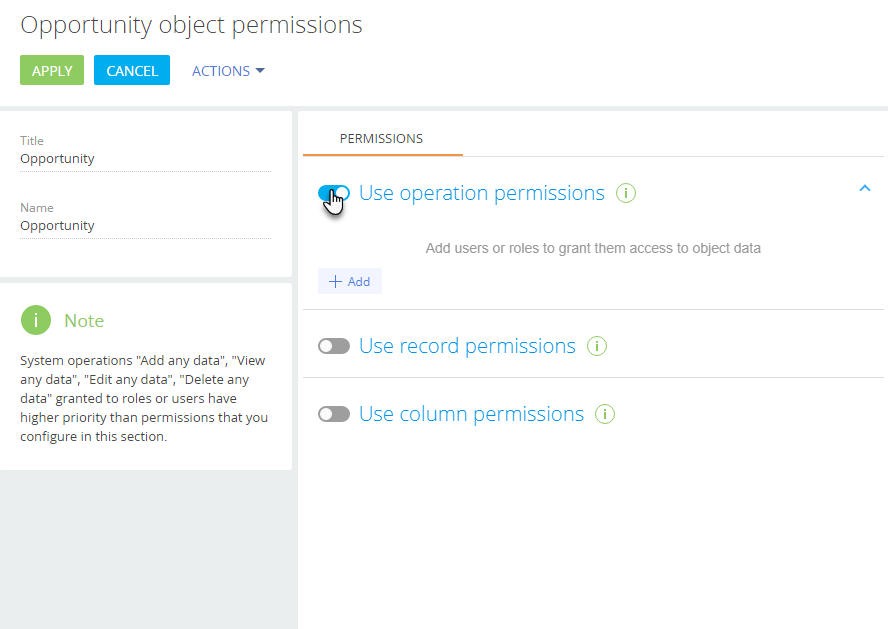
-
Click Add and select the necessary users and roles. You can use the search box or the Organizational roles, Functional roles and Users tabs to quickly find users and roles. In this case:
-
The “All employees” role (added automatically).
-
The “Sales managers” organizational role.
-
The “Sales managers. Managers group” organizational role.
-
The “Secretaries” organizational role.
-
An individual user from the “Secretaries” organizational role (Fig. 3), e. g., V. Murphy.
Fig. 3 Adding users and roles to grant access permissions to the section
-
-
By default, each user or role that you add is granted access to read, create, update and delete object data. Edit these permissions according to your requirements, for example:
-
Leave the Read checkbox selected and clear the Create, Edit and Delete checkboxes for the “All employees” role. As a result, all company employees can read section records but cannot create, edit or delete them.
-
Leave the Read, Create, Edit checkboxes selected and clear the Delete checkbox for the “Sales managers” role. As a result, sales managers will be able to read, create and edit section records without the ability to delete them.
-
Leave the Read, Create, Edit and Delete checkboxes selected for the “Sales managers. Managers group” role. As a result, sales department managers will have permission to read, create, edit or delete records in the Opportunities section.
-
Clear the Read, Create, Edit and Delete checkboxes for the “Secretaries” role. As a result, the Opportunities section will be hidden from the company’s secretaries.
-
Leave the Read checkbox selected for the specific user in the “Secretaries” role. As a result, the user can read records in the Opportunities section.
 icon might appear next to some permissions. This means that some settings contradict each other, and it is necessary to adjust their priorities.
-
Create the hierarchy of object operation permissions
Sometimes the access permissions that apply to the same user or role might contradict each other, since a user might be included in several roles. Also, organizational roles might inherit permissions from one another, for example, the “Sales managers,” “Sales managers. Managers group,” and “Secretaries” roles are a part of the “All employees” role. Additionally, permissions granted to an individual user might conflict with permissions that the user may have as a member of their role. These conflicts are indicated by the  icon next to the conflicting access permission.
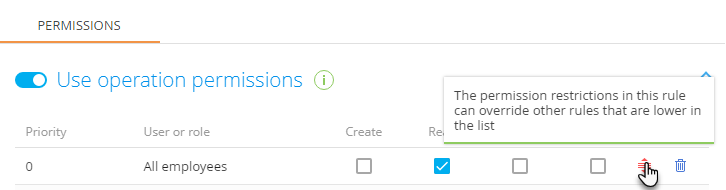
In case of a conflict, the permission that is the highest in the list will have a higher priority. The priority is shown in the Priority column and the highest possible priority is “0.” An  icon next to an access permission rule indicates such a conflict. You can drag a rule to change its position in the list (Fig. 4).
Please take the following into account while configuring access permission priorities:
-
-
A user who is a part of several roles will get the access permissions of the highest role in the list.
For example, all users should not access the Opportunities section records, but sales managers (who also belong to the “All users” role) should be given all permissions except those that enable them to delete records. To do this, place the “Sales managers” role higher than “All employees” in the list.
-
-
-
To deny access permissions to an operation for a role while permitting the operation for some of its users, place this role lower in the list than the users who need to be granted access.
Thus, if you deny access to the Opportunities section for the “Secretaries” role, but grant permission to read data to one of the secretaries, make sure that you move the “Secretaries” below the secretary employee who is supposed to access to the section.
-
-
-
Users or roles that are not added to the object operations settings area do not get access to operations and are not included in priority settings.
-
Configure access permission priorities. To change the rule display order, drag the rule to the necessary position in the list (Fig. 5).
-
Place the organizational role with the highest level of permissions (in our case, “Sales managers. Managers group”) at the top of the list.
-
Place the “Sales managers” role directly below.
-
The “All employees” role and the “V. Murphy” user (who belongs to the “Secretaries” role) have the same access permissions. Thus, you can place them directly below the “Sales managers” role in any order.
-
The “Secretaries” role should be placed at the very bottom of the list since they do not have access to the Opportunities section.
-
Save the changes by clicking “Apply” in the upper left corner of the page.
Fig. 5 Set up the access permission priorities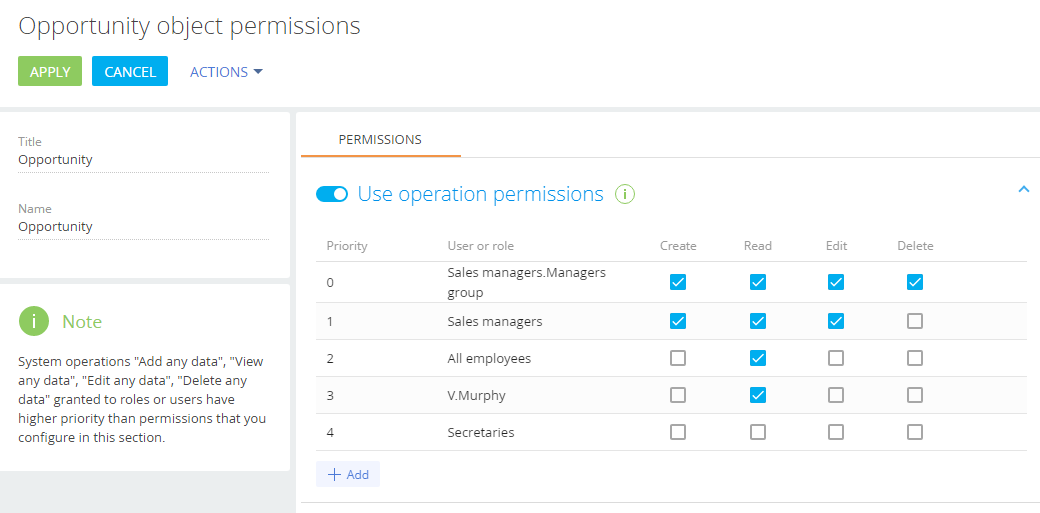
As a result:
-
-
Users in the “Sales managers” role have access to the Opportunities section with the ability to create and edit section records. Sales managers do not have permission to delete records.
-
-
-
Their managers should have full access to these records, including the permissions to delete them.
-
-
-
All company employees can read section records but cannot create, edit or delete them.
-
-
-
All secretaries, apart from V. Murphy, cannot view the Opportunities section records.
-
-
-
V. Murphy can read the records in the section.
-
Configure access to operations in detail objects
-
Go to the system designer (
 button) and open the Object permissions section.
 -
Select the “All objects” filter.
-
Find the “Attachments” object via the search box.
-
Click the name or the title of the object to open the access permissions configuration window.
-
Enable the “Use operation permissions” switch (Fig. 6).
Fig. 6 Enable the “Use operation permissions” switch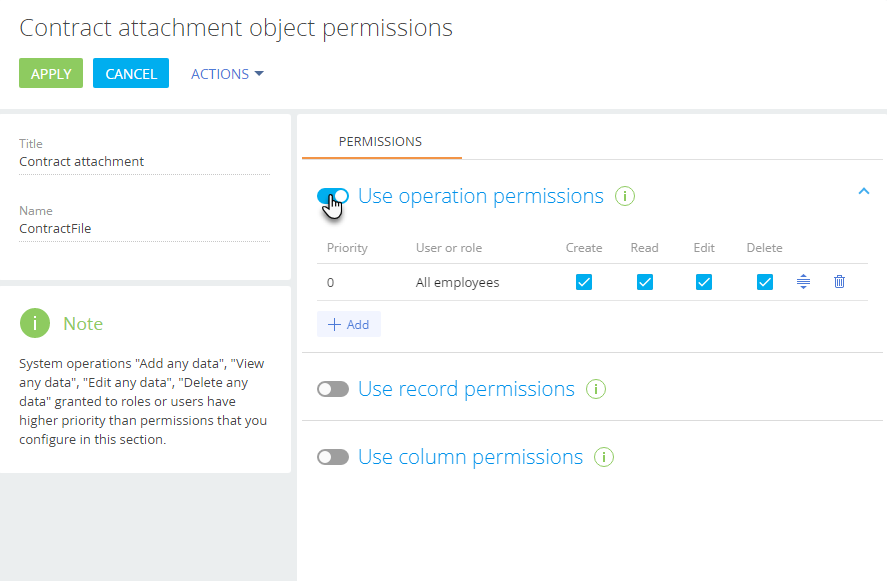
-
Click Add and select the necessary users and roles. Use the search box to quickly find the necessary users and roles. In this case:
-
The “All employees” role (added automatically).
-
The “Sales managers” role.
-
-
By default, each user or role in the list is granted access to read, create, update and delete object data. Edit these permissions to fit the example requirements:
-
Leave the Read, Create, Edit and Delete checkboxes selected for the “Sales managers” role. As a result, sales managers can read, create, edit and delete data in the Attachments detail.
-
Leave the Read checkbox selected and clear the Create, Edit and Delete checkboxes for the “All employees” role. As a result, all employee users can view the data on the Attachments detail without the ability to add, edit or delete anything.
-
-
If necessary, configure access priorities for the selected roles. Adjustments may be necessary if access levels conflict with each other (roles may overlap). For example, the “Sales Managers” role is included in the “All Employees” role. These conflicts are indicated by the
 icon next to the conflicting access permission. Learn more about priorities: Create the hierarchy of object operation permissions.
As a result:
-
-
Users in the “Sales managers” role have full access to the Attachments detail.
-
-
-
All company’s employees can view the data on the Attachments detail without the ability to create, edit or delete anything.
-
Permission inheritance
Subordinate objects can inherit access permissions from parent objects. For example, communication options can inherit access permissions of the parent account. In this case, any user who lacks the permission to edit the primary account record cannot edit the communication options as well.
By default, this functionality is disabled for new sections. You can set up the functionality in the Object Designer of the Configuration section.