Controls are objects that organize interaction between the user and Creatio. For example, buttons, details, fields, etc. Usually, navigation bars, dialog boxes, and toolbars display controls.
Terrasoft.controls.Component is the parent class for controls. Terrasoft.BaseObject class is the parent class for the Component class. The Bindable mixin of the Component class lets you bind control properties to the needed view model properties, methods, or attributes.
Declare events in the control to ensure it operates as intended. Control inherits the following events from the Component class:
- added. Triggered after the control is added to the container.
- afterrender. Triggered after the control is added and the HTML view is added to the DOM.
- afterrerender. Triggered after the control is rendered and the HTML view is updated in the DOM.
- beforererender. Triggered before the control is rendered and the HTML view is added to the DOM.
- destroy. Triggered before the control is deleted.
- destroyed Triggered after the control is deleted.
- init. Triggers after the control is initialized.
Learn more about the Component class events in the JS classes reference.
Control can subscribe to browser events and define its own events.
Implement the control in the diff array of modifications.
The template (template <tpl>) defines the control appearance. Creatio generates the control view in the page view while rendering the control to the page view. Generation is based on the specified template.
The control element has no business logic. The module where you add the control implements the business logic.
The control has styles and selectors attributes that are defined in the Component parent class. These attributes let you customize styles flexibly.

1. Create a module
- Open the Configuration section and select a custom package to add the schema.
-
Click Add → Module on the section list toolbar.
/scr_add_module.png)
-
Fill out the schema properties in the Module Designer.
- Set Code to "UsrLimitedIntegerEdit."
- Set Title to "LimitedIntegerEdit."

Click Apply to apply the changes.
-
Add the source code in the Module Designer.
- Besides the standard extend and alternateClassName properties, set the range of allowed values (minLimit and maxLimit properties). Use default values for the properties.
- Implement the business logic of the control. To do this, overload the onEnterKeyPressed() method. Call base logic to generate value change events and implement the isOutOfLimits() method after the call. The method checks if the entered value is within the range of allowed values. If the number is out of range, display a warning message in the input field.
Regardless of displaying the warning message, Creatio saves the entered value and transfers it to the schema view model that uses the control.
- Click Save on the Module Designer’s toolbar.
2. Add the control to a contact page
- Open the Configuration section and select a custom package to add the schema.
-
Click Add → Replacing view model on the section list toolbar.
/scr_add_replacing_module.png)
-
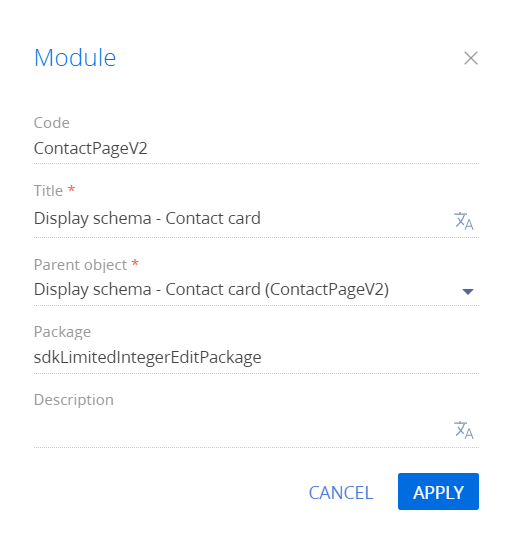
Fill out the schema properties.
- Set Code to "ContactPageV2."
- Set Title to "Display schema - Contact card."
- Select "ContactPageV2" in the Parent object property.
-
Add the source code in the Module Designer.
- Add the ScoresAttribute attribute to the attributes property. The attribute is bound to the value of the control’s input field. Instead of an attribute, you can use an integer column of an object that is linked to a record page schema.
-
Add a configuration object that defines the property values of a control instance to the diff array of modifications.
- Bind the value of the value property to the ScoresAttribute attribute.
- Set the range of allowed values (minLimit and maxLimit properties). If you do not enter the minLimit and maxLimit properties in the configuration object explicitly, the default range of valid values is [-1000; 1000].
View the source code of the replacing view model schema of the contact page below.
- Click Save on the Designer's toolbar.
Outcome of the example
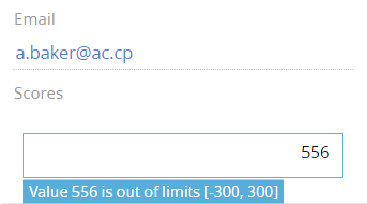
To view the outcome of the example:
- Open the contact page.
- Enter a value that is out of the range of valid values in the Scores field.
As a result, Creatio will display the corresponding warning message on the contact page.