Creatio IDE is an integrated development environment used to develop complex business logic, integration, and setup. Creatio IDE is located in the Configuration section. Use the Configuration section to manage configuration elements that control Creatio functionality.
Set up permissions to access the Configuration section
You can set up permissions to the Configuration section on the system operation level. By default, only system administrators have access to key system operations. However, you can grant permissions to specific users or user groups. To grant permissions to access the Configuration section:
- Click
 to open the System Designer. Click Operation permissions in the Users and administration block.
 - Select the Can manage configuration elements (“CanManageSolution” code) system operation.
- Click
 and specify the user/role in the Operation permission detail. The relevant record will appear in the Operation permissions detail with Yes in the Access level column. The users with the role will have permission to the Can manage configuration elements system operation.
If a user does not have permission to access the Configuration section, they will receive a standard notification about the lack of permissions to perform an operation when trying to load the section.
Open the Configuration section
To open the Configuration section in Creatio .NET Framework:
- Click
 to open the System Designer. Click Advanced settings in the Admin area block.
 - Open the [Creatio address]/0/ClientApp/#/WorkspaceExplorer URL. For example, http://my.creatio.com/0/ClientApp/#/WorkspaceExplorer.
- Use the /we alias. For example, http://my.creatio.com/0/we.
- Use the /conf alias. For example, http://my.creatio.com/0/conf.
- Use the /dev alias. For example, http://my.creatio.com/0/dev.
You can open the section in Creatio ASP.NET Core in a similar way. However, you do not need to use the /0 prefix.
The Configuration section will open in a new tab.
Configuration development
The Configuration section UI includes several functional areas:
- Toolbar (1)
- Package workspace (2)
- Main workspace (3)
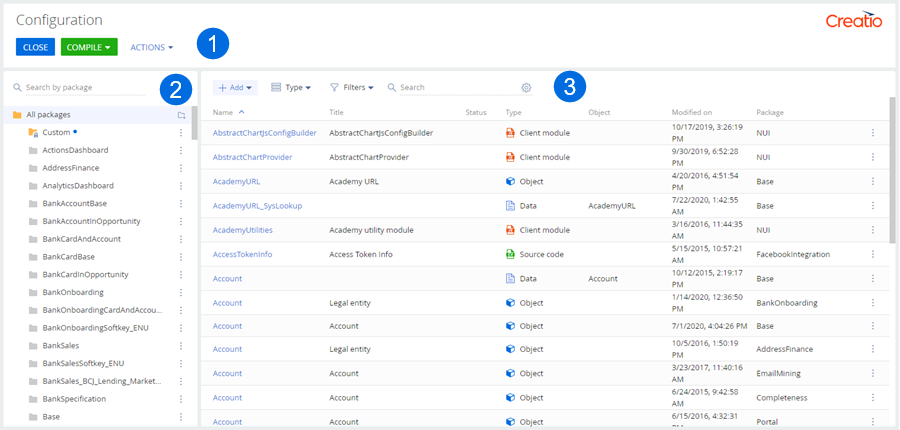
The Configuration section tools let you manage:
- Development in the file system
- Packages
- Package configuration elements
- Version control system repositories
- Configuration compilation
Development in the file system
The file system development actions are located in the File system development mode group (4) in the toolbar's (1) Actions dropdown.
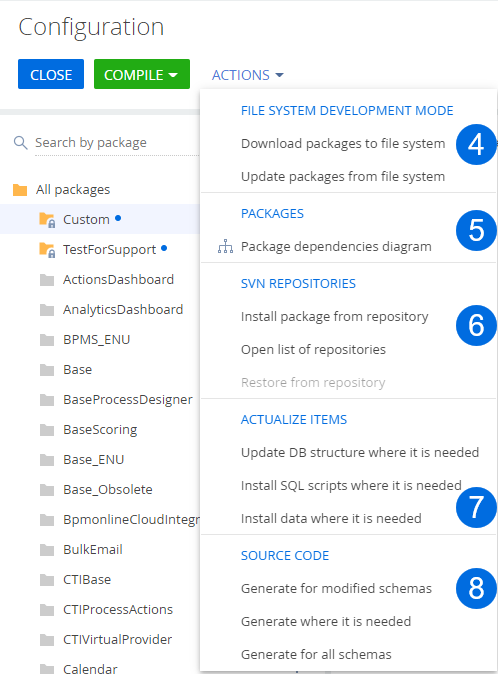
The File system development mode (4) action group lets you:
- Download packages from the Creatio database to the ...\Terrasoft.WebApp\Terrasoft.Configuration\Pkg directory (Download packages to file system option).
- Upload packages from the ...\Terrasoft.WebApp\Terrasoft.Configuration\Pkg directory to Creatio database (Update packages from file system option).
To access the options in the File system development mode action group (4), enable development mode in the file system. Hover over an option in this action group to view the steps to enable development mode. Learn more about the file system development mode in the Development in the file system article.
Packages
Package management tools:
- The Packages group (5) in the toolbar's (1) Actions dropdown.
- Package workspace (2).
- The package menu.
The Packages action group (5) lets you open the package dependencies diagram.
The package workspace (2) lets you:
- Search for a package by name (Search by package bar).
- Create a package (
 button). Click the button to open the package creation window. Set the package name and description, as well as add dependencies in this window. Learn more about creating packages in the Create a package for development article.
 - View the list of Creatio packages (All packages folder). The packages are displayed in alphabetical order. The modified packages and modifiable packages are displayed at the top. If you select the All packages folder, Creatio will display the configuration elements of all packages alphabetically in the Configuration section's main workspace (3). If you select a different package folder, Creatio will only display the configuration elements of that package. Creatio displays the modified packages at the top of the All packages folder list and marks them with
 .
.
Click  next to the package name to bring up the package menu.
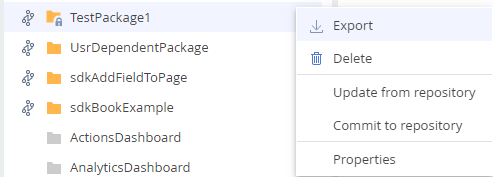
The package menu lets you:
- Delete a package (Delete option). Not available for pre-installed packages. You can delete empty packages and packages with non-parent configuration elements. Attempting to delete a package with parent configuration elements will open a dialog window with the list of dependent packages and dependent elements that block deletion.
- Review the package properties (Properties option). Set up the package dependencies for modifiable packages in the Properties tab. The tab also lets you view the system information: the package author and editor, the creation and modification dates, the unique identifier, the primary package key in the database table. To open the package properties, double-click the package name.
Package configuration elements
The Configuration section includes the following package configuration element management tools:
- The Actualize items group (7) in the toolbar's Actions dropdown (1).
- The Source code group (8) in the toolbar's Actions dropdown (1).
- The workspace toolbar (3) in the Configuration section.
- The record list (3) in the Configuration section.
The Actualize items (7) action group lets you:
- Update the database structure for outdated configuration elements (Update DB structure when it is needed option).
- Install the necessary SQL scripts (Install SQL scripts where it is needed option).
- Install the necessary data (Install data where it is needed option).
Creatio will send you a notification when it finishes updating the configuration items.
The Source code action group (8) lets you:
- Generate the source code for modified schemas (Generate for modified schemas option).
- Generate the source code for schemas that require it (Generate where it is needed option).
- Generate the source code for every schema (Generate for all schemas option). This operation may take more than 10 minutes.
Since version 7.18.4, Creatio generates the source code for schemas in the background.
The major features of background generation are as follows:
- Background generation does not affect the core user workflows.
- Starting compilation or a new source code generation is not possible while the running operation is not complete If you attempt to start them, Creatio will warn you that the source code generation is still in progress.
- We do not recommend working on functionality that requires compilation until the source code generation is done. That includes installing applications and extensions, configuring the UI and business logic.
Once the operation is completed, Creatio will display the corresponding notification in the communication panel.
You can view the Configuration section's workspace toolbar (3) on the figure below.

The toolbar lets you:
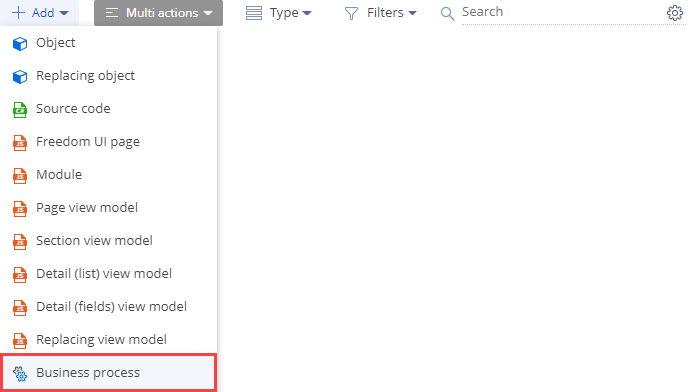
- Add a configuration element by type (Add dropdown). Select a package before adding an element. If you do not select a package, the options in the Add dropdown will be grayed out. You cannot add configuration elements to pre-installed packages. View the configuration element types you can add on the figure below.
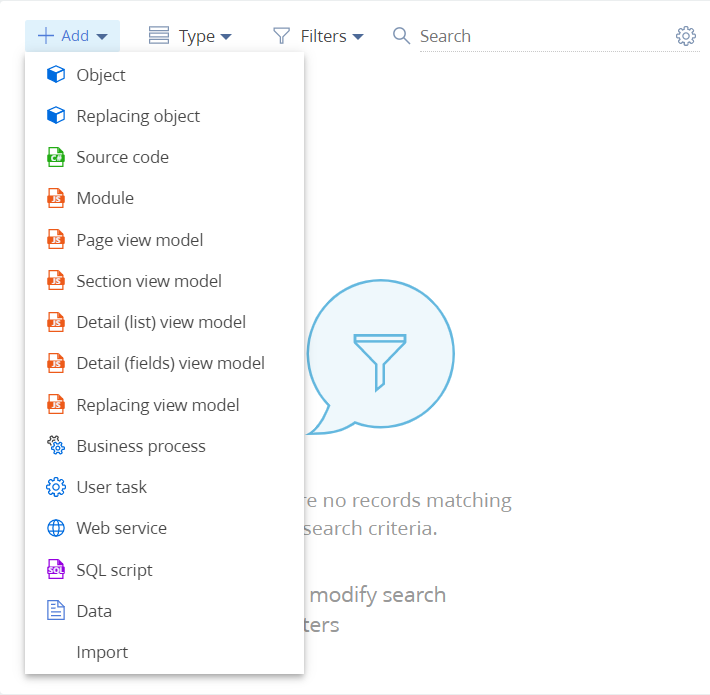
-
Import a schema (*.md) or a reference assembly (*.dll) to the custom package (Import option in the Add dropdown).
- Select the configuration element type to display in the section list (Type dropdown). View the configuration element types you can display on the figure below.
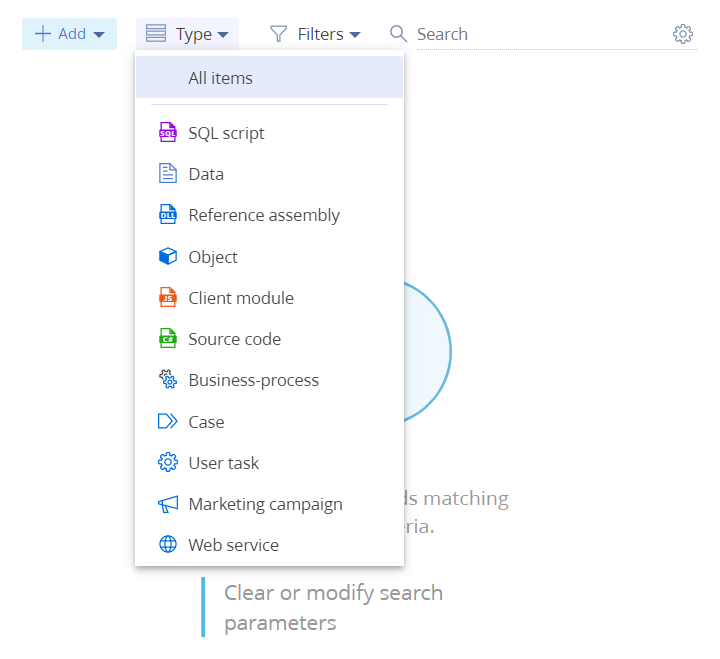
Client module type configuration elements:
- Module.
- Page view model.
- Section view model.
- Detail (list) view model.
- Detail (fields) view model.
- Replacing view model.
Object type configuration elements:
- Object.
- Replacing object.
- Filter configuration elements in the section list by status (Filters) dropdown). Creatio saves the settings of the Filters dropdown to the user profile. Creatio will apply the filters when you open the Configuration section. View the configuration element statuses on the figure below.
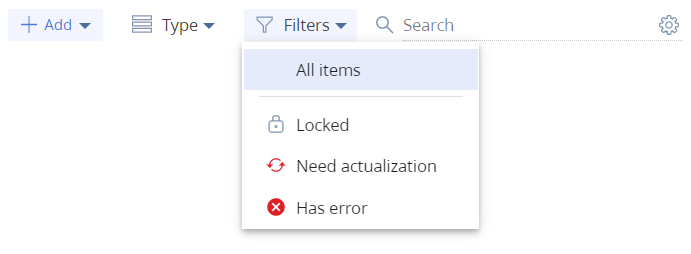
Configuration elements with Need actualization value in the Filters dropdown:
- SQL script and Data – when the Needs to be installed in database property is active.
- Object – when the Needs to be updated in database property is active.
- Client module, Source code, Case, Marketing campaign, Business-process, User task – when the Needs generate source code property is active.
- Search for a configuration element by name in the record list (Search bar). Creatio searches within a selected package. To search within all packages, navigate to the All packages folder in the package workspace (2). Click
 to configure the search parameters:
- Search by title (Search by column "Title" option), active by default.
- Search by a unique identifier (Search by column "UID" option), inactive by default.
- Search mode Available options:
- Starts with, selected by default. The configuration element name starts with the text you type in the Search bar.
- Contains. The configuration element name contains the text you type in the Search bar.
- Equals. The configuration element name is the same as the text you type in the Search string.
Click Apply to apply the changes.
Creatio saves the search settings to the user profile. Creatio will apply them when you open the Configuration section.
The main workspace's (3) section list in the Configuration section contains the list of configuration elements. You can view the list of configuration element properties in the table below.
| Column | Description | Comments |
|---|---|---|
| Name | The configuration element name you specify when creating it. | All configuration elements are sorted in alphabetical order. The modified configuration elements have |
| Title | The configuration element title | |
| Status | The configuration element status | Contains data from the Filters dropdown.
The Status column will display
The Status column will display If the configuration element needs an update and contains errors, the Status column will display |
| Type | The configuration element type | |
| Object | The object connected to the package bound data | Creatio only populates the column for the Data configuration element. |
| Modified on | The configuration element modification date | |
| Package | The name of the package that contains the configuration element |
Click  in the configuration element row to bring up the context menu. The menu options vary depending on the Type column value. View the configuration element actions in the configuration element menu in the table below.
| Option | Action | Comments | Configuration element |
|---|---|---|---|
| Delete | Deletes the configuration element | Not available for configuration elements in pre-installed packages. |
SQL script Data Reference assembly Object Client module Source code Case Marketing campaign Web service |
| Install | Installs the configuration element |
Creatio will install SQL script elements to the database and Data elements to the object specified in the Object column. Should there be installation issues with the object specified in the Object column, you will be able to view the error description in the Status column. You can also view the error description in the configuration element properties. |
SQL script Data |
| Discard changes | Undoes the changes | This option is available if the configuration element's package is connected to a VCS repository. |
SQL script Data Reference assembly Object Client module Source code Case Marketing campaign Business process User task Web service |
| Properties | Opens the configuration element properties window |
SQL script Data Reference assembly Object Client module Source code Case Marketing campaign Business process User task Web service |
|
| Edit process | Opens the object in the Process Designer | If the object was created by a third party, Creatio will display the corresponding notification. |
Object |
| Export | Downloads the configuration element | in *.md format. |
Object Client module Source code Case Marketing campaign Business process User task Web service |
| Update database structure | Updates the object's database structure |
Object |
|
| Generate source code | Generates the source code of the configuration element | The code generation will work if there are compilable elements in the process. |
Object Business process User task Web service |
| Open metadata | Opens the configuration element metadata window. |
Object Client module Source code Case Marketing campaign Business process User task Web service |
Click  in the record list to delete a custom package's configuration element. To bring up this button, hover over the configuration element record in the Configuration section.
Version control system repositories
Version control system repository management tools:
- The SVN repositories group (6) in the toolbar's (1) Actions dropdown.
- The package menu.
The SVN repositories action group (6) lets you:
- Install a package from the VCS repository (Install package from repository option).
- Create, update and delete links to VCS repositories in the List of repositories window (Open list of repositories option).
- Synchronize the configuration with the latest version in the repository (Restore from repository option). This will roll back the changes not committed to the VCS repository.
Subversion VCS is only available for Creatio .NET Framework. Learn more about working with VCS repositories in the Version control in Creatio IDE article.
The package menu lets you:
- Export a package as a ZIP archive (Export option). Learn more about exporting packages in the Packages export and import article.
- Update the package from the VCS repository (Update from repository option). Learn more about updating packages in the Updating package from repository article.
- Commit a package to the repository (Commit to repository option). Learn more about committing a package to the VCS in the Committing a package to storage article.
Compile the configuration
Click Compile on the toolbar (1) to start compiling the configuration changes.
If you select Compile all in the Compile button's dropdown, Creatio will compile the configuration for all configuration elements. This will update all executable files and upload the static content to the ...\Terrasoft.WebApp\conf directory. Once the compilation finishes, Creatio will send a corresponding notification. The changes will take effect for users working in the relevant configuration.
Creatio will display any compilation errors in the dialog window. Compilation error properties:
- The error type icon (error
 or warning
  ).
). - The name of the relevant file.
- The error description.
- The error code.
- The number of the line with an error.
Close the Configuration section
To close the tab with the Configuration section, click Close on the toolbar (1).
1. Create a user task schema
- Go to the Configuration section and select a custom package to add the schema.
-
Click Add → User task on the section list toolbar.

-
Fill out the schema properties in the User Task Designer.
- Set Code to "UsrSumNumbersProcessUserTask."
- Set Title to "User task of sum numbers."
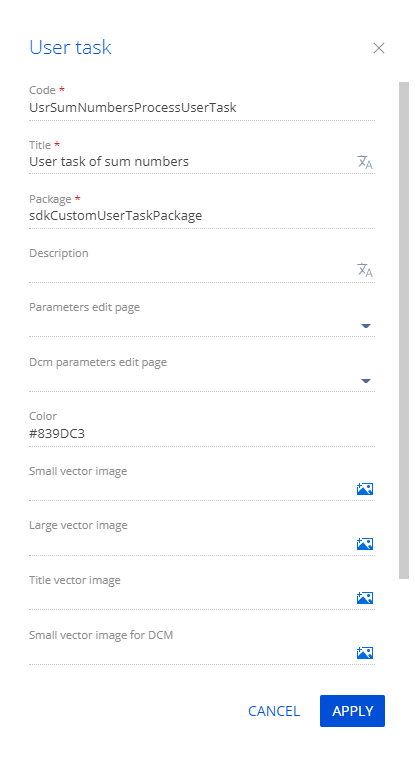
Click Apply to apply the properties.
-
Add a user task parameter that contains the first integer.
- Click
 in the properties area of the Parameters node’s context menu.
 -
Fill out the parameter properties in the User Task Designer.
- Set Code to "FirstNumber."
- Set Title to "First number."
- Set Type to "Integer."
- Set the Serializable checkbox.
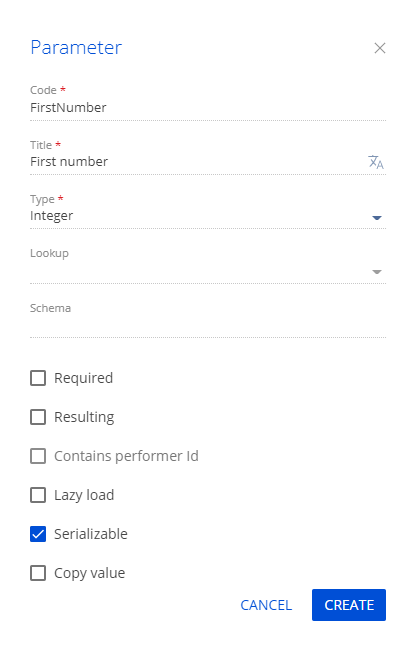
- Click Create to add a parameter.
- Click
-
Add user task parameters that contain the following in a similar way:
- second integer
- integer sum
View the properties of the parameters to add in the table below.
Parameter property valuesParameter Property Property value Parameter that contains the second integer Code "SecondNumber" Title "Second number" Type Select "Integer" Serializable checkbox Set Parameter that contains the integer sum Code "SumNumbers" Title "Sum of numbers" Type Select "Integer" Serializable checkbox Set -
Implement the logic to add integers. To do this, implement the InternalExecute() method of the user task schema’s automatically generated source code.
Full source code of the user task schema - Click Publish on the User Task Designer’s toolbar to apply the changes to the database level.
2. Implement a business process
- Go to the Configuration section and select a custom package to add the schema.
-
Click Add → Business process on the section list toolbar.
-
Fill out the properties of the business process:
- Set the Title property in the element setup area to "Sum of numbers process."
- Set the Code property on the Settings tab of the element setup area to "UsrProcessSumNumbers."

-
Implement the business process.
View the business process in the figure below.

-
Add the user task.
-
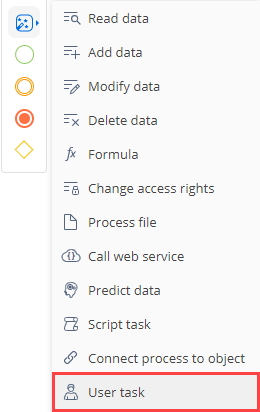
Click System actions in the Designer’s element area and place a User task element between the Simple start event and Terminate end event in the Process Designer’s working area.
-
Fill out the user task properties.
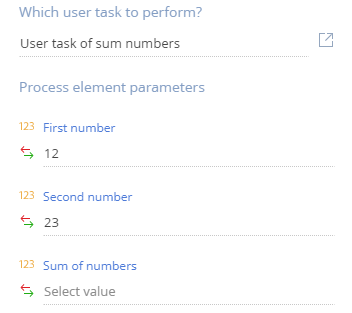
- Select "User task of sum numbers" in the Which user task to perform? property.
-
Fill out the user task parameters.
- Set First number to "12."
- Set Second number to "23."
-
-
Add an auto-generated page.
-
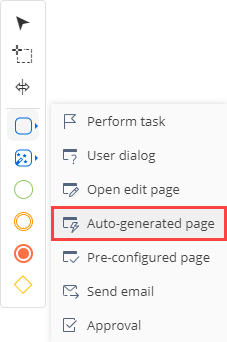
Click User actions in the Designer’s element area and place an Auto-generated page element after the User task element in the Process Designer’s working area.
-
Fill out the auto-generated page properties.
- Set Title to "Sum of numbers page."
- Set Page title to "Sum of numbers page."
-
Add an auto-generated page.
-
Click
/scr_add_button.png) in the Page Items block and select "Integer."
in the Page Items block and select "Integer."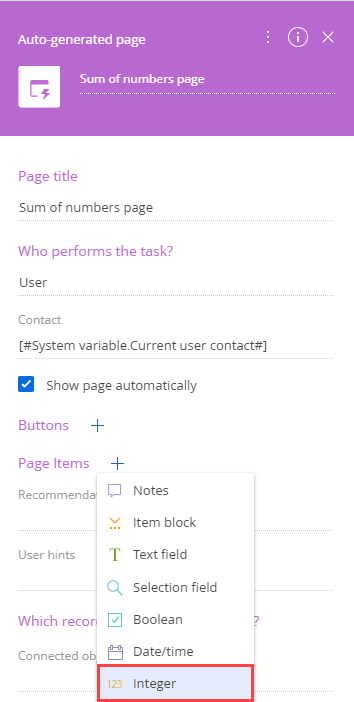
-
Fill out the item properties.
- Set Title to "SUM:."
- Set Code to "Sum."
- Click
 → Process parameter → Sum of numbers in the Value property.
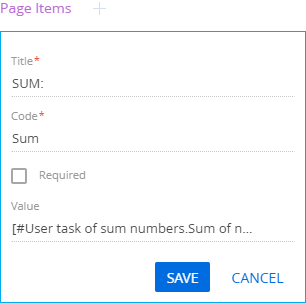
- Click Save to add the parameter.
-
-
-
- Click Save on the Process Designer’s toolbar.
Outcome of the example
To view the outcome of the example, run the Sum of numbers process business process.
As a result, Creatio will open the Sum of numbers page auto-generated page. The page will display the sum of 2 integers that are specified in the business process parameters.


