Connect the Identity Service to Creatio
Identity Service implements OAuth 2.0 in Creatio. Before you connect the Identity Service to Creatio on-site, deploy the Identity Service. Instructions: Deploy the Identity Service.
This functionality is available for Creatio deployed on either .NET Framework or .NET 8 in Creatio 8.3.2 and later. In Creatio 8.3.1 and earlier the functionality is available for Creatio deployed on .NET Framework only.
If you use Creatio in the cloud, the Identity Service is connected out of the box. Proceed with generating OAuth 2.0 client credentials. Instructions: Set up client credentials grant, Set up authorization code grant.
To connect the Identity Service to Creatio on-site:
-
Enable the OAuth 2.0 integration in Creatio. To do this, change the status of the
OAuth20Integrationadditional feature. Instructions: Change the status of an additional feature for all users (developer documentation). The feature is enabled out of the box in Creatio 8.3.2 and later.As a result, the OAuth 2.0 integrated applications will be displayed in the Import and integration block of the System Designer (Fig. 1).
Fig. 1 OAuth 2.0 integrated applications section 
-
Open the OAuth integrated applications page (Fig. 2). To do this, click OAuth 2.0 integrated applications in the Import and integration block.
Fig. 2 OAuth integrated applications page 
The Diagnostic tab displays the status of Identity Service connection and OAuth setup.
-
Fill out the parameters to connect the Identity Service to Creatio. To do this, click the Open settings button on the Diagnostic tab. This opens the Connection settings mini page (Fig. 3).
Fig. 3 Connection settings mini page 
Parameter
Parameter description
Identity Service URL
Website URL you specified in the Sites area of the IIS. Creatio saves the specified value to the "Authorization server Url for OAuth 2.0 integrations" (
OAuth20IdentityServerUrlcode) system setting.Client ID
Client Id you specified in the
ClientIdparameter of the appsettings.json file. Creatio saves the specified value to the "Client id for OAuth 2.0 integrations" (OAuth20IdentityServerClientIdcode) system setting.Client secret
Secrets you specified in the
Secretsparameter of the appsettings.json file. Creatio saves the specified value to the "Client secret for OAuth 2.0 integrations" (OAuth20IdentityServerClientSecretcode) system setting. -
Test connection to the Identity Service. To do this, click Test connection.
- If Creatio displays the "Connection established" notification, click Save.
- If Creatio displays the "Connection failed" notification, identify potential issues or errors in the Identity Service or OAuth setup and usage. Instructions: OAuth health monitoring.
As a result:
- All checkboxes on the Diagnostic tab will be selected (Fig. 4).
- The Identity Service will be connected to Creatio.
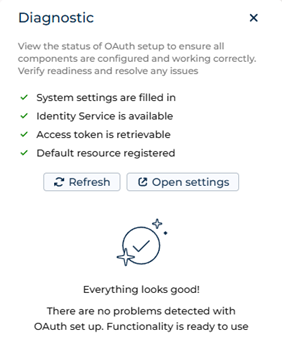
If you change the deployment parameters of the Identity Service, click the Refresh button on the Diagnostic tab to display up-to-date status of Identity Service connection and OAuth setup.
You can set up automated monitoring systems based on OAuth health monitoring. Instructions: OAuth health monitoring. If needed, use Postman to check the health of OAuth functionality. The Postman request collection that tests requests is available in Creatio API documentation.
See also
Set up client credentials grant
Set up authorization code grant
Update the Identity Service using IIS
Authorize external requests using client credentials grant (developer documentation)
Authorize external requests using authorization code grant (developer documentation)
E-learning courses
Tech Hour - Integrate like a boss with Creatio, part 2 (Odata)