Back up database
You will need a backup of your production database to create a test website, to update Creatio, as well as to roll back the changes in case of problems, for example, compatibility with customizations.
If you deploy a backup of the production database and you want to disable your integrations in it, run the Disable_Synchronization.sql script. Download the script.
Back up Microsoft SQL Server database
-
Run Microsoft SQL Server Management Studio.
-
Select the Back Up command under the Tasks section in the context menu of the application database catalog.
-
Specify the name of the database copy and the directory to create backup. Click OK to start the backup process (Fig. 1).
Fig. 1 Back up the database 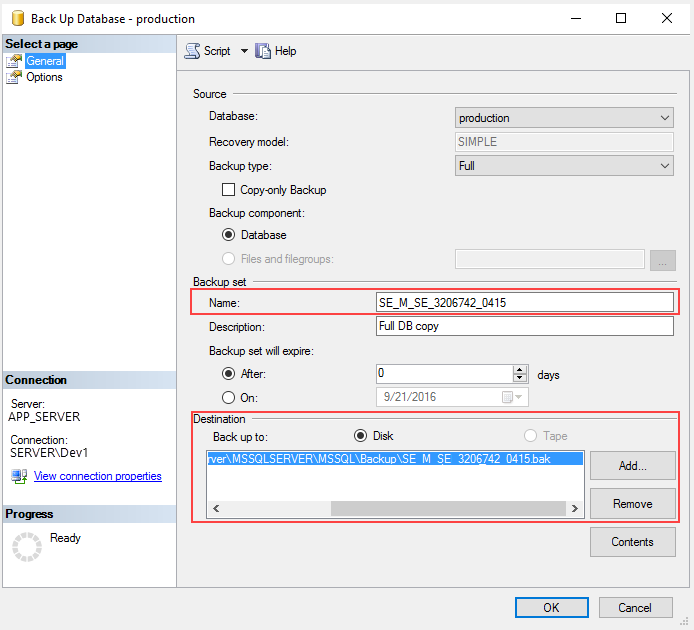 note
noteMake sure the directory for the database backup already exists. The SQL server has no rights to create directories.
When updating the Creatio production version, we recommend creating a copy of the application using any file manager.
To open a database backup:
- Log in to Microsoft SQL Studio.
- Create a new database if you need to extract only certain data from the backup, or select an existing database if you need to restore all data.
- Select the Restore database command in the context menu of the database. This opens a window.
- Specify the path to the backup file.
- Click OK and wait for the restoration process to complete.
Learn more about deploying the backup database: Deploy Microsoft SQL Database for Creatio.
Back up PostgreSQL database
To create a database backup, use the pg_dump utility. It is located in the software setup folder for PostgreSQL.
-
Enter the data base connection password in the environment variable:
- Windows
- Linux
set PGPASSWORD=#SysUserPassword#export PGPASSWORD=#SysUserPassword# -
Run the following command:
"C:\\PostgreSQL\\pg_dump.exe" --host=#ServerIP# --port #ServerPort# --username #SysUserName# --format=c --blobs --verbose -clean -file=#BackupFilePath# #DatabaseName#where
ServerIP– PostgreSQL server address.ServerPort– PostgreSQL server port.SysUserName– name of the PostgreSQL system user (you specify it when installing the PostgreSQL server).SysUserPassword– password of the PostgreSQL system user (you specify it when installing the PostgreSQL server).BackupFilePath– full path to the directory where the backup copy will be placed.DatabaseName– name of the data base, whose backup to make.
As a result, the utility will create a database backup in the BackupFilePath directory.
Learn more about deploying the backup database: Deploy PostgreSQL Database (Linux) and Deploy PostgreSQL Database (Windows).