Set up Quick filter components
Use Quick filter components to filter data by custom conditions, date/time, or lookup values.
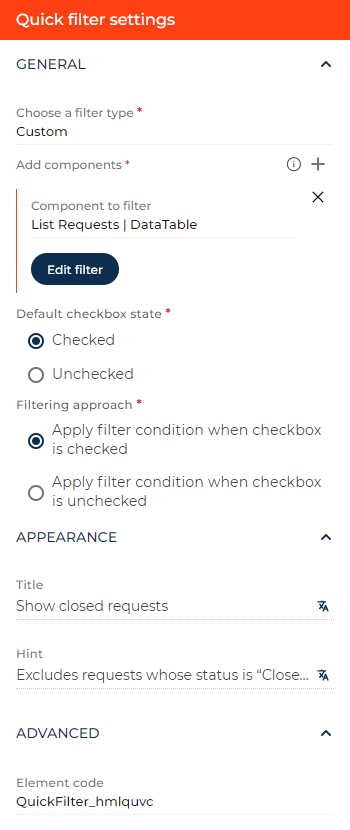
Set up a custom filter
Set up a Quick filter component that filters the list by open requests on the list page.
- Add and set up a "Request status" field. Connect the field to the Status custom lookup that has multiple values, including "Closed." Learn more about the setup in separate articles: Set up a Dropdown field, Manage lookup values.
- Add a Quick filter component to the page by dragging and dropping it to the canvas and open the component setup area.
- Select "Custom" in the Choose a filter type parameter. This brings up new parameters.
- Fill out the Component to filter field with the list you want to filter in the element settings area.
- Click Setup filter and configure the "Status ≠ Closed" filter. The filter setup process is similar to classic UI. Learn more in a separate article: Advanced filter.
- Specify whether to keep the filter checkbox selected or cleared on page load in the Default checkbox state parameter. For this example, set the checkpoint to be selected.
- Specify whether to apply the filter when a user selects or clears the filter checkbox in the Filtering approach parameter. For this example, leave the filter applied when a user selects the checkbox.
- Enter "Show closed requests" in the Title parameter. You can click the
 button to the right to localize the title to other languages you are going to use in the app. Learn more about localizing Freedom UI elements in a separate article: Localize a Freedom UI element.
 - Enter the filter tooltip in the Hint parameter. Hold the pointer over the filter to view the tooltip. For this example, enter "Excludes requests whose status is Closed." You can localize the parameter similarly to the Title parameter.
- View the unique component code in the page schema in the Element code parameter. Creatio uses this code in page schemas. You can change it if needed. This helps software developers to customize the app easier, especially if you have multiple similar components on the page. For this example, leave the code as is.
As a result, Creatio will add a Quick filter component that filters the list by open requests to the list page.
Set up a date/time filter
Set up the Quick filter component that filters records by their creation date on the list page.
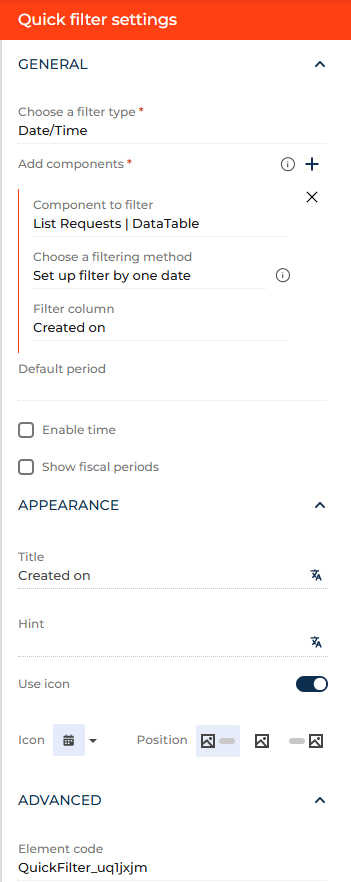
- Add a Quick filter component to the page by dragging and dropping it to the canvas and open the component setup area.
- Select "Date/Time" in the Choose a filter type parameter. This brings up new parameters.
- Fill out the Component to filter field with the list you want to filter in the element settings area.
- Specify whether to use single dates or date ranges for the filter boundaries in the in the Choose a filtering method parameter. For this example, select "Set up filter by one date."
- Select "Created on" in the Filter column parameter.
- Specify the filter period to apply on page load in the Default period parameter. If you leave the parameter empty, Creatio does not apply any filter period on page load. For this example, leave the parameter empty.
- Click the Use fiscal period toggle to enable fiscal period macros for the filter. Available in Creatio 8.3.3 and later. When enabled, the filter supports fiscal period macros such as "Q1–Q4," "Half year," "Current year," "Previous year," and "Next year." Fiscal boundaries are derived from the "Start date of the fiscal year" (
FiscalYearStartDatecode) system setting. If the fiscal year start date is not configured, Creatio falls back to calendar-based calculations. For this example, leave the toggle as is. - Enter the filter caption in the Title parameter. Creatio populates the parameter using the filter column name, but you can change the parameter if needed. For this example, leave the parameter as is. You can click the button to the right to localize the title to other languages you are going to use in the app. Learn more about localizing Freedom UI elements in a separate article: Localize a Freedom UI element.
- Enter the filter tooltip in the Hint parameter. Hold the pointer over the filter to view the tooltip. For this example, leave the parameter empty. If you fill out the parameter, you can localize it similarly to the Title parameter.
- Click the Use icon toggle to remove the icon from the filter. For this example, leave the parameter as is.
- Select the needed filter icon in the Icon parameter. For this example, use the
 icon.
icon. - Specify the icon position or toggle the filter caption in the Position parameter. For this example, place the icon to the left of the caption.
- View the unique component code in the page schema in the Element code parameter. Creatio uses this code in page schemas. You can change it if needed. This helps software developers to customize the app easier, especially if you have multiple similar components on the page. For this example, leave the code as is.
As a result, Creatio will add the Quick filter component that filters the list by record creation date to the list page.
Set up a lookup filter
Set up the Quick filter component that filters list records by the requester on the list page.

- Add and set up a "Requester" field. Connect the field to the Contacts lookup. To do this, follow the steps in separate article: Set up a Dropdown field.
- Drag a Quick filter component to the canvas and open the component setup area
- Select "Lookup" in the Choose a filter type parameter. This brings up new parameters.
- Select the list in the Component to filter parameter.
- Select "Requester" in the Filter column parameter. This brings up new parameters.
- Specify the lookup value to apply to the filter on page load in the Default value parameter. If you clear the parameter, Creatio does not apply any lookup value to the filter on page load. For this example, clear the parameter.
- Click Setup filter to narrow down the lookup values available in the component. For example, display only employees of a specific department. The filter setup process is similar to classic UI. Learn more in a separate article: Advanced filter. For this example, do not set up the filter.
- Enter the filter caption in the Title parameter. Creatio populates the parameter using the filter column name, but you can change the parameter if needed. For this example, leave the parameter as is. You can click the button to the right to localize the title to other languages you are going to use in the app. Learn more about localizing Freedom UI elements in a separate article: Localize a Freedom UI element.
- Enter the filter tooltip in the Hint parameter. Hold the pointer over the filter to view the tooltip. For this example, leave the parameter empty. If you fill out the parameter, you can localize it similarly to the Title parameter.
- Click the Use icon toggle to remove the icon from the filter. For this example, leave the parameter as is.
- Select the needed filter icon in the Icon parameter. For this example, use the
 icon.
icon. - Specify the icon position or toggle the filter caption in the Position parameter. For this example, place the icon to the left of the caption.
- View the unique component code in the page schema in the Element code parameter. Creatio uses this code in page schemas. You can change it if needed. This helps software developers to customize the app easier, especially if you have multiple similar components on the page. For this example, leave the code as is.
As a result, Creatio will add the Quick filter component that filters list records by specific requester to the list page.
See also
Overview of Freedom UI Designer and its elements