Process Designer basics
Add process elements to the working area to build a new business process.
The process elements are covered in separate articles.
Learn more about improving the performance of your business processes in an online course: How to start modeling your process? Creatio best practices and tools.
Add an element to a process diagram
You can add elements to a business process in several ways:
-
Drag an element from the process element toolbar on the left to the working area of the Process Designer (Fig. 1).
Fig. 1 Dragging an element from the element toolbar 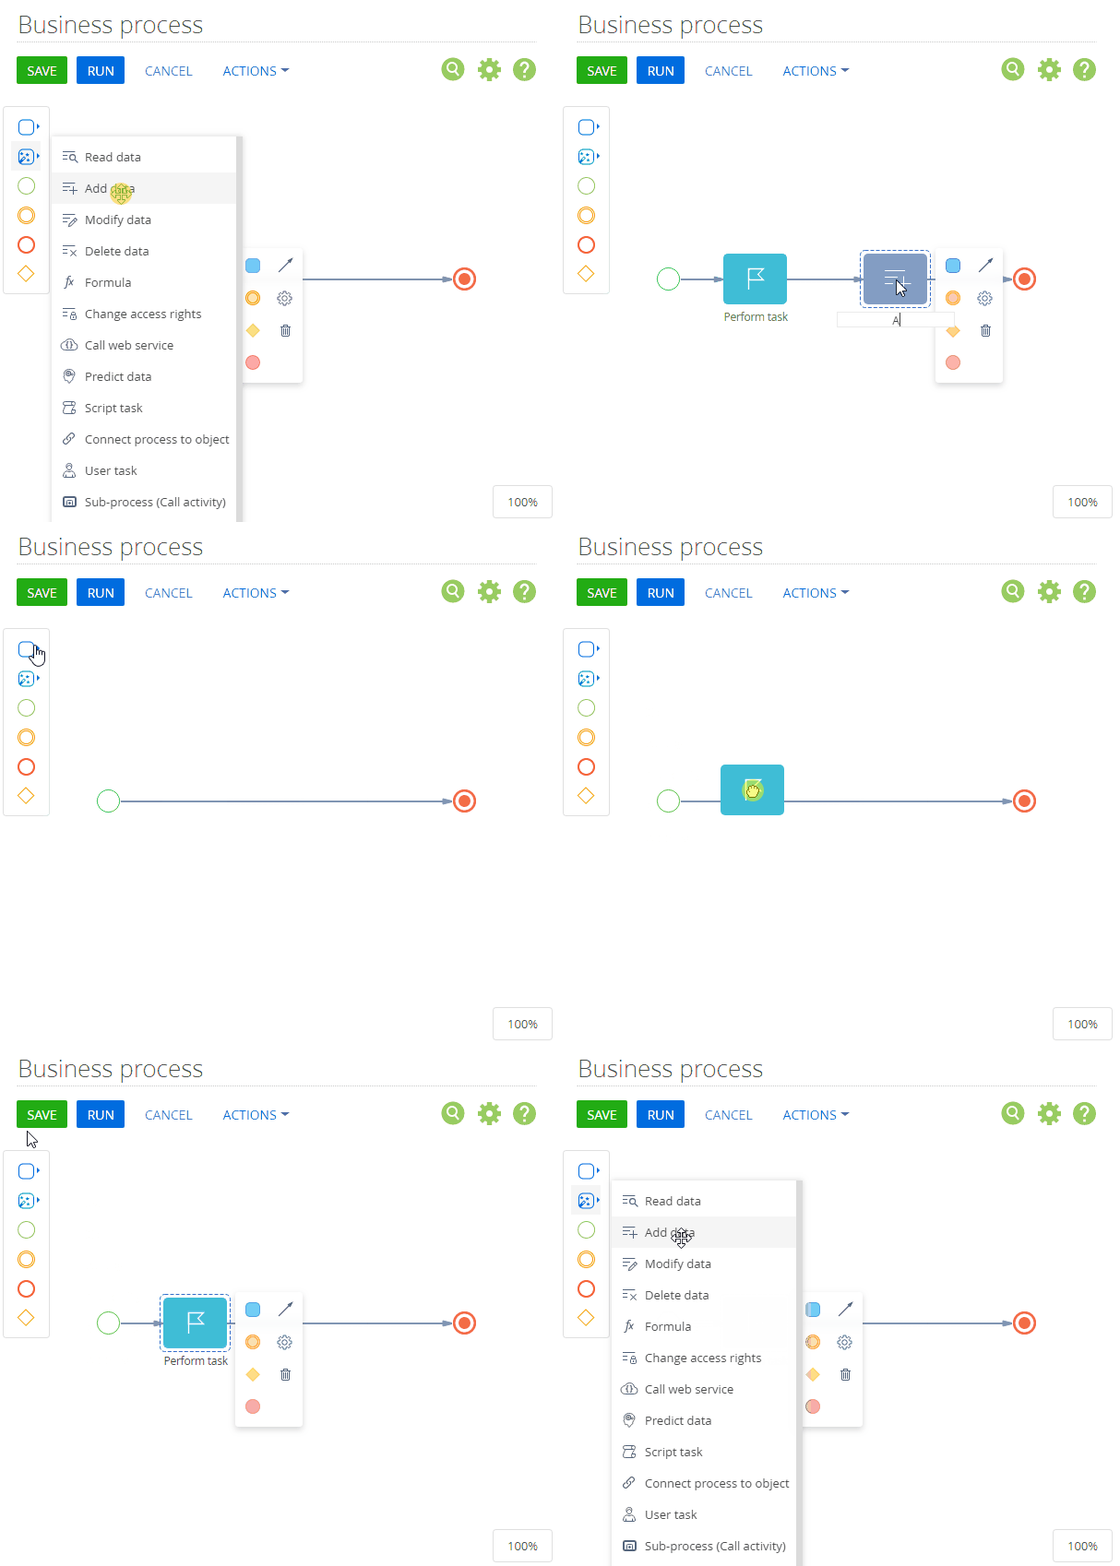
-
Select an element from the context menu of another element on the diagram and drag the element to the working area. This adds the element and connects it to the previously selected element with a sequence flow (Fig. 2). Click
 and select the element type if needed.
Fig. 2 Adding an element from the context menu of another element 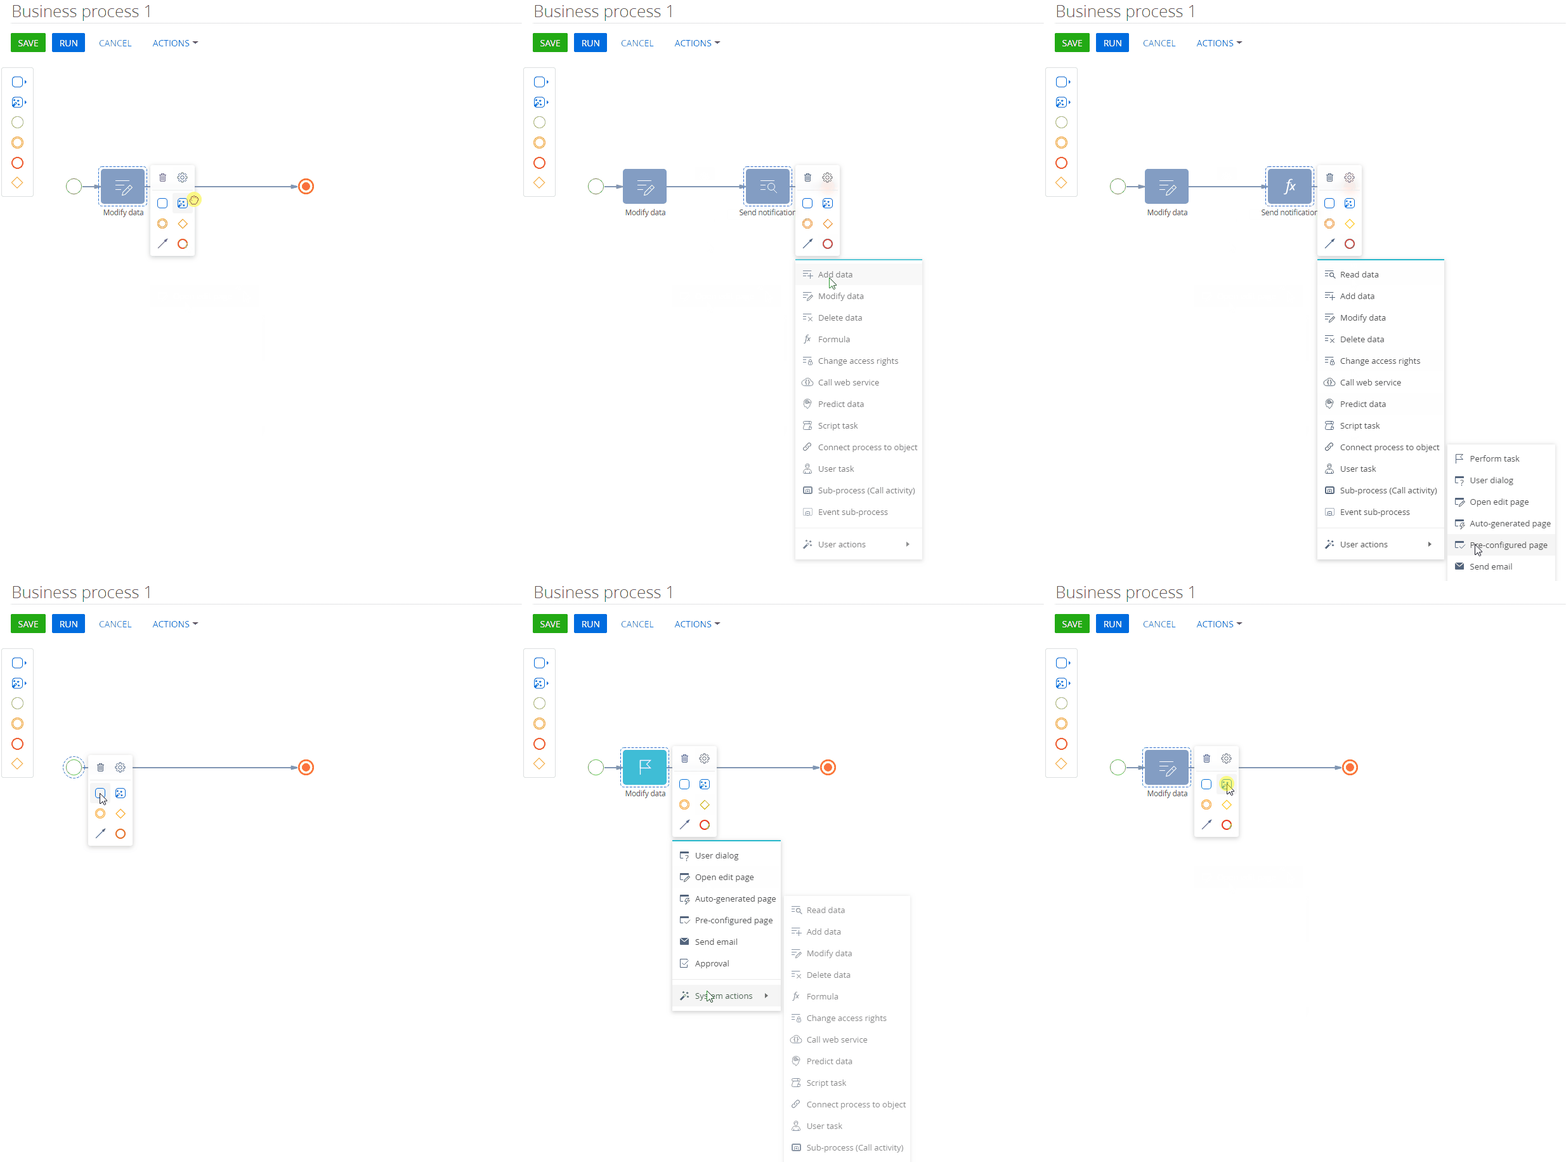
-
Select an element from the suggestion dialog and drag the element to the working area (Fig. 3). The AI suggestion mechanism generates recommendations for each user based on their previous decisions, as well as best practices for business process setup in Creatio. Recommendations are generated after you set up an existing element. The suggestion menu displays 5 most suitable options for the next element sorted by probability. The mechanism also predicts a block of settings for certain elements. You can change the element settings if needed. To reopen the index of suggested elements, click the
 button in the context menu of the business process element.
The suggestion mechanism speeds up the diagram setup for experienced users and improves the learning curve for new users. Creatio trains the data prediction model constantly to tailor predictions to specifics of your company’s processes.
noteSuggestions for next process steps are available since Creatio 8.0.1.
Fig. 3 Adding an element to the diagram from suggestions 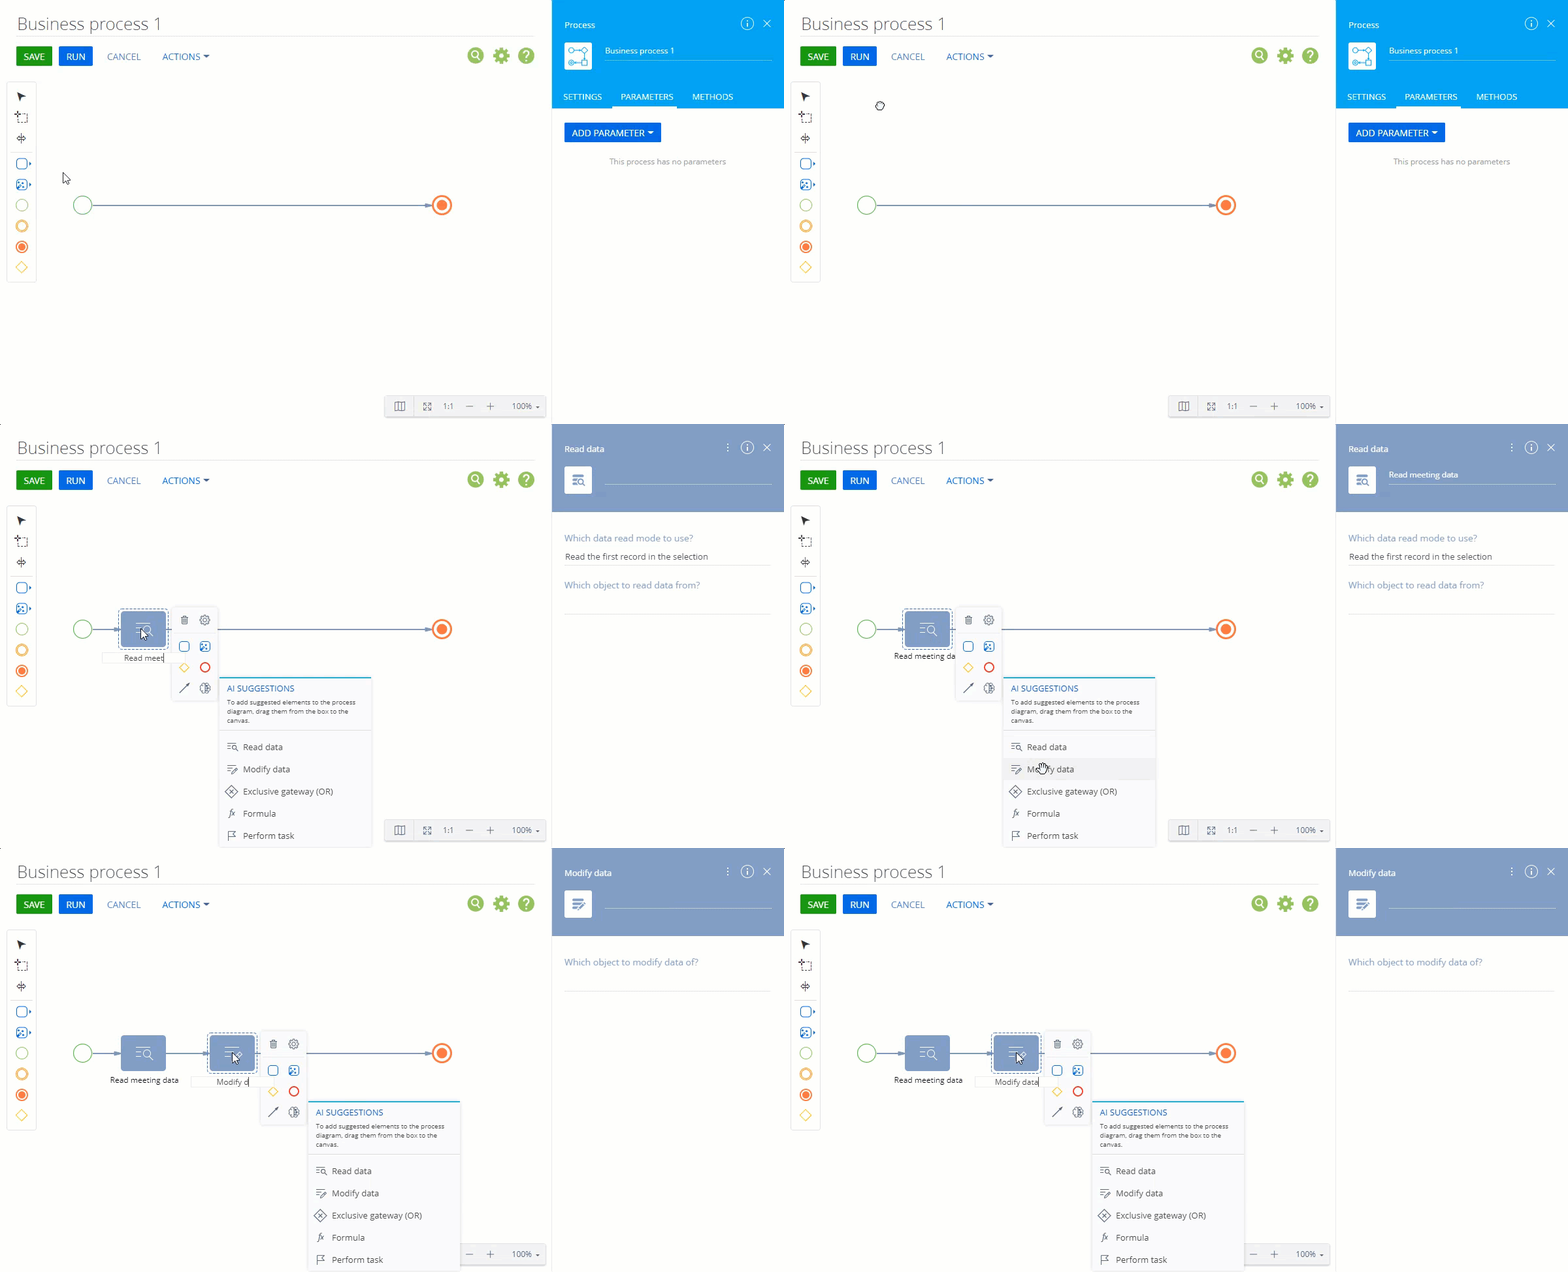
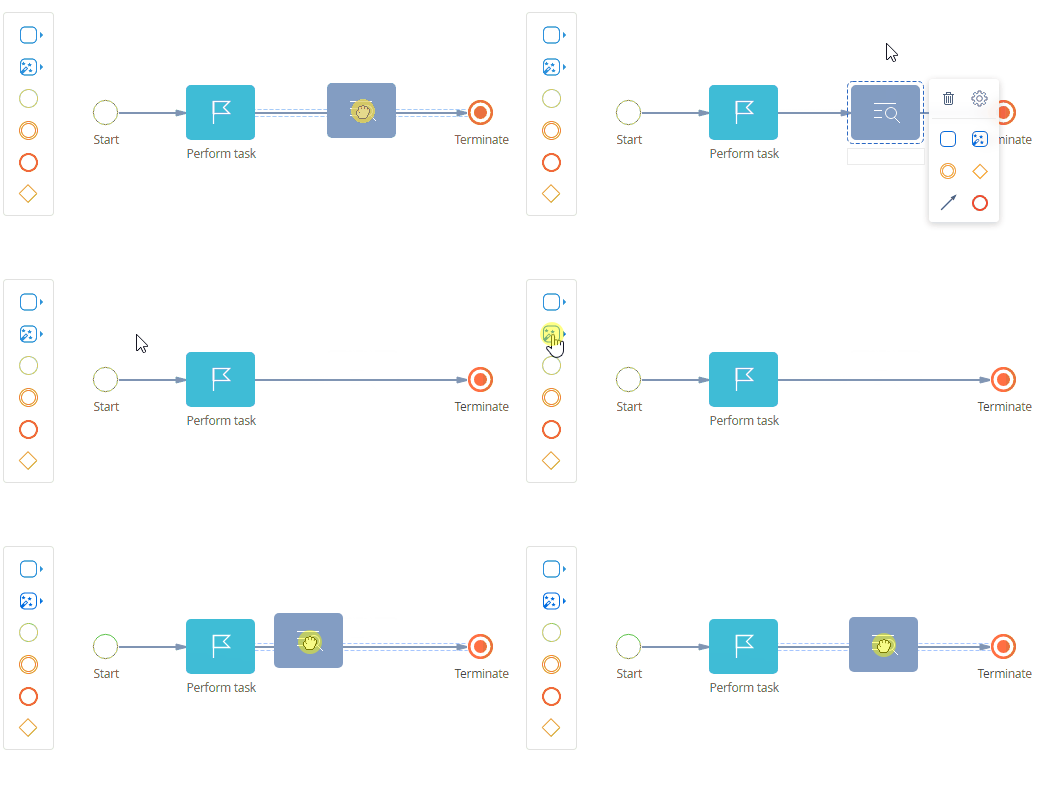
As you move the element on the diagram, alignment lines appear (Fig. 4).
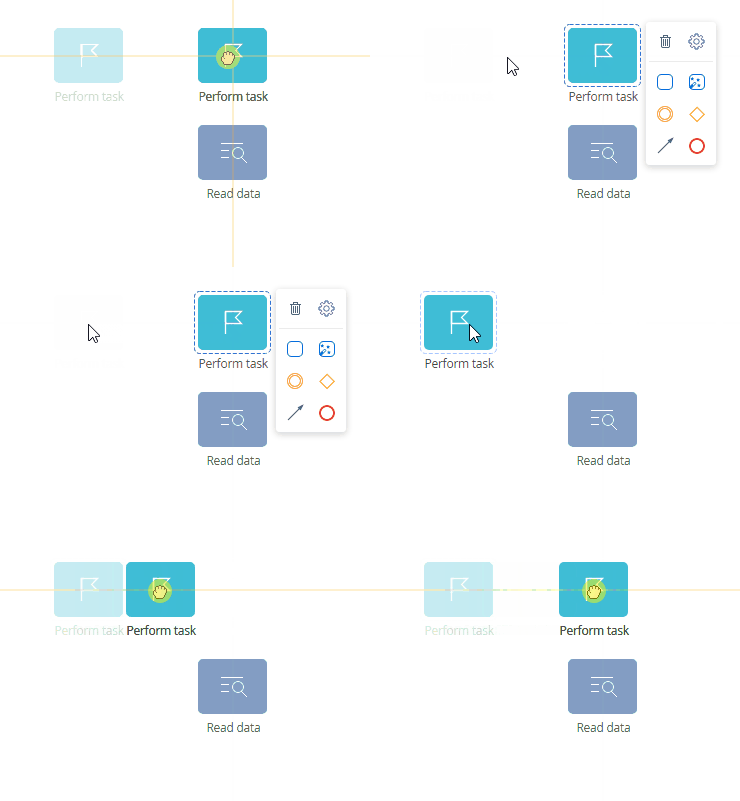
If you place a process element on a sequence flow that connects two other elements, the flow splits into two flows to encompass the new element (Fig. 5).
Connect elements
You can connect Creatio process elements with conditional flows, sequence flows, and default flows. When you add a process element from the context menu of a different element, Creatio connects the elements with a sequence flow automatically.
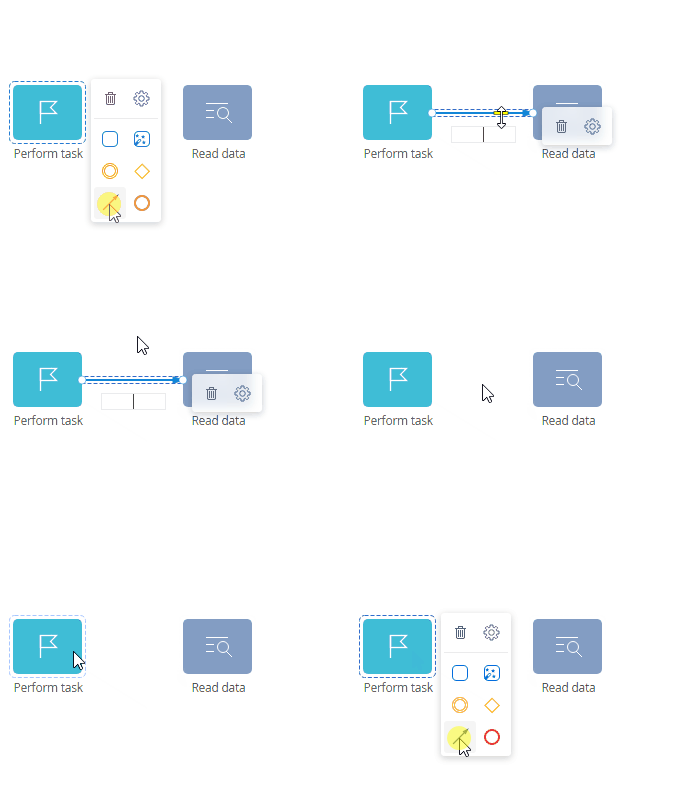
Also, you can connect elements by adding a sequence flow from the context menu of an element (Fig. 6).
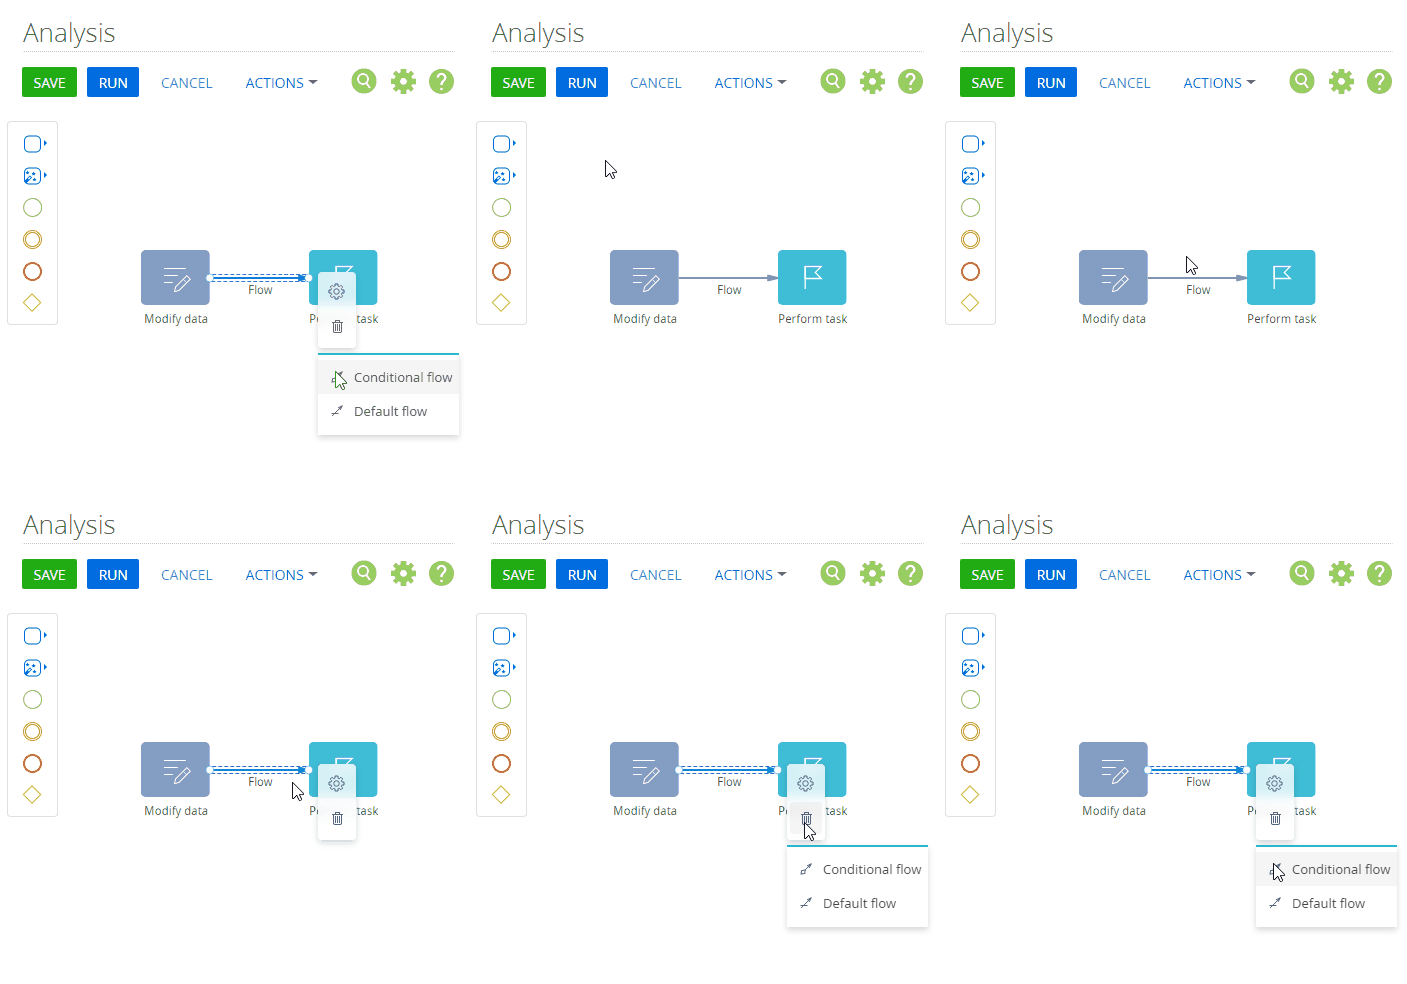
The sequence flow is the default connection item. To connect elements with a default flow or conditional flow, change the sequence flow type by clicking ![]() in the element context menu (Fig. 7).
in the element context menu (Fig. 7).
Change the element type
The element toolbar and element context menu display several basic process elements.
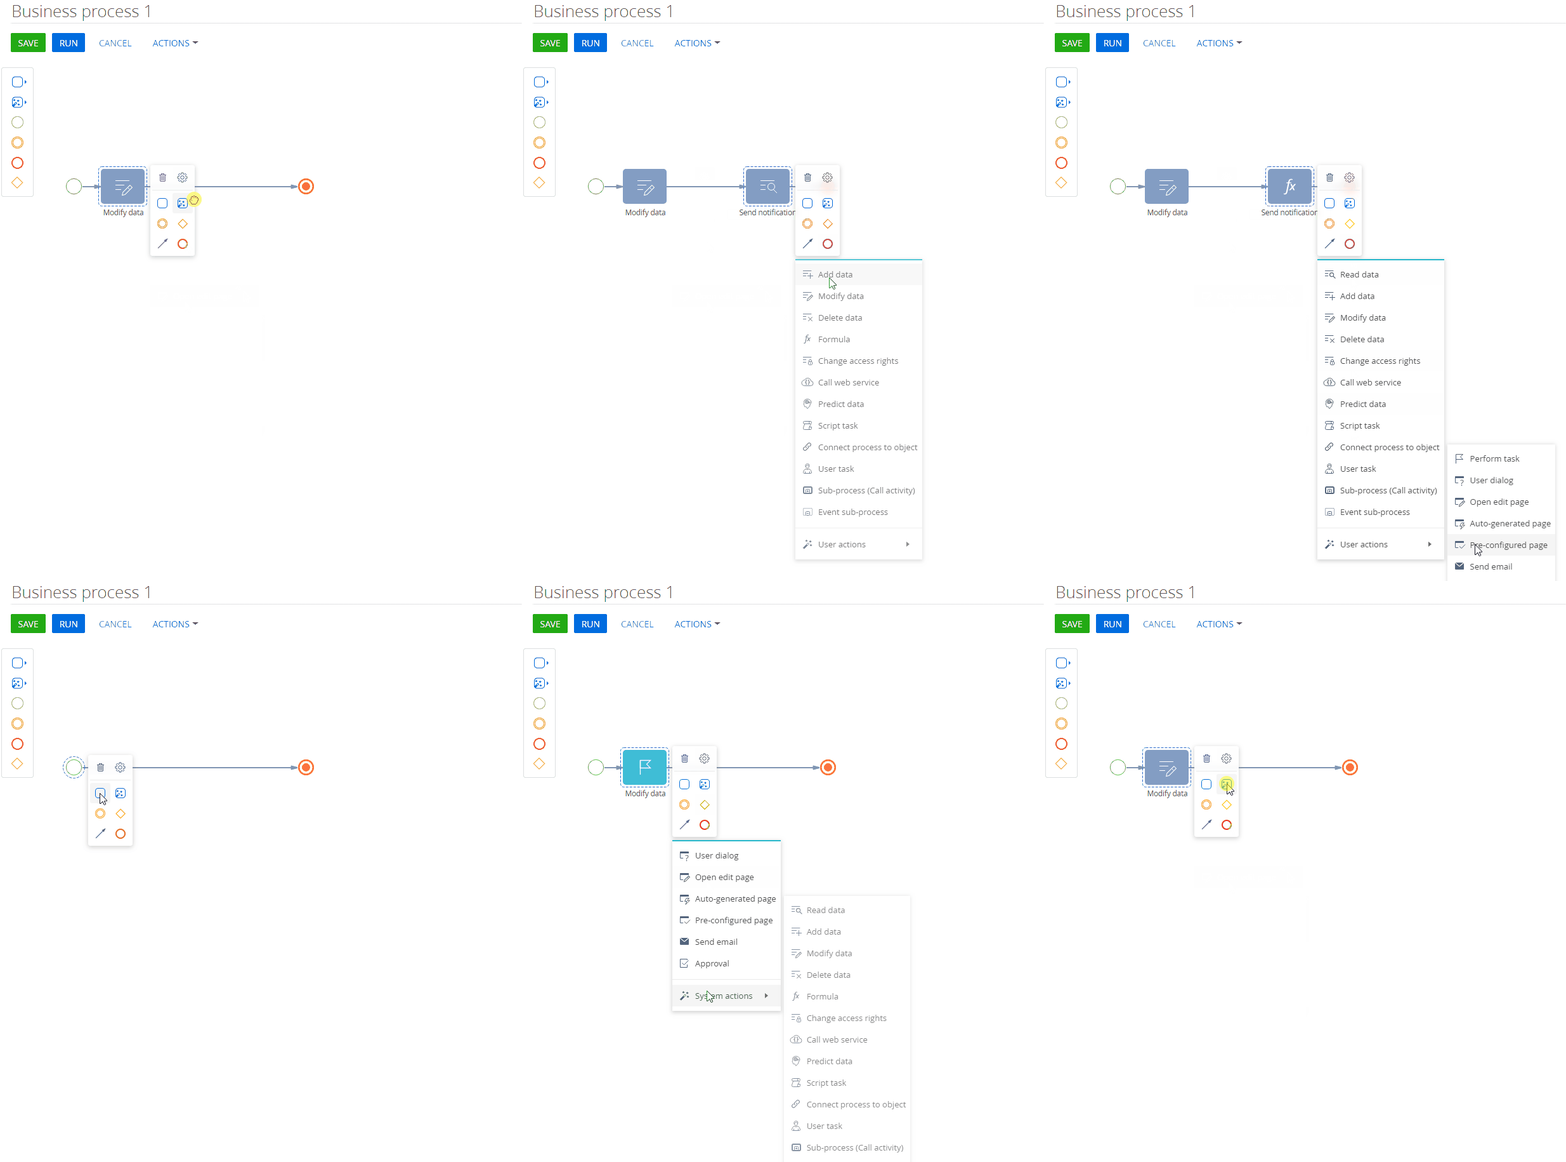
- You can change a
 system action group to
  user action group and vice versa.
 - You can change
 start,
  intermediate, or
  end events to any other event type.
 - You can change a
 gateway to any other gateway type.
 - You can change a
 sequence flow to a
  conditional flow or
  default flow.
Select multiple elements on the process diagram
You can select multiple elements on the diagram, for example, to move them.
To select multiple elements, click on individual elements while holding Ctrl (Fig. 9).
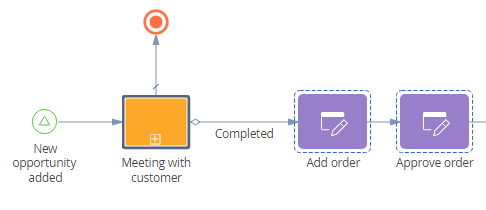
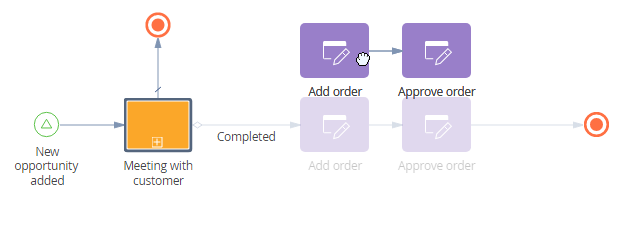
Creatio highlights the selected elements with a dotted frame around them. You can move or delete the selected elements (Fig. 10).
To select the entire business process diagram, hold Shift, left-click the working area of the Process Designer, and select the business process while holding the left mouse button.
Set up branching processes
Business processes can branch into several parallel or alternative flows.
Create a process that branches depending on call results. If the customer is interested, schedule the meeting. If the customer is not interested, end the process. The task can also be completed with the "Call later" result, in which case the call element must be run again.
Use the following elements to branch the process:
- Conditional flows that activate if their conditions are met.
- Gateways that activate one ore more outgoing flows depending on the gateway type: "exclusive OR," "inclusive OR," "parallel AND."
- User dialog and Auto-generated page process elements whose results depend on the items (answers, buttons) selected on the dialog page or auto-generated page. You can use the selected items as conditions for outgoing conditional flows.
- Perform task, Open edit page process elements whose results depend on the values of a field. You can use the value of the field that determines the element result as a condition for outgoing conditional flows.
The Exclusive gateway (OR) gateway is the best element for task result processing since the task can only have one result. Alternatively, you can add outgoing conditional flows directly to the Call customer process element without using the gateway.
To branch the process based on the Perform task element results (Fig. 11):

Use the [Exclusive gateway (OR) gateway when only one of the alternative process branches can be executed.
If both process branches must be executed simultaneously, use the Parallel gateway (AND) gateway. This gateway supports sequence flows only.
-
Place the Exclusive gateway (OR) gateway on the process diagram after the Call customer element (Fig. 12).
Fig. 12 Add a gateway to a process 
-
Connect the gateway and the "Conduct meeting" element with a conditional flow.
-
Select the Completed checkbox in the element setup area of the conditional flow (Fig. 13).
Fig. 13 Select a condition for a conditional flow 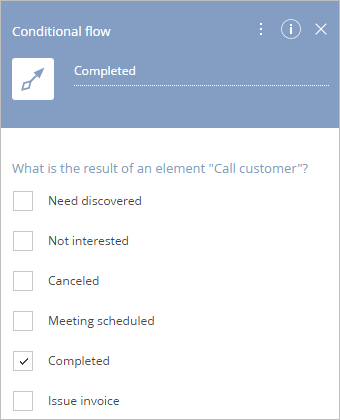
-
Add conditional flows for other results similarly. Add a return flow to the meeting element and select Call later. Add another outgoing conditional flow to the process end event and select Not interested (Fig. 14).
Fig. 14 Branch a process using a gateway 
-
Save the process.
As a result, three results will be available on the "Call customer" activity page: Completed, Not interested, and Rescheduled (Fig. 15).
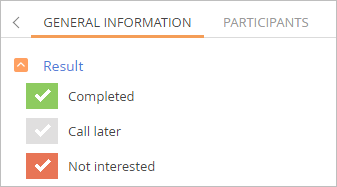
Clicking Completed will open the "Conduct meeting" page. Clicking Rescheduled will create another call task. Clicking Not interested will end the process.
To change the condition for the conditional flow, click the flow and select the new condition in the window that opens.
If the process depends on the activity results, you can complete the activity only with the results provided by the process.
If a process branch must be executed when you select any other result, add a default flow that triggers if the activity result is not specified in the conditional flows.
Process version control
Process version control in Creatio ensures that business process revisions and updates do not disrupt any active process instances. Also, the version control enables seamless updates to business processes and easy switching between the existing process versions.
You can modify a process and save it as the current or new version regardless of the existence of active process instances. To do this, modify the process, click Save, and select "Save new version" or "Save current version."
The new version replaces the earlier process versions in every place that uses the process schema, for example, sub-processes. However, the active instances of the process continue to work according to the version in which they were launched.
Whenever a process is saved, Creatio checks:
- whether the process package is editable
- whether the process was exported
If the process package is non-editable, Cratio asks if you want to save the new business process version. After you confirm this, Creatio saves the new version to the package specified in the Current package system setting.
If the business process schema was exported, Creatio asks if you want to create a new schema version. If you choose not to, Creatio saves the process to the existing schema.
To view the business process version, select the process, click Properties, and go to the Process versions tab.
If you do not need to create several process versions, save the changes to the current process version. If the process has active instances, they might be stopped when you save the changes.
Creatio saves the latest process version directly to the package. If you save the package as an archive and transfer the package to a different environment, the latest process version is transferred with the package. Creatio determines the final current process version based on which package is higher in the hierarchy.