Filter values in a lookup field
You can set up a business rule that will apply filter to the list of values in the lookup field. This will make the list shorter.
Implement the following logic in the custom Requests section: only contacts with the "Employee" type are available in the Owner field.
To implement the logic of the case, add a business rule that would filter the values in the Owner lookup field. To do this:
-
Open the needed section (e.g., the Requests custom section) and add a new business rule. You can learn more about adding and setting up a new business rule in the "Set up a new business rule" article.
-
In the "THEN" block of the business rule, set up the action that would implement the needed business logic (Fig. 1):
-
Click Add action.
-
In the drop-down menu of possible actions, select "Add field values filter."
noteThe "Add field values filter" business rule action is unconditional. When you select this action, the "IF" block of the business rule becomes grayed out and cannot be edited.
-
In the Which field to filter and which connection in this field’s lookup to use for filtering? field, click
 .
. -
In the opened window, click + next to "Requests" → select Owner as the connected object field.
-
In the Column field, select Type from the drop-down list → click Select.
-
Click the
 icon and select the "Lookup" in the drop-down list. A set of fields for specifying lookup values will appear to the right.
 -
In the Which field to filter by filed to the right, select "Employee."
-
-
Click Apply → Section Wizard → Save.
Fig. 1 Filter lookup values - configuring the THEN condition of the business rule 
As a result, only the contacts of the "Employee" type will be available for selection in the Owner field of the request page.
Clear and populate fields automatically
When working with filtering values in Creatio, you can automatically clear and populate fields on a record page.
For example, you can set up a business rule that will automatically populate the Account field on a request page if the request owner is specified. This rule will also filter the owners by the account if the Account field is populated on a request page.
Additionally, you can set up clearing the Owner field on a request page automatically if the account value is changed.
To implement this logic:
-
Open the needed section (e.g., the Requests custom section) and add a new business rule. You can learn more about adding and setting up new business rules in the "Set up a new business rule" article.
-
In the "THEN" block of the business rule, set up the action that would implement the needed business logic:
-
Click Add action.
-
In the drop-down menu, select "Add field values filter."
noteThe "Add field values filter" business rule action is unconditional. When you select this action, the "IF" block of the business rule becomes grayed out and cannot be edited.
-
In the Which field to filter and which connection in this field’s lookup to use for filtering? field, click
. -
In the opened window, click "+" next to "Requests" → select Owner as the connected object.
-
In the Column field, select Account from the drop-down list → click Select.
-
Click the
 icon and select "Field" in the drop-down list.
 -
In the Select field window that pops up, select "Account" on the Requests fields tab.
-
-
Select the Clear when the Account field is modified checkbox to clear the Owner field on a request page automatically if the account value for this specific contact is changed.
-
Select the Populate when the Owner field is populated checkbox to populate the Account field on a request page automatically if the request owner is specified.
Setting up a business rule for clearing and populating fields automatically 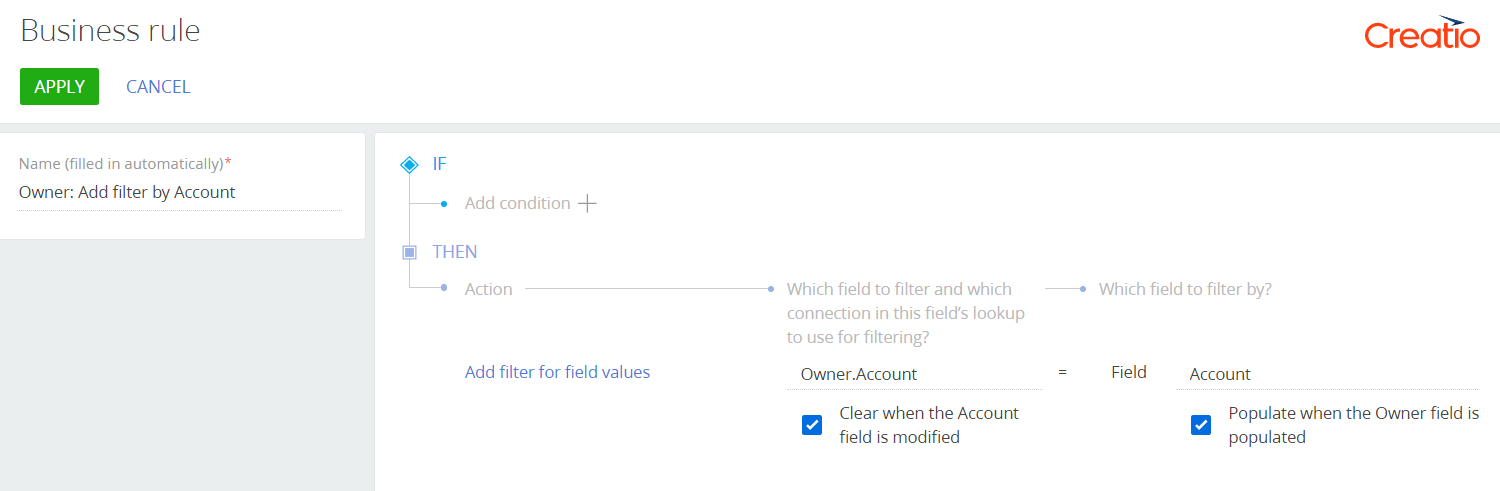
As a result, the Owner field on the request page will be cleared each time the account is changed for the corresponding contact. The Account field will be populated automatically if the owner of the request is specified.
Set field values
Starting from Creatio version 8.0.8, you can set up a business rule that automatically populates field values based on specified conditions. This business rule is useful for automating data entry and ensuring data consistency.
Automatically specify a 10% discount for orders paid with a cashless payment (Fig. 8).
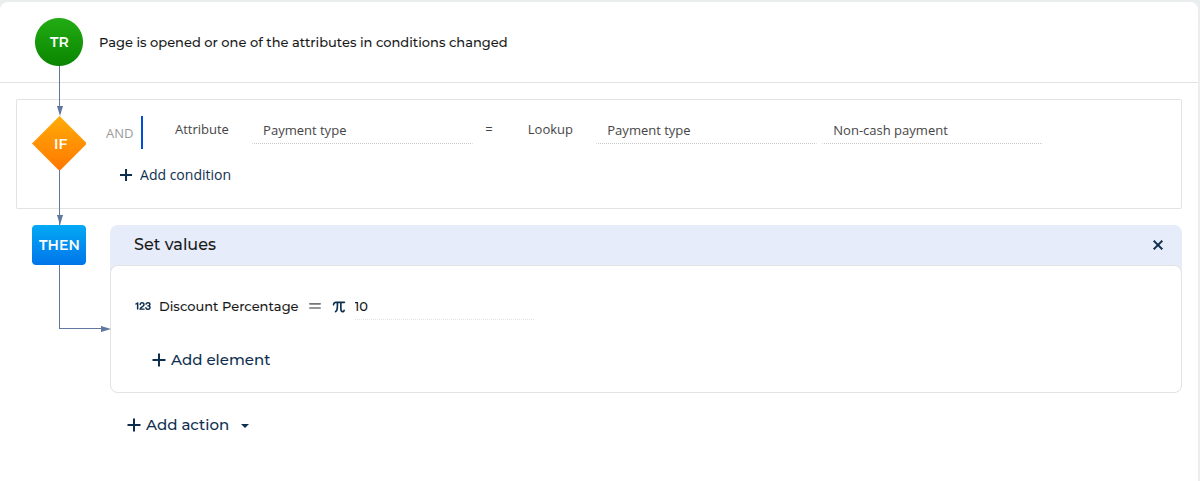
The "Set field values" action is currently available in object business rules and is not available in page business rules. Values are set when a new record is created or when any attribute used in the conditions changes via the UI.
To set field values using a business rule:
-
Open the needed section (for example, the Order and Contract Management out-of-the-box app that has a custom Discount percentage numeric field) and add a business rule.
-
Set the filter to define when to set the value in the IF block. For this example, apply the rule when the "Payment type" field equals "Non-cash payment":
- Click Add condition. This adds a condition row.
- Select the "Payment type" attribute in the new row.
- Leave the "=" (equal) sign as it is.
- Click the icon and select the "Lookup" field type in the drop-down list.
- Select the "Non-cash payment" lookup value.
-
Set up the action that implements the needed business logic in the THEN block:
- Click Add action → Set values.
- Select the field to set a value for in the Which field will be set? block. For this example, select "Discount percentage".
- Click Constant and enter a fixed value. For example, "10".
-
Save the changes.
As a result, when a record has the "Non-cash payment" payment type, the specified field will be automatically populated using the set value.