Create dynamic queue
Dynamic queues are populated automatically. The queue will be populated with records that match a specific filter condition. For example, dynamic queues can be used to process new cases that have not yet been assigned a responsible.
Let's take a closer look at how to create and populate dynamic case queues. To create a dynamic queue for cases where the resolution deadline is today or falls within the nearest three days: To do this:
-
Go to the Queues section.
-
Open the Queues setup view and add a new element.
-
Specify the name of the queue in the opened window.
-
Select the priority for the queue. The queue priority influences the display order of the queue elements on the agent desktop. Learn more: Sort queue elements.
-
Select a system object in the Queue type field. In our case, it is "Case". You can customize queue objects in the Queue objects lookup by clicking the Queue sorting setup action in the Queues section. After saving the queue you cannot change its type.
noteThe selected object defines the queue type - regular or blind.
-
Select the "In progress" queue status.
noteThe agent desktop displays only active queues. The status of active queues is "In progress". By default, the status is "Active".
-
Select a business process in the Process field. The selected business process will be run each time an agent takes an element from the queue. Select the "Agent desktop: Queue cases processing" business process for cases.
noteTo be able to use a process in a queue, add two global parameters to it: "queueelementId" and "entityRecordId" with the "Unique identifier" type. The record ID from the (Queue element object) is passed to the "queueelementId" parameter, and the contact/case/application record ID is passed to the "entityRecordId" parameter.
-
Select the Automatically by filter conditions option in the Queue population type field group on the Queue population tab.
-
Specify the filter conditions in the filter area.
-
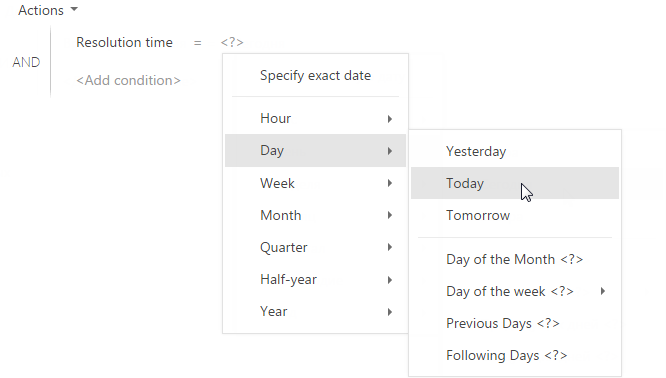
Click the Add condition link and select the Resolution time column in the opened window. Select the value of the condition: "Day → Today"(Fig. 1).
Fig. 1 Setting up the Resolution time = Today filter condition 
-
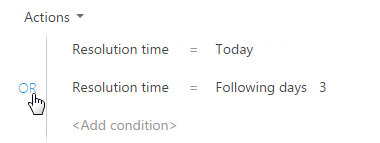
Add another filter condition: "Resolution time = Following 3 days" (Fig. 2).
Fig. 2 Setting up the Resolution time = Following 3 days filter condition 
-
Select the "OR" logical operator (Fig. 3).
Fig. 3 Selecting the OR logical operator 
ImportantIf you do not specify the filter condition for a dynamic queue, the queue elements will not be displayed on the agent desktop.
-
-
To form a list of agents to process objects from the queue, go to the Team tab. Click the New button and select the required employees. The selected contacts can process the content of the queue from the agent desktop.
Only those agents who have the Active checkbox selected on the Team tab can process the queues. By default, this checkbox is selected for all contacts on the detail. You can clear the checkbox for certain agents. In this case, the queue elements of the queue will not be displayed on the agent desktop for these agents.
- Save and close the page.
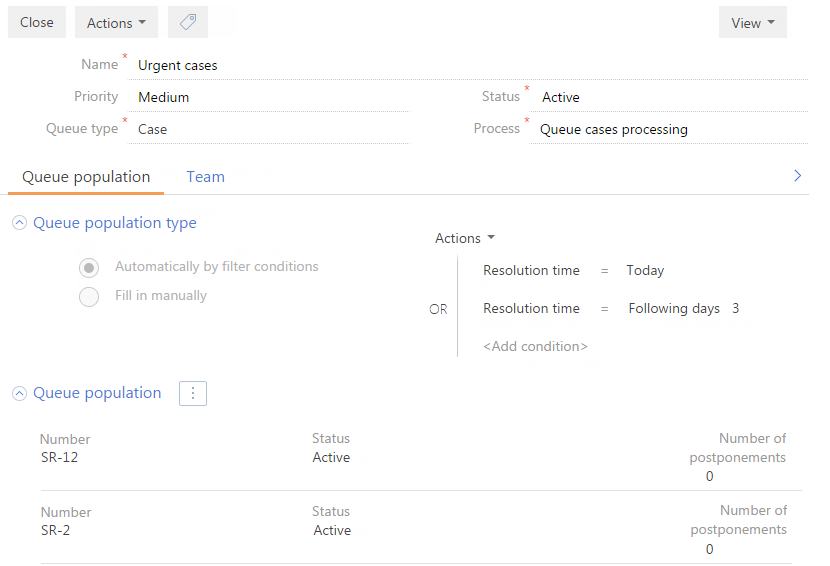
To view the content of the queue, select the Fill queues action from the action menu of the Queues section. Open the queue record. All applications in the current queue will be displayed on the Queue population detail (Fig. 4). The data is available in read-only mode.

See also
General Agent Desktop settings