Read data from the record that triggered the process
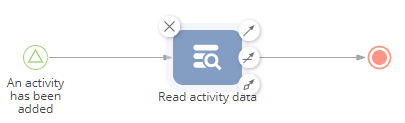
If a business process is run by a Signal start event, it will store the Id of the corresponding record in its outgoing parameter (Fig. 1).

For example, if a process is set to run every time an activity is added, you will be able to access the id of the added activity.
To use the data (i.e., a field value) of the record further down the process, you need to obtain its field values using the Read data element. For example if the process was triggered by adding a new activity, you will know which activity is that, but will not be able to access that activity data, such as subject or assignee, unless you “read” them.
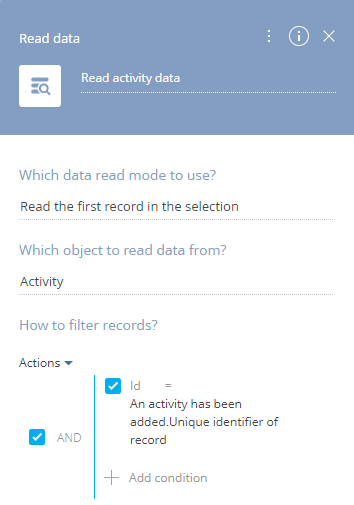
To fetch the data from the record that triggered the process, add the Read data element on the diagram (Fig. 2) and set up its properties (Fig. 3):
-
In the Which data read mode to use? field, select “Read the first record in the selection”.
-
In the Which object to read data from? field, select the object whose record triggered the process start signal event. For example, if the start signal event is set up so that the process starts whenever a new activity is added, select the “Activity” object.
-
Set up the following filter by the Id column and the value of the Unique identifier of record parameter of the start signal event:
-
Click add and select the Id column.
-
Click <?> and select Compare with parameter option in the menu.
-
In the window that appears, select the “Unique identifier of record” parameter of the Signal start event (Fig. 4).
Fig. 4 Getting the Id of the record that triggered the signal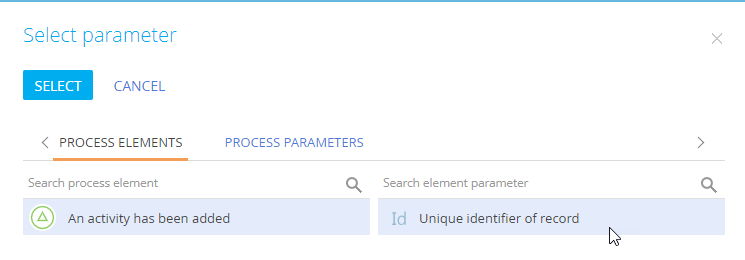
-
-
There is no need to set up record sorting in the How to sort records? block, since only one record will match a filter by Id.
-
Specify the columns whose values must be fetched:
-
Select “Read data from all columns” to read values of all columns of the record.
-
Select “Read data from selected columns only” (Fig. 5), then click + Add column and select the columns whose values you are going to use later, down the process.
-

As a result, the added Read data element will obtain the values of the specified columns for the record whose Id matches the Id of the record that triggered the process. The column data will be passed to the outgoing parameters of the Read data element.
Read data from a record that matches certain criteria
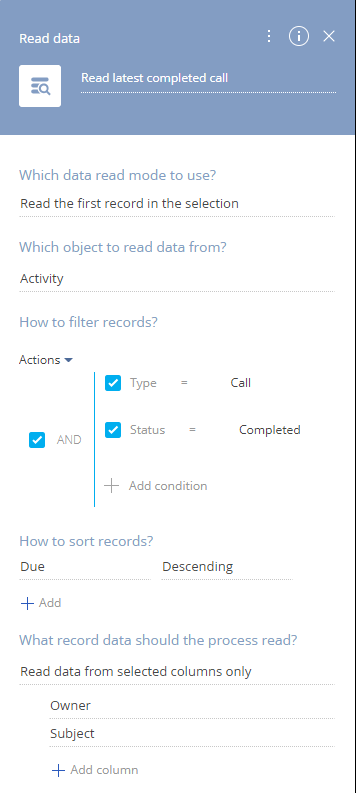
If the Id of the needed record is unavailable, you can filter and sort records, then read the data from the first record in the resulting list. For example, you can read data of the latest completed “Call” activity.
To read data of a specific record, populate the fields of the Read data element the following way (Fig. 6):
-
In the Which data read mode to use? field, select “Read the first record in the selection”.
-
In the Which object to read data from? field, select the object that contains the needed record. For example, to read activity data, select the “Activity” object.
-
Set up the filter. To specify static filter values, select the Compare with value option. For example, to select completed calls, you need to filter the activities by the Type and Status columns, as shown on Fig. 6.
-
Set up record sorting: select a column to sort records by and select the sorting mode (“Ascending“ or “Descending“), so that the needed record is the first in the list of filtered records. For example, to obtain latest activity, sort records by the Due column in descending order (i.e., later “larger” dates are on top).
-
Specify the columns whose values must be fetched:
-
Select “Read data from all columns” to read values of all columns of the record.
-
Select “Read data from selected columns only” (Fig. 7), then click + Add column and select the columns whose values you are going to use later, down the process.
Fig. 7 Reading data from specific columns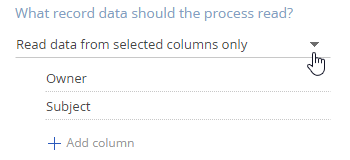
-
As a result, the added Read data element will get a list of records that match the filter, sort them in the specified order and obtain the values of the needed columns for the first record in the list. The column data will be passed to the outgoing parameters of the Read data element.
Read the data of the record being processed
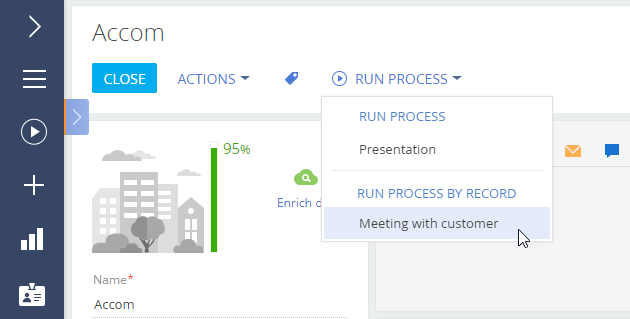
Some business processes are designed to run by a chosen record in a specific section. For example, you can run a “Meeting with customer” process for a specific customer account. These processes are available in the Run process menu in the list and on the record page of the corresponding section (Fig. 8).
To set up such a process, add a separate process parameter (Fig. 9) where Creatio will automatically pass the record Id (e.g., the account for which the process is run).
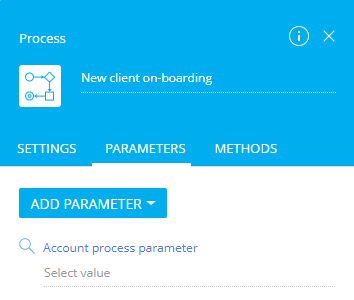
Later down the process flow, you can always obtain the record Id from that process parameter.
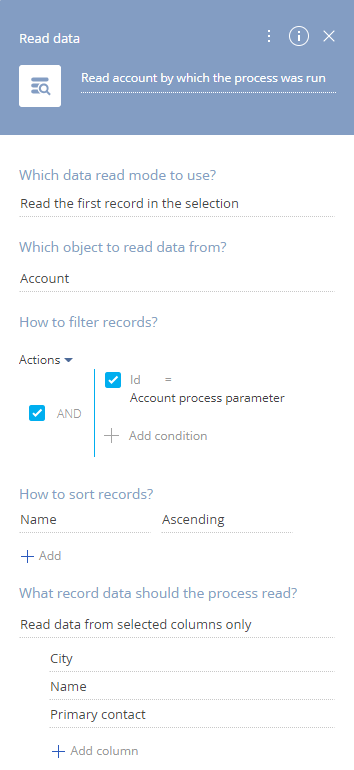
To read a record that has its Id stored in a process parameter, add a Read data element on the process diagram and populate its setup area (Fig. 10):
-
In the Which data read mode to use? field, select “Read the first record in the selection”.
-
In the Which object to read data from? field, select the object, which contains the records of the needed type. For example, if the process is run by an account record, select the “Account” object.
-
Set up the following filter by the Id column and the parameter that stores the record by which the process was run:
-
Click Add and select the Id column.
-
Click <?> and select Compare with parameter option in the menu.
-
In the opened Select parameter window, click Process parameters and select the parameter that contains the needed record (Fig. 11).
Fig. 11 Getting the Id of the record by which the process was run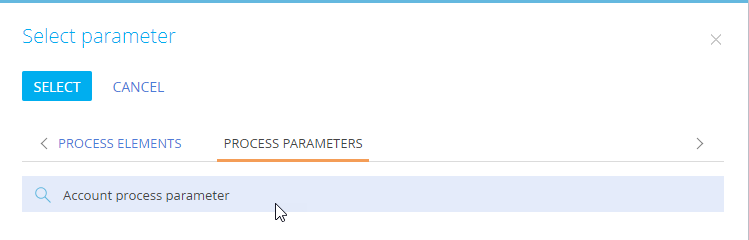
-
-
There is no need to set up record sorting in the How to sort records? block, since only one record will match a filter by Id.
-
Specify the columns whose values must be fetched:
-
Select “Read data from all columns” to read values of all columns of the record.
-
Select “Read data from selected columns only”, then click + Add column and select the columns whose values you are going to use later, down the process.
-
Read the data of a record from another object
When a Read data element reads a lookup column (e.g., a Primary contact field of an account), it obtains the Id of the corresponding lookup record. To obtain the actual values of the record, selected in the lookup column, it must be read separately.
To read the data from a linked record, you will need to use 2 Read data elements (Fig. 12).
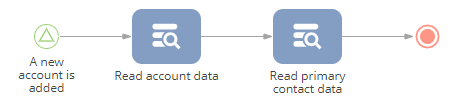
-
First Read data element reads the data of the parent record, namely the lookup column that references the linked record.
-
Second Read data element obtains the Id of the linked record from the first element an then reads the linked record itself.
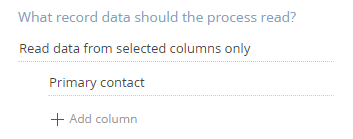
Make sure that the corresponding lookup column is added to the list of read columns in the first Read data element (Fig. 13).
Set up the second Read data element:
-
In the Which data read mode to use? field, select “Read the first record in the selection”.
-
In the Which object to read data from? field, select the object that contains the needed record. For example, to read contact data, select the “Contact” object.
-
Set up the filter by Id:
-
Add the Id column to the filter and select Compare with parameter.
-
In the Select parameter window, select the Read data element that obtained information about the record with the lookup column. For example, if you need to read data of the account’s contact, select the Read data element that obtained information from the account record.
-
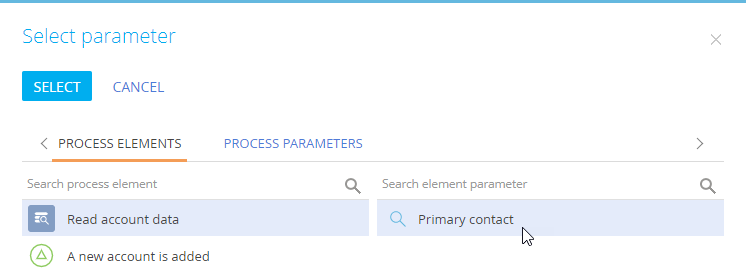
In the right area of the Select parameter window, select the first Read data element, and then the lookup parameter, where the needed record from the linked object is selected (Fig. 14). For example, if you need to read data of the account’s contact, select the Primary contact column.
-
-
Specify the columns of the connected record whose values must be fetched, or select “All columns“ to fetch all data.
Calculate sum, minimum, maximum and average of several records
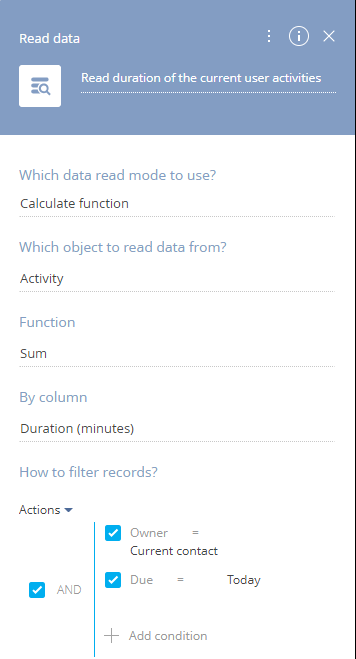
Use the “Calculate function“ mode of the Read data element for calculating various functions using the data from the records that match a filter. You can calculate the sum of values in a specific column for a number of records, as well as determine minimum, maximum or average value of a specific column. For example, you can calculate the total duration of activities of a specific employee for today.
To calculate a function, add the Read data element on the diagram and set up its properties (Fig. 15):
-
In the Which data read mode to use? field, select “Calculate function“.
-
In the Which object to read data from? field, select the object (section, detail or lookup). For example, to calculate the duration of activities, select the “Activity“ object.
-
In the Function field, select the function to use for calculation. For example, to calculate the total duration of activities, select “Sum”.
-
In the By column field, select the column by which the value must be calculated. For example, to calculate the total duration of activities, select the “Duration (minutes)” column. Only the columns that are compatible with the selected function will be available for selection.
-
In the How to filter records? block, specify filter conditions for record selection. The function will be calculated only for the columns that match the filter. For example, to calculate the functions only for the current user’s activities that are due today, set up the filter as shown on Fig. 15.
As a result, when the process is run, Creatio will access the data of the specified object, get a list of records that match the filter, and calculate the specified function by the values of the specified column. The resulting value will be passed in the outgoing parameter of the Read data element.
Calculate the number of records that match a condition
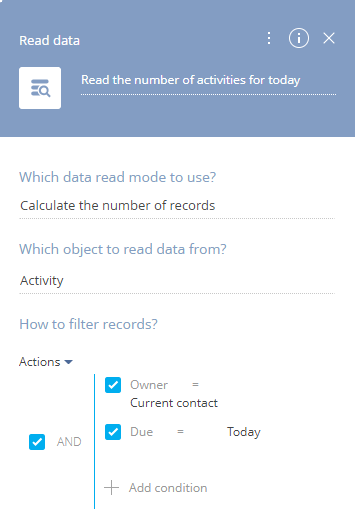
Use the “Calculate the number of records“ mode of the Read data element for determining the number of records that match specific filer conditions. This is usually used for determining whether specific records exist (i.e., the number of records is not “0”), or whether the number of records reaches specific threshold. For example, you can calculate the number of calls an employee has scheduled for today.
To calculate the number of records, add the Read data element on the diagram and set up its properties. Below is an example of calculating the number of records (Fig. 16).
-
In the Which data read mode to use? field, select “Calculate the number of records”.
-
In the Which object to read data from? field, select the object (section, detail or lookup) whose records to calculate. For example, to calculate the number of activities, select the “Activity“ object.
-
In the How to filter records? block, specify filter conditions for record selection. The Read data element will calculate only the number of records that match the filter. For example, to calculate the number of the current user’s activities that are due today, set up the filter as shown on Fig. 16.
As a result, when the process is run, Creatio will access the data of the specified object, get a list of records that match the filter, and calculate the number of records in the list. The resulting value will be passed in the outgoing parameter of the Read data element.
Read data from multiple records (collection)
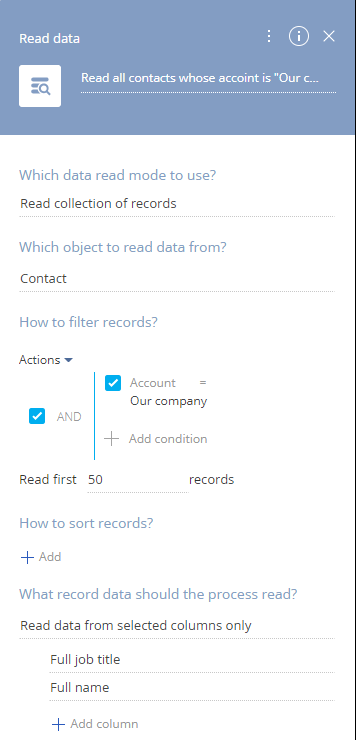
In the “Read collection of records” mode, the Read data element can obtain field values from several records. For example, you can read the names of all contacts of a specific account (Fig. 17).
To read a collection of records, add the Read data element on the diagram and set up its properties:
-
In the Which data read mode to use? field, select “Read collection of records”.
-
In the Which object to read data from? field, select the object that contains the needed record. For example, to read contact data, select the “Contact” object.
-
Set up the filter. For example, to read all contacts of a specific account, set up a filter by the Account column and use the Compare with value option to select a specific account, or use the Compare with parameter option to map the filter value to the value of a process or a process element parameter.
-
Specify the limit the number of records in the resulting collection by populating the Read first ... records field. If you need to select all records that match the filter, specify the number larger than maximum possible records.
-
If necessary, set up sorting in the How to sort records? block. Note that the process will read data from the first records in the list according to sorting rules.
-
Specify the columns whose values must be fetched:
-
Select “Read data from all columns” to read values of all columns of the record.
-
Select “Read data from selected columns only” (Fig. 18), then click + Add column and select the columns whose values you are going to use later, down the process.
Fig. 18 Reading data from specific columns
-
As a result, the Read data element will obtain the data of the specified columns for all records that match the filter and fit within the Read first ... records limit and pass their values to an outgoing parameter of the “collection” type.
Add one record
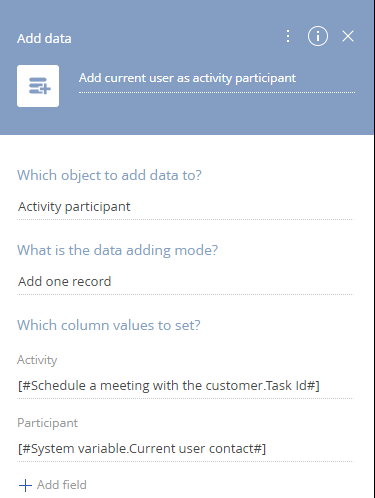
You can add a new record to an object using the Add data element in the “Add one record” mode. For example, you can add current user as a participant of an activity that triggered the process.
To add a single record, populate the fields of the Add data element in the following way (Fig. 20):
-
Select an object to which the record will be added. For example, to add a record on the Participants detail of an activity page, you need to select the Activity participant object.
-
In the What is the data adding mode? field, select “Add one record”.
-
In the Which column values to set? field, add the columns that must be populated for the new record:
-
Click + Add field and choose an object column from the list. A new field will be added in the Which column values to set? block. For example, when adding activity participants, you need to specify the activity and the participating contact.
-
Click the
 icon in the field and populate it using standard functions of the Process Designer. For example, when adding an activity participant, add an Activity column and map it to a parameter that contains the Id of the needed activity, then add a Participant column and populate it with the needed contact (to specify the contact of the user who runs the process, click
  and select Current user contact).
As a result a new record will be added to the specified object. The record columns will be populated according to the settings in the Which column values to set? block. The other columns of the new record will be populated with default values or remain empty.
-
Add multiple records
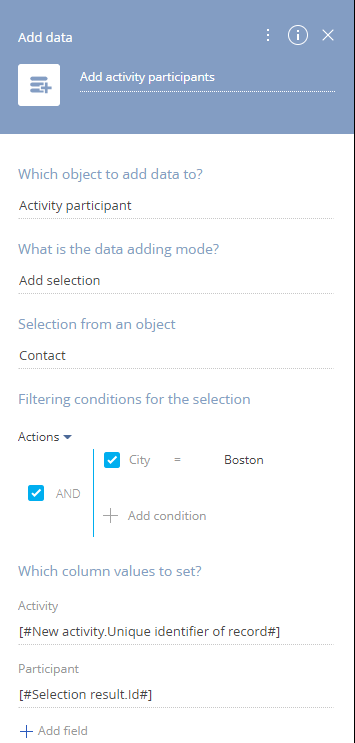
You can add multiple records to an object using the Add data element in the “Add selection” mode. For example, you can add activity participants based on the contacts who live in Boston. In this case, “Activity participant” will be the target object and “Contact” – reference object.
The added records will be based on a “selection”, which is a list of filtered records from another object. For example, you can add records to the Participants detail based on the selection from the “Contact” object (i.e., a list of filtered contacts). A filter by the City field will select all contacts who live in Boston, and an activity participant will be added based on each contact that matches filter.
The column values from the selection can be passed to the added records. For example, the records in the “Activity participant” object must be linked to the corresponding contacts. When adding activity participants, you can populate the contact fields of the new records with the values from the corresponding contacts in the selection.
To add a single record, populate the fields of the Add data element the following way (Fig. 21):
-
Select an object to which the records will be added. For example, to add records on the Participants detail of an activity page, you need to select the Activity participant object.
-
In the What is the data addition mode? field, select “Add selection”.
-
In the Selection from an object field, select the object whose data will be used in the new records. For example, we need to add activity participants based on the contacts who live in Boston. Hence, a selection from the “Contact” object is required.
-
Specify filter for the selection. If the filter is not applied, then Creatio will assume that the selection contains all records from the object specified in the Selection from an object field. For example, to get a list of contacts who live in Boston, apply a filter by the City column as shown on Fig. 21.
-
In the Which column values to set? field, add the columns that must be populated for the new records:
-
Click + Add field and choose an object column from the list. A new field will be added in the Which column values to set? block. For example, when adding activity participants, you need to specify the activity and the participating contact.
-
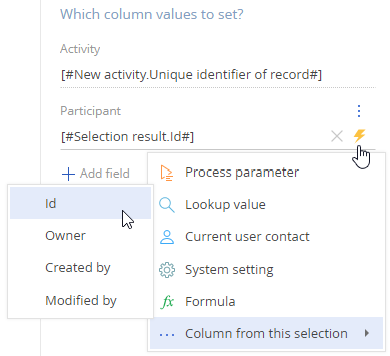
Click the
 icon in the field and populate it using standard functions of the Process Designer. For example, when adding an activity participant, add an Activity column and map it to a parameter that contains the Id of the needed activity, then add a Participant column and populate it with the contact Id from the selection (Fig. 22).
-
As a result, for each record from the selection, a new record will be added to the specified object. The record columns will be populated according to the settings in the Which column values to set? block. The other columns of the new record will be populated with default values or remain empty. For example, for each contact who lives in Boston, a new activity participant will be added. For each added record, the Activity field will be populated with the needed activity, and the Participant field (which is a lookup field based on the “Contact” object) will be populated with the corresponding contact from the selection.
Modify multiple records that match a condition
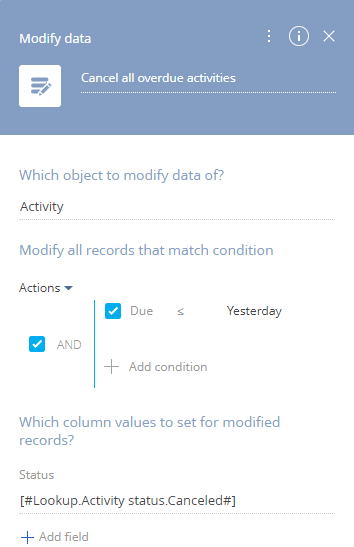
You can modify several existing records using the Modify data element. For example, you can change the status of all overdue activities to “Canceled”.
To modify records, populate the fields of the Modify data element the following way (Fig. 23):
-
In the Which object data to modify? field, select the object whose records must be modified. For example, to change the status of activities, select the “Activity” object.
-
In the Modify all records that match condition block, set up a filter. All records that match the filter will be modified. For example, to modify all overdue activities, set up a filter by the Due column as shown on (Fig. 23).
-
In the Which column values to set for modified records? block, set up a list of columns whose values must be modified:
-
Click + Add field and select a field from the list. A new field will appear.
-
Click + Add field and choose an object column from the list. A new field will be added in the Which column values to set for modified records? block. For example, to change the status of an activity, you need to modify the value in the Status field.
-
Click the
 icon in the field and populate it using standard functions of the Process Designer. For example, to set the value in a lookup field to another specific value, select Lookup value in the menu an choose the needed value from the list (Fig. 22).
As a result, the Modify data element will set the specified values to the corresponding fields for all records that match the filter. For example, it will change the value of the Status field to “Canceled” for all activities that were due yesterday or earlier.
-
Modify specific record
To modify a specific record, you need to obtain its Id from a process or process element parameter. If the Id of the needed record is available in the process, you can set up a filter by the Id column in the Modify data element. For example, you can use the Modify data element to complete an activity created earlier in the process flow.
To modify records, populate the fields of the Modify data element the following way (Fig. 24):
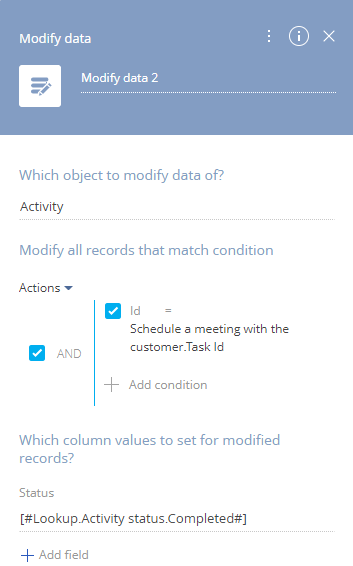
-
In the Which object data to modify? field, select the object whose records must be modified. For example, to change the status of activities, select the “Activity” object.
-
In the Modify all records that match condition block, set up a filter by the Id column. If the corresponding Id is available in a process, you can obtain it from the corresponding process or element parameter:
-
In the Modify all records that match condition block, click +Add condition and select the Id column.
-
Click <?> and select “Compare with parameter”. Select a process or element parameter that contains the needed Id (Fig. 25). For example, if you need to modify an activity created earlier in the process flow, select the corresponding Perform task element and its Task Id parameter.
Fig. 25 Setting up a filter to modify a specific record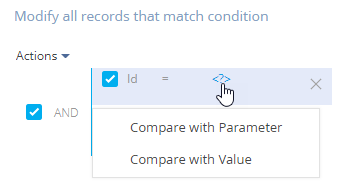
-
-
In the Which column values to set for modified records? block, set up a list of columns whose values must be modified:
-
Click + Add field and choose an object column from the list. A new field will be added in the Which column values to set for modified records? block. For example, to change the status of an activity, you need to modify the value in the Status field.
-
Click the
 icon in the field and populate it using standard functions of the Process Designer. For example, to set the value in a lookup field to another specific value, select Lookup value in the menu an choose the needed value from the list ().
As a result, the Modify data element will set the specified values to the corresponding fields for all records that match the filter. For example, it will change the value of the Status field to “Canceled” for all activities that were due yesterday or earlier.
-
Delete all records that match a condition
You can delete all records that match specific filter conditions. For example, you can delete all canceled future activities.
To delete records that match a filter, populate the fields of the Delete data element the following way (Fig. 26):
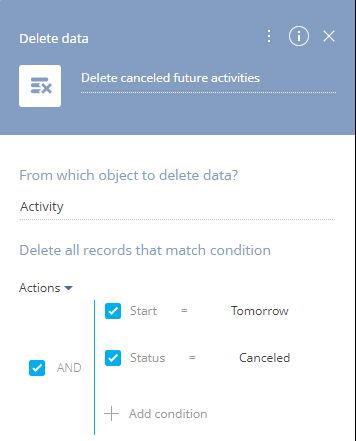
-
In the Which object to delete data? field, select an object whose records must be deleted. For example, to delete activities, select the “Activity” object.
-
In the Delete all records that match condition area, specify filtering conditions for selecting a list of records to delete. For example, to delete future canceled activities, set up a filter by the Start and Status columns as shown on Fig. 25.
As a result, the Delete data element will delete all records that match the filter. For example, it will delete all activities with the “Canceled” status and whose due date is tomorrow.
Delete a specific record
To delete a specific record, you need to get its Id, provided the Id is available in the process. For example, you can delete a specific contact.
To delete records that match a filter, populate the fields of the Delete data element the following way (Fig. 27):
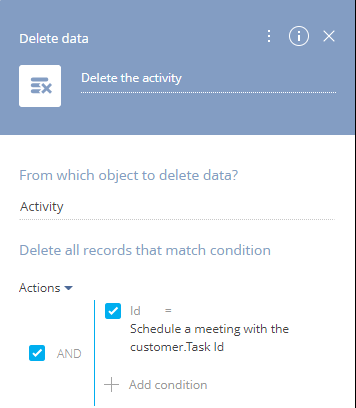
-
In the Which object to delete data? field, select an object whose records must be deleted. For example, to delete activities, select the “Activity” object.
-
In the Delete all records that match condition area, set up a filter by the Id column. If the corresponding Id is available in a process, you can obtain the Id from the corresponding process or element parameter:
-
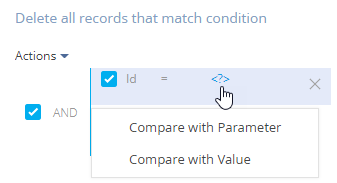
In the Delete all records that match condition block, click +Add condition and select the Id column.
-
Click <?> and select “Compare with parameter”. Select a process or element parameter that contains the needed Id (Fig. 28). For example, if you need to delete an activity created earlier in the process flow, select the corresponding Perform task element and its parameter Task Id.
-
As a result, the Delete data element will delete the record whose Id matches the Id in the filter. For example, it will delete the activity that was created earlier in the process flow.