To add products to an order or invoice quickly, such as when working with extensive product catalogs, use the catalog product selection page (Fig. 1). Navigating to the page is available in the Invoices, and Orders sections.
Let’s see how to select products from an order page.
-
Go to the Products detail from the selected record in the Orders section.
-
Click
 .
.
As a result, a product selection page with the complete list of products and services will appear. The product selection page does not display products, for which the Inactive checkbox is selected. -
Use the search bar at the top of the page to find the needed product by name or code.
Alternatively, use sorting by group in the product catalog. -
Specify the number of products to add to the order in the Quantity field. Delete the entered value to cancel your selection.
If a product has already been added to the order, the field will feature the icon on the right. Hover the mouse pointer to display information on the product quantity in the order. The number of order-ready products is available in the Warehouse field. The value of this field is calculated by the On hand column on the Stock in warehouse detail on the Prices and availability tab of the product page.
 -
To change the unit of measure of a product, select the required value in the Unit of measure field unless it is already in the Units detail on the product page. By default, this field shows the base unit specified on the Base price detail of the product page. After the base unit is changed, the total amount of the selected products will be recalculated.
-
Use the Price field to specify the new product price. By default, this field shows the base product price recalculated in the order currency. Changes in this field do not affect the base price specified in the Price field on the product page. The amount of the order will be calculated according to the changes made.
The summary information about the quantity of the selected products and their total cost is available in the top right corner of the page.
View and edit the cart
See the selected products in the “Cart”  view on the product selection page. Changing the quantity of a product in the list automatically adds the product to the cart. Use the cart to check the list of products you have selected, and change it as necessary.
Click  to open the “Cart” view.
The columns in the “Cart” view are mapped to the columns in the product list. This view also supports searching for products by name or code. The search result will show you the total quantity of products and the amount of the selected items. You can change the quantity and unit of measure for each product in the cart.
To remove a product from the cart, specify zero quantity, or clear the field.
Click Save to apply the changes.
As a result, the product selection page will be closed and the selected product items will be added on the Products detail of the order.
Click the Cancel button to close the page without saving your changes.
Display additional information
You can set up list columns in both product selection page views. For example, you can display the products available in stock.
To do this:
-
In the View menu of the product selection page, select the Select fields to display command.
-
Click the
 button in the column setup area.
 -
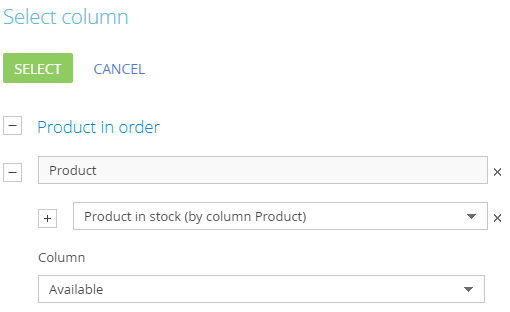
In the opened column selection window:
-
Click the
 button next to the “Product in order” object name.
 -
In the added field, select the “Product” reverse connection object.
-
Click the
 button next to the “Product” object name.
 -
In the added field, select the “Product in stock (by column Product)” reverse connection object.
-
In the Column field, specify the column of the “Available” connected object (Fig. 1).
-
Click the Select button.
-
-
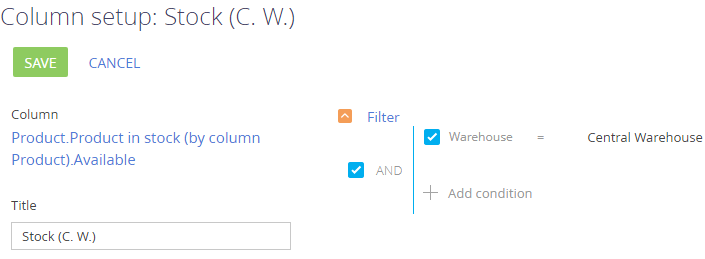
On the opened page, specify the display parameters for the selected column:
-
Enter the column title, for example, “Stock (C. W.)”.
-
Specify the filter for data aggregating. For example, to display the product stock in a specified warehouse, set the filter by the corresponding warehouse (Fig. 2).
-
-
Click the Save button on the column setup page.
-
Save the list setup.
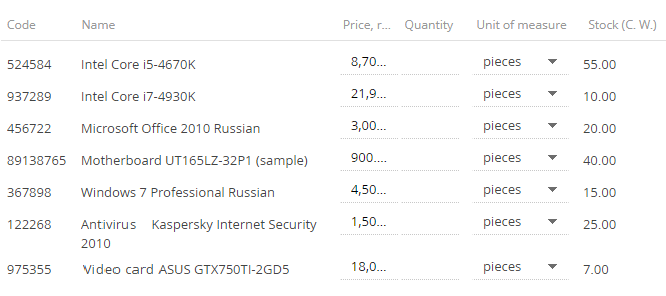
As a result, the list on the product selection page will display the product stock in the warehouse (Fig. 3).


