A campaign flow diagram (Fig. 1) includes:
-
Flows between campaign elements.
Use the Campaign designer to set up campaign flow diagrams. To open the Campaign designer:
-
Open the needed record in the Campaigns section.
-
Go to the Campaign flow tab and click Create if no diagram exists or Edit to change an existing diagram.
Campaign designer features
The Campaign designer lets you:
- Save and cancel changes using the toolbar (1).
Use the corresponding buttons on the toolbar to open the element setup area, open the Academy, or search the diagram for campaign elements by name.
-
Set up the campaign diagram using elements and flows in the Campaign designer working area (2). Select an element in the Elements area of the designer and drag it to the campaign area to add it to the diagram (Fig. 2).
Select an element and select “Delete” to delete it.
Fig. 2 Adding elements and flows to the working area
-
Select elements and tools in the element area (3). The area contains the campaign elements and the following tools:
 “Arrow.” Use this tool to select and move separate elements on the diagram.
 “Lasso.” Use this tool to select multiple elements on the diagram.
 “Space.” Use this tool to move parts of the diagram left/right or up/down. For example, drag the cursor down to move all the elements below the cursor.
Learn more about these tools: Process designer.
- Specify parameter values for campaigns and campaign elements in the element setup area (4).
- Zoom and pan the campaign diagram (5).
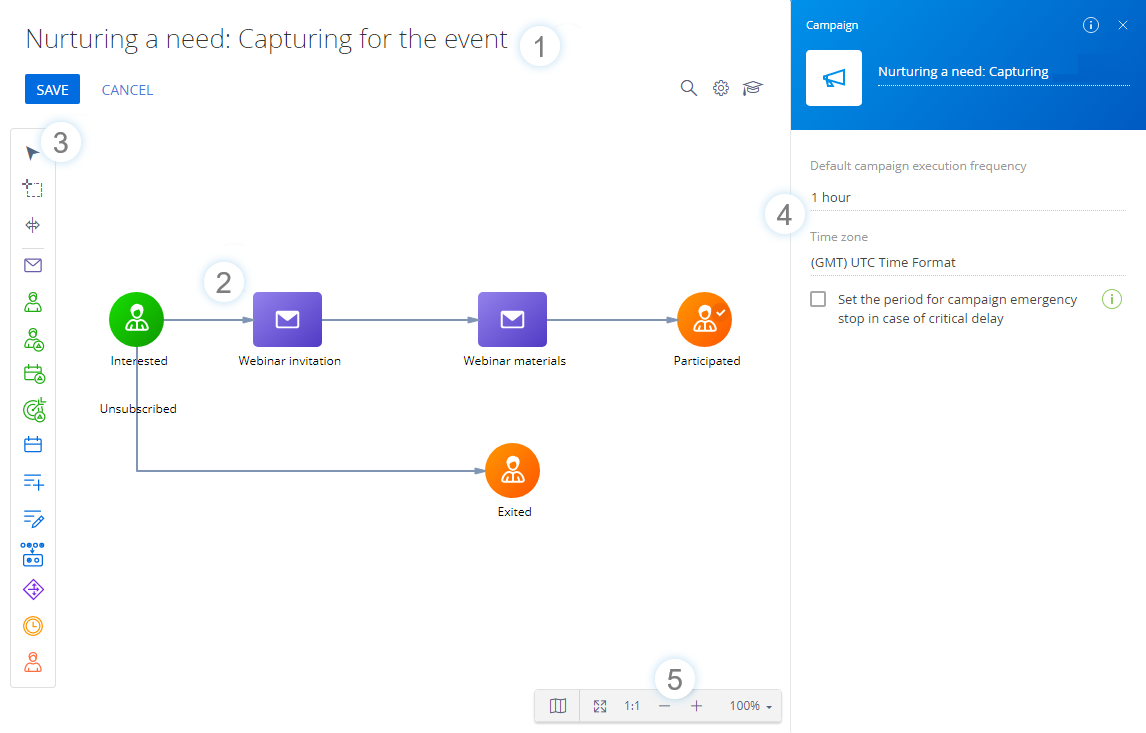
Set up the campaign properties
Configure the campaign properties in the element setup area (4). Click anywhere on the campaign designer working area or click the  button to open the campaign properties area.
- Default campaign execution frequency – determines how often to execute the campaign steps without a set execution period.
The frequency specified in this parameter applies to:
-
The campaign steps whose incoming flows do not specify an exact time.
-
The Add audience element that adds new participants to the campaign.
-
The Exit from campaign element that removes participants from the campaign.
-
- Time zone – sets the time zone for all the campaign's time frames. For example, the execution time of conditional flows. By default, Creatio sets the campaign time zone to:
-
The time zone of the user who created the campaign.
-
The time zone specified in the “Default TimeZone” (“DefaultTimeZone” code) system setting if there is no time zone set in the user profile.
If Creatio cannot set the time zone according to the rules above, it will populate the Time zone field of the new campaign with the “(GMT) UTC Time Format” value. You can change the time zone at any time.
-
-
Set the period for campaign emergency stop in case of critical delay – select the checkbox to define the critical delay time. If the campaign does not run during this period, for example, due to application updates, Creatio will stop it automatically, and the campaign owner will receive a notification.
-
Specify the delay units and their value after selecting the checkbox.